為什麼會寫這一篇
在開發 ASP.NET Core Web API 時,JWT(JSON Web Token)是一種常見的認證方式。然而,在 Google 搜尋相關教學時,我發現大多數的範例都使用 ASP.NET Core Identity,但在企業內部系統中,很多公司會使用 自行設計權限與認證機制,在我的經驗中,系統登入/登出 是非常常見的功能,因此我想結合我的經驗實作一個 JWT 的認證。如果你希望在 ASP.NET Core Web API 中自行管理 JWT 認證,這篇文章會是一個不錯的參考。
本篇重點
- Rider
- JWT(JSON Web Token)
- Entity Framework Core
- 登入/登出/註冊
- Web API(Application Programming Interface)
閱讀說明書
本篇適合
- 有 C# 基礎
- 有 JSON 基礎
- 有 API 基礎知識
- 有 ASP.NET Core(MVC) 基礎
JWT(JSON Web Token)
JWT 全名是 JSON Web Token,是一種 輕量級的認證與授權機制,常用於 Web API 的身份驗證。它是一種 基於 Token 的驗證方式,不需要在伺服器端維護使用者的登入狀態,適合 無狀態(stateless) 應用,例如 RESTful API。
無狀態(stateless)
指 伺服器不會記住客戶狀態,使用者登入的資訊會記錄在客戶端的瀏覽器(使用 Cookie)
與之相對的就是 有狀態(stateful),早期 JSON 還沒發成熟時,很多系統會 將使用者登入資訊記錄在伺服器(使用 Session)來進行身份驗證,由於資料都是記錄在伺服器,所以容易造成伺服器運算效能問題,同時要記錄使用者登入資訊、進行使用者身份驗證……。
當然,由於使用者登入資訊記錄在使用者電腦瀏覽器中,會造成管理上的問題以及資訊安全風險,因些需要進行一些設定來防止資料外洩,下面實作會再介紹。
格式
接下來說明一下 JWT 的格式,由三個部分組成,每一個部分用「.」區隔
用來說明 Token 的類型及加密所使用的演算法,最後由 Base64Url 編碼整段 Header
- typ:Token 的類型,通常是 JWT(JSON Web Token)
- alg:加密演算法,通常是 SH256(HMAC SHA256)
1
2
3
4
| {
"typ": "JWT",
"alg": "SH256"
}
|
Payload
JWT 的主要資訊,通常包含使用者的登入資訊(Claims), 同樣也使用 Base64Url 編碼整個資訊
- iss:發行這個 Token 的單位,通常是 Server 自己
- sub:JWT 的使用者,通常會放使用者的 ID
- name:使用者的名稱,通常是使用者帳號
- aud:JWT 的接收單位,如果有開放給第三方使用的話,這裡會是呼叫端的 domain
- exp:JWT 的有效期限,以 UNIX Timestamp 表示,會是一串數字,為了安全性考量,不會讓使用者無限期登入
- iat:JWT 的產生時間,同上是一串數字,也就是這個 Token 是什麼時候建立的
其他通常會放企業自訂的資訊,如使用者角色「role」、部門「department」等
 1
 2
 3
 4
 5
 6
 7
 8
 9
10
| {
"iss": "https://serverdomain.com/",
"sub": "6dced4f8-e22a-4a5e-87d9-81e8de14dc24",
"name": "useraccount@mail.com",
"aud": "https://thirdpartydomain.com",
"exp": 1712682600,
"iat": 1712675400,
"role": "admin",
"department": "IT"
}
|
由於 Payload 資訊使用 Base64Url 編碼(非加密),所以是可以還原的,因此不建議加入機密資料,如:使用者密碼、或身份證明資訊。
Signature
中文應該是翻成數位簽章之類的,就是將 Header,Payload 的資料加起來,用 Header 的加密演算法及伺服器的 Private Key 加密的結果,最後用這個結果確認登入資料有沒有被竄改。
程式邏輯以 JavaScript 表示看起來會像下面這樣
 1
 2
 3
 4
 5
 6
 7
 8
 9
10
11
12
13
14
15
| // 假設有 3 個方法
// 1. createSignature,負責產生 Signature
// 2. base64Url,將物件進行 base64 編碼
// 3. HMACSHA256,將資料進行 SHA256 加密
// 參數傳入一個 jwt 物件
createSignature(jwt) {
// 加密的 private key
string secretKey = "thisissecretkey";
// 加密資料
return HMACSHA256(
`${base64Url(jwt.Header)}.${base64Url(jwt.Payload)}`,
secretKey
);
}
|
PrivateKey(私鑰)是加密的關鍵之一,應該保存在伺服器,不可以外流
PrivateKey 及 Base64 非本編重點,這邊就不多加說明了
開發工具
其實我自己也是第一次作 JWT 驗證功能,最下方有我實作時看的影片,可以參考,但由於我的 .NET 版本是 8 版,所以有些地方略略有不同。
- Rider
本來想用 Visual Studio 開發,不過由於要紀錄自己開發的過程,所以希望介面可以有善一點,最後決定使用 Rider 來作開發,也順便體驗 Rider 開發的感覺與 VS Code 有什麼不同。 - Google Cloud
主要作為資料庫,因為我的作業系統是 MacOS,所以使用 MS SQL Server 有一些不方便,所以在雲端上開了一個 MS SQL Server 作為資料庫連線使用,且在現實情境下,大部分的資料庫不會在同一個 Server,這邊也當作模擬真實的情景。
建立專案
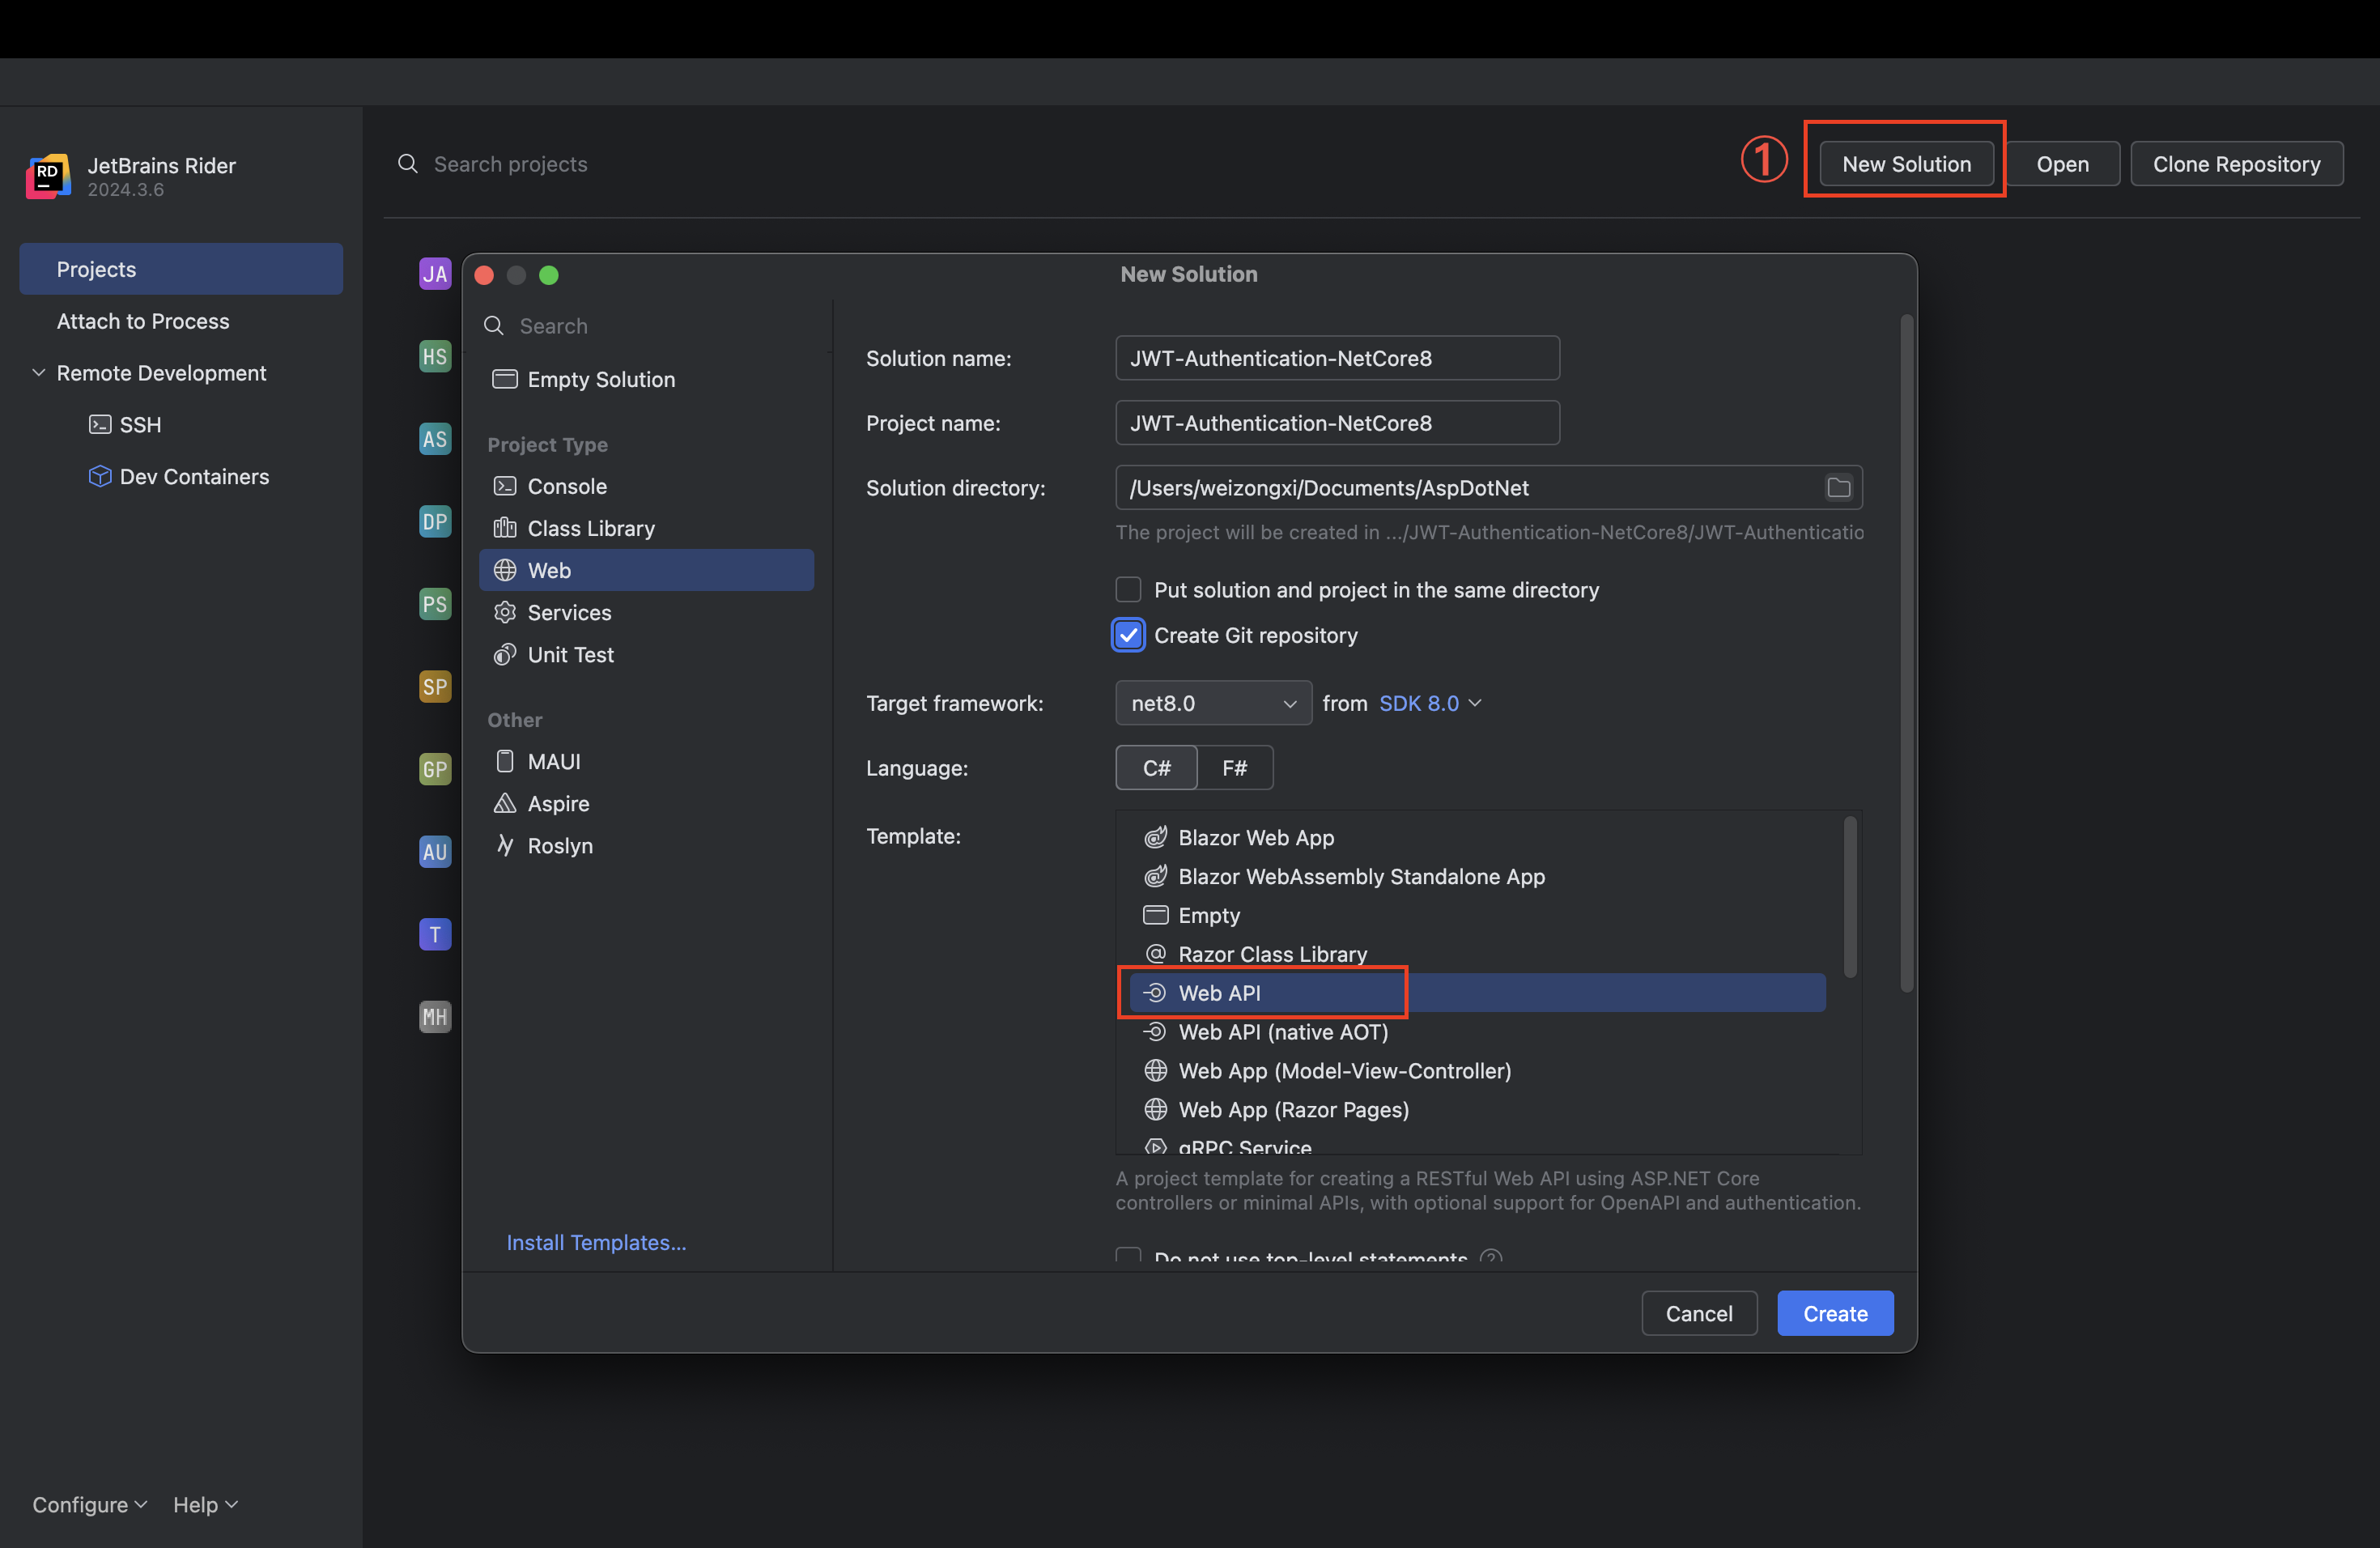
開啟 Rider 新增一個 Web API 專案,輸入資訊如下
- Solution name:方案名稱
- Project name:專案名稱
- Solution directory:方案要存放的目錄
- Target framework:.NET 的版本,選「
net8.0」就是 .NET8 - Language:使用的語言,選「
C#」 - Create Git repository:要不要上傳版本控制,自己決定
- Template:專案範本,選「
Web API」
其他可以不要動,如下圖
接著可以執行,按下右上角 綠色 bug 旁邊有一個 綠色 play
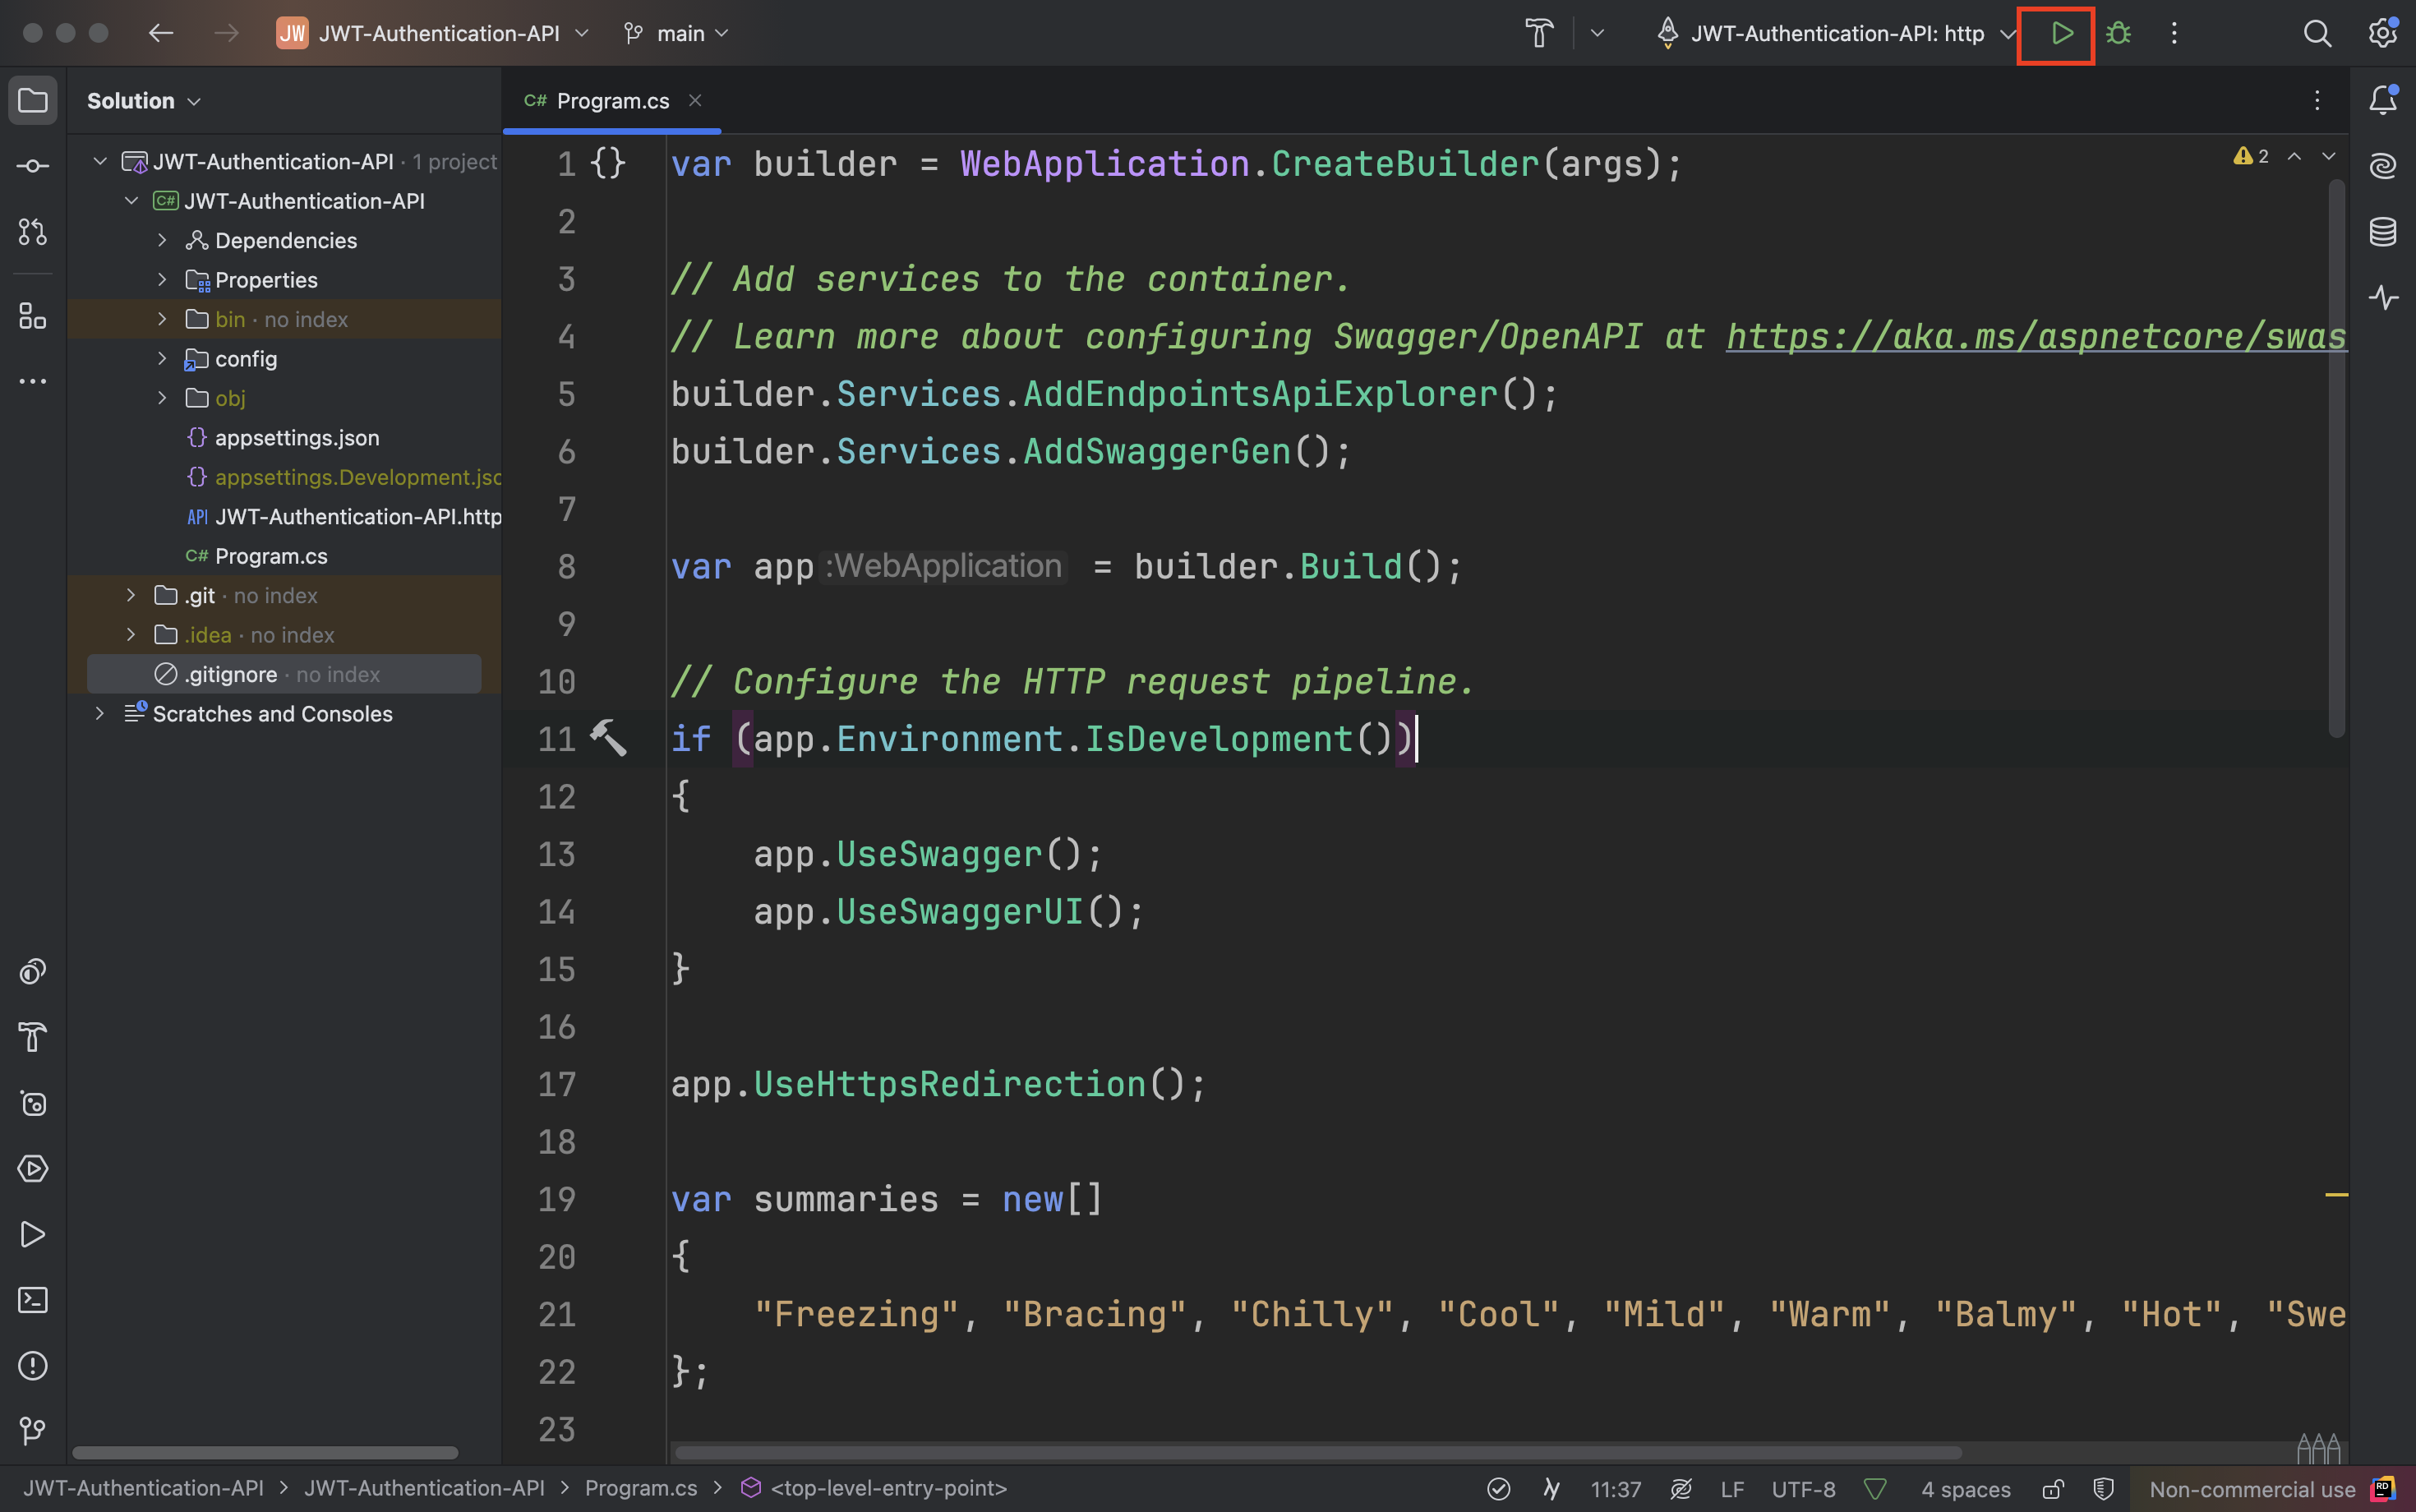
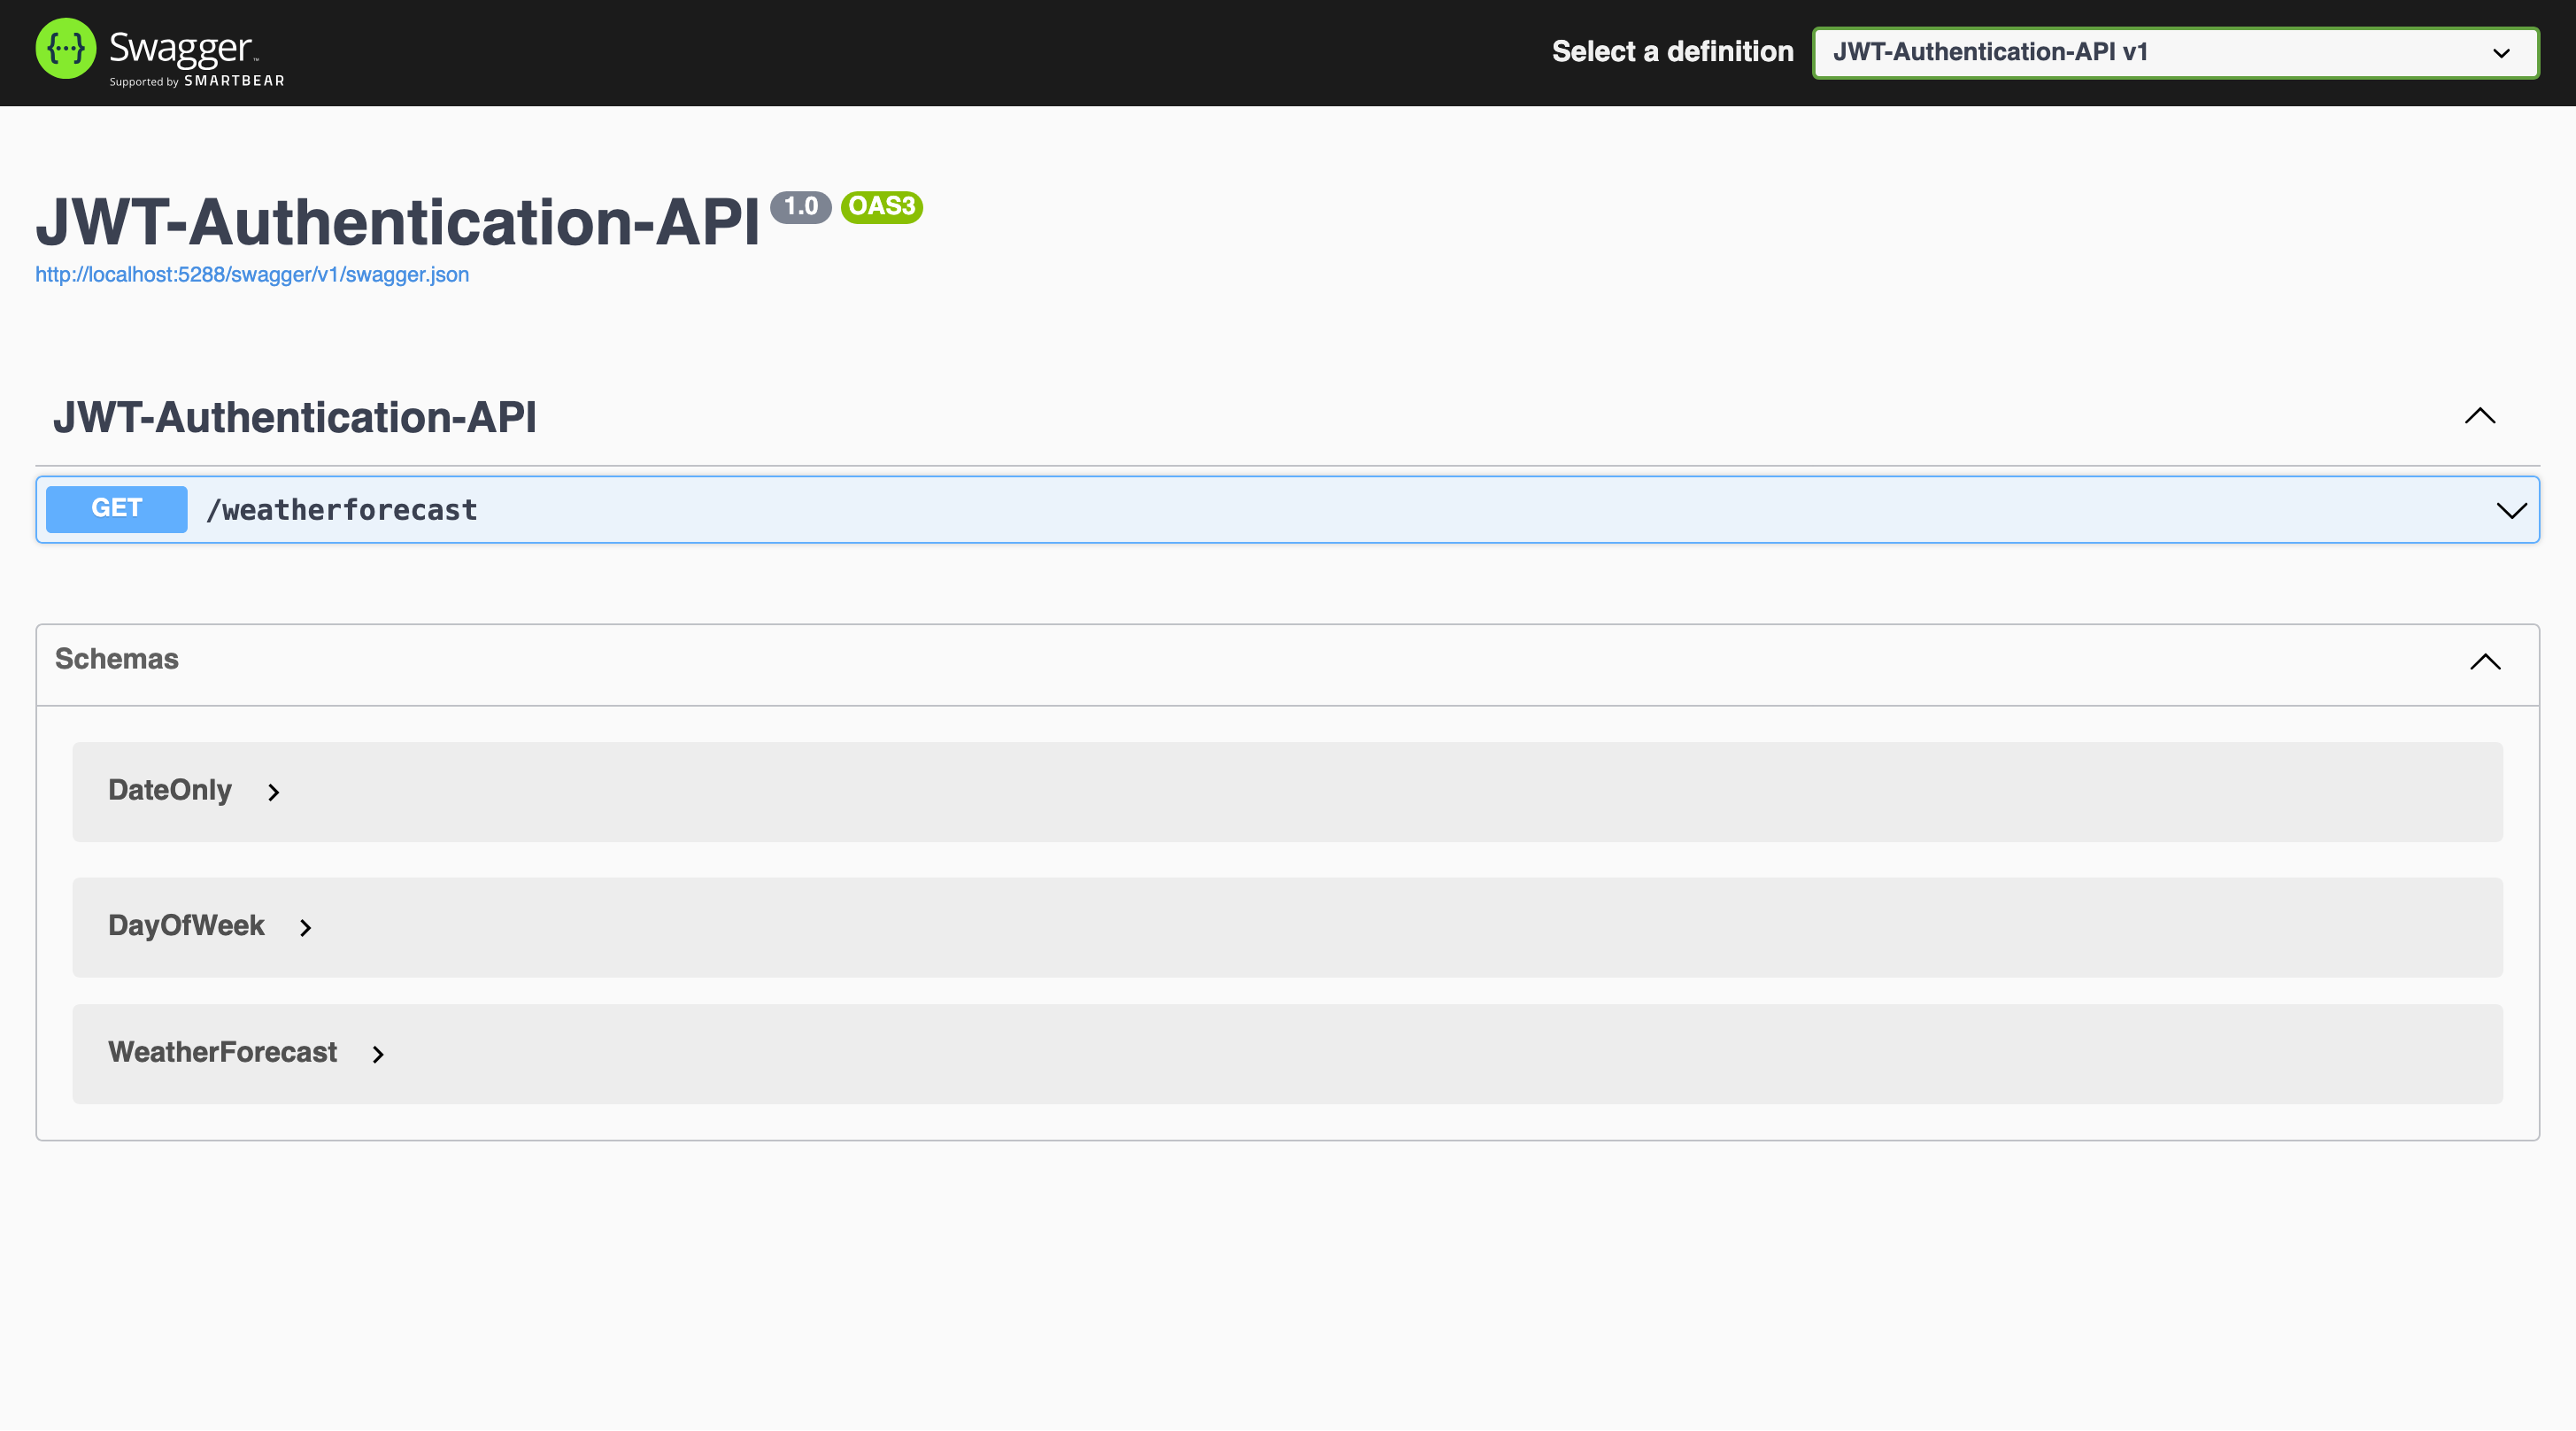
如果有看到 Swagger 的畫面而且網頁的主標題是專案名稱就是專案建立成功
開啟 Program.cs,將預設的 api 程式碼清掉,保留部分如下
 1
 2
 3
 4
 5
 6
 7
 8
 9
10
11
12
13
14
15
16
17
18
19
| WebApplicationBuilder builder = WebApplication.CreateBuilder(args);
// Add services to the container.
// Learn more about configuring Swagger/OpenAPI at https://aka.ms/aspnetcore/swashbuckle
builder.Services.AddEndpointsApiExplorer();
builder.Services.AddSwaggerGen();
WebApplication app = builder.Build();
// Configure the HTTP request pipeline.
if (app.Environment.IsDevelopment())
{
app.UseSwagger();
app.UseSwaggerUI();
}
app.UseHttpsRedirection();
app.Run();
|
安裝套件
我採用 Database-First 方式開發,也就是先建立資料模型再產生資料庫,其中會使用到 ORM(Object Relation Mapping) 物件關連對映的技術,所以會用到幾個 Nuget 的套件
- EntityFrameworkCore.Design
- EntityFrameworkCore.SqlServer
可以採用指令安裝或介面安裝
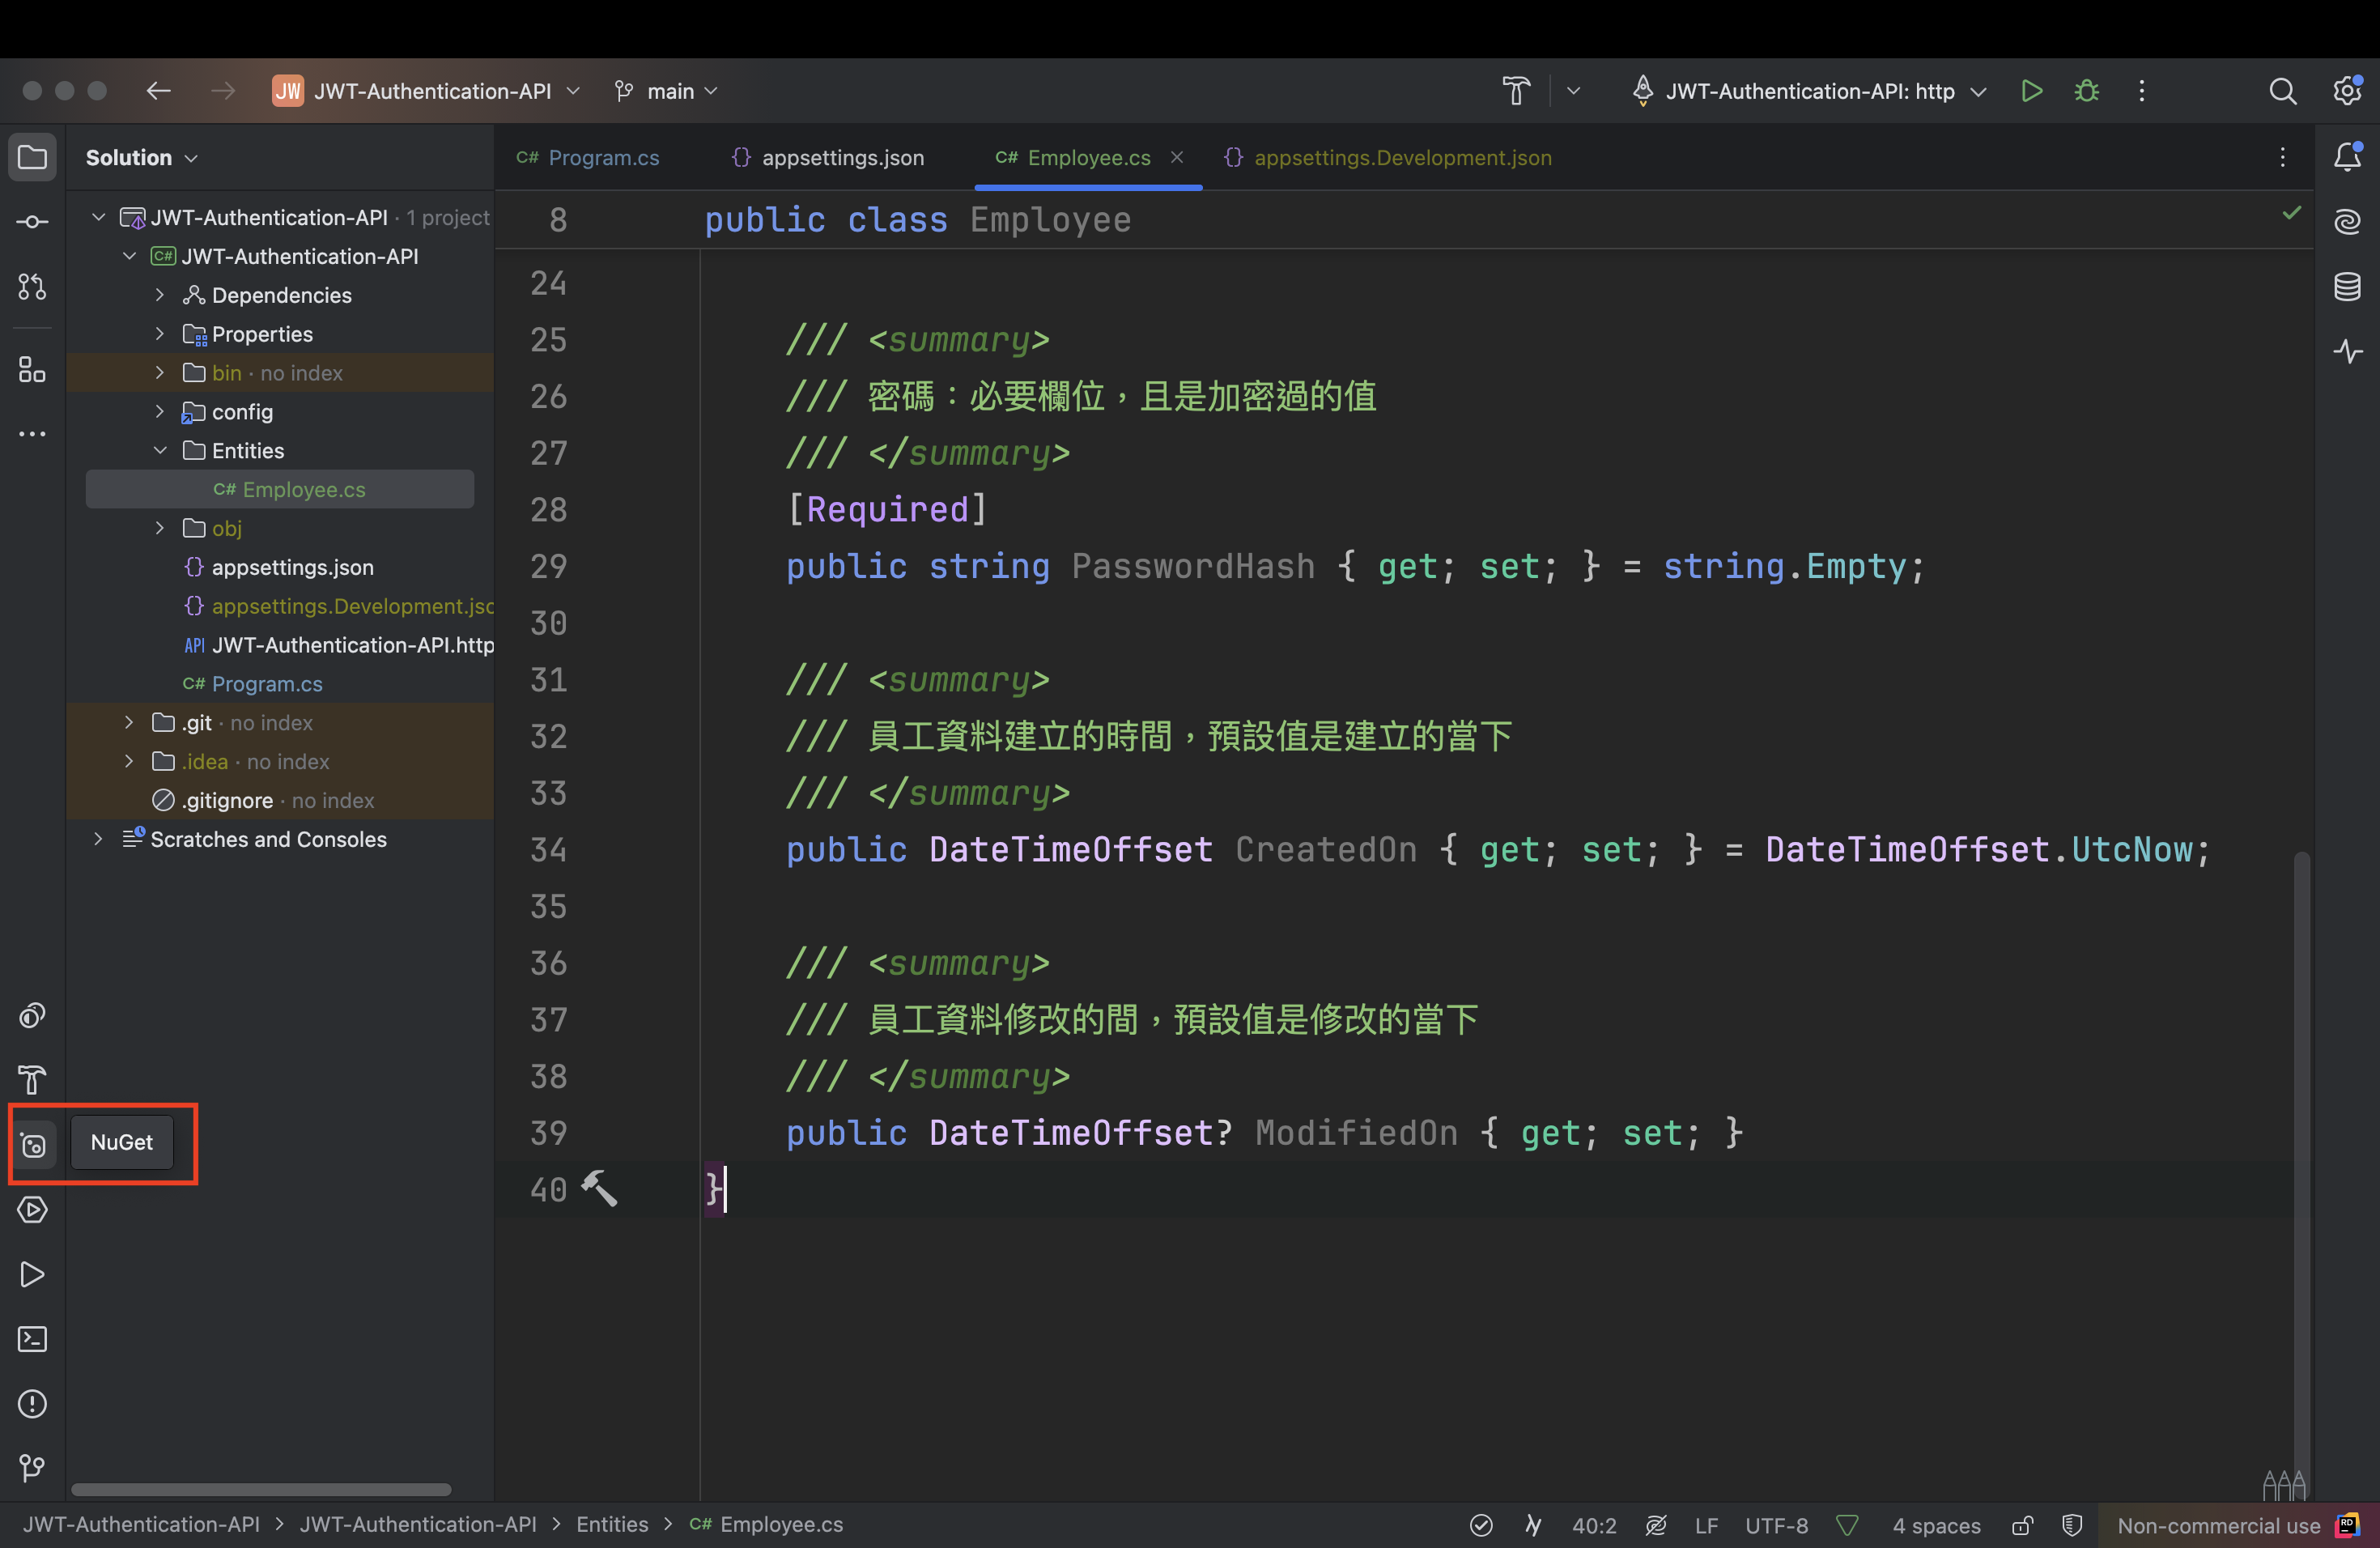
介面安裝
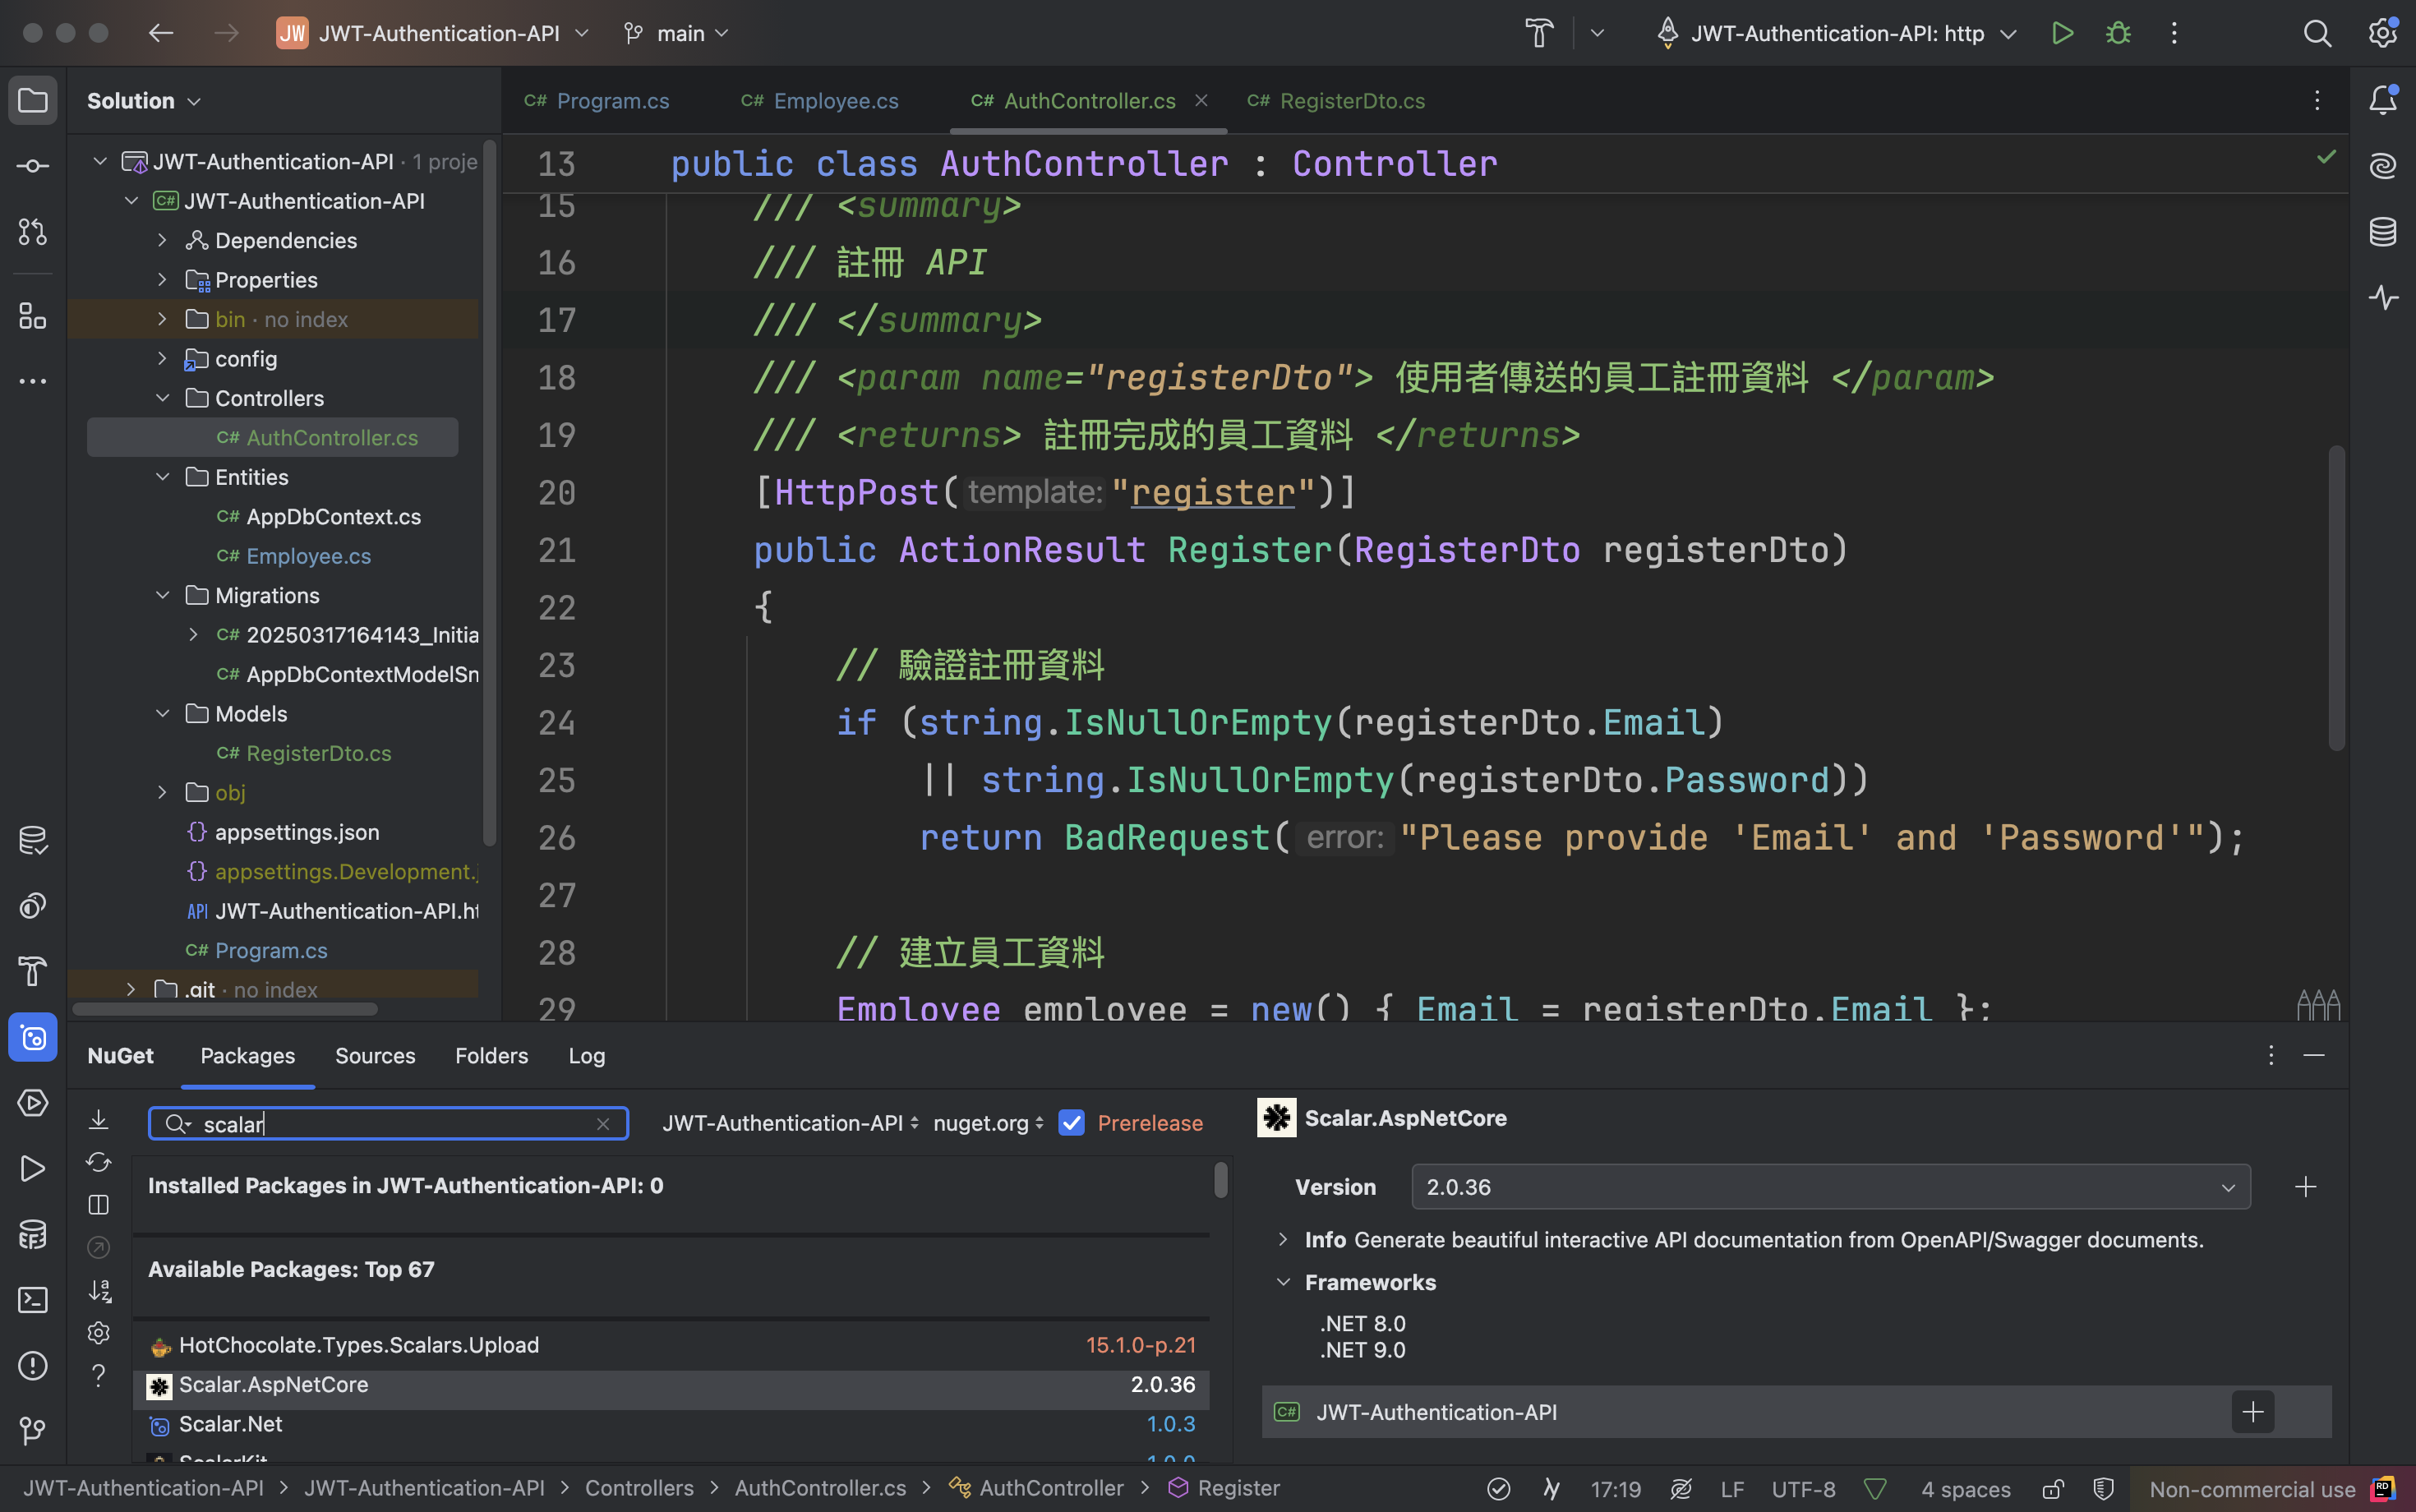
在 Rider 左下有一欄選單,可以找到 NuGet
在搜尋框中輸入套件名稱「EntityFrameworkCore.SqlServer」,通常第一個就會是我們要的結果,在 NuGet 視窗右半邊會看到版本,由於 .NET8 可以相容到 9.0.3 的版本,所以版本選「9.0.3」,當然你也可以選擇適合你本機環境的版本,如果你不是使用 .NET8 的話
在右半邊下方會看到專案的列表,我目前只有一個專案,所以只會出現一個,接著在要安裝的專案按下「+」就會安裝了,如下圖
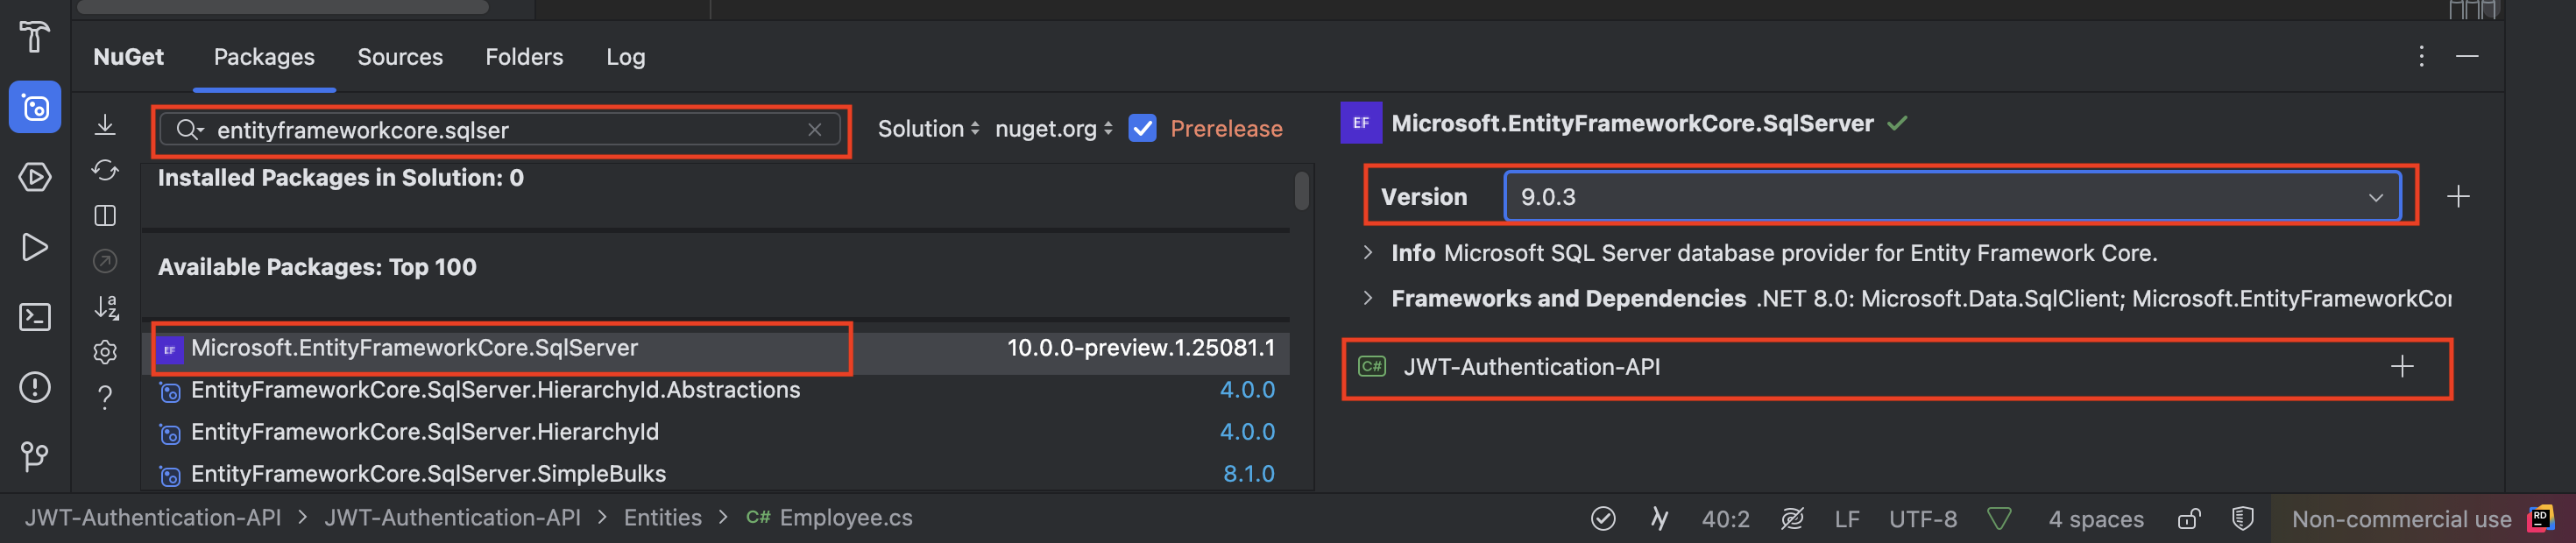
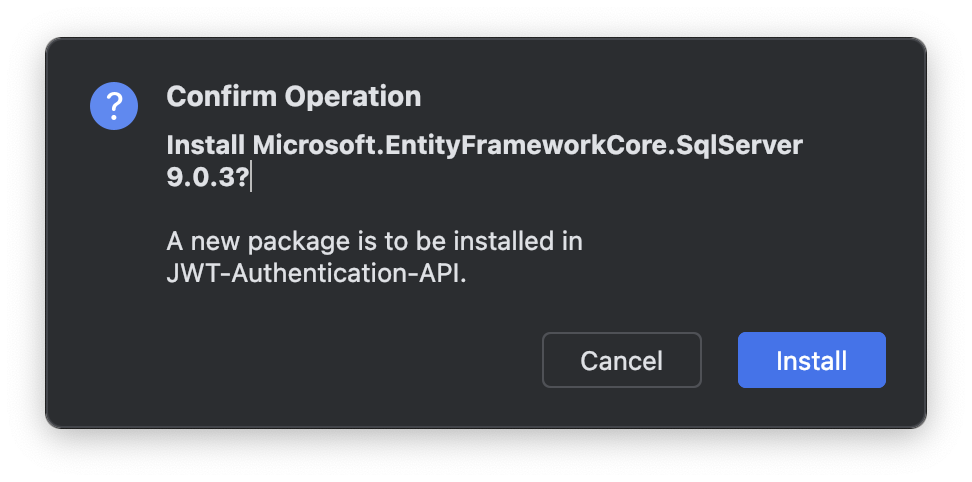
會出現提示安裝的對話框,按下確定,另外一個套件再操作一次同樣的步驟
指令安裝
在 Rider 開啟終端機(Terminal)
輸入安裝指令如下,我撰寫這一篇文的時候是最新穩定版是 9.0.3,之後可能會更新,可以在上方 安裝套件 找到最新資訊
1
2
| dotnet add package Microsoft.EntityFrameworkCore.SqlServer --version 9.0.3
dotnet add package Microsoft.EntityFrameworkCore.Design --version 9.0.3
|
建立資料模型
以 ORM 的概念來說,可以把一個 Entity 想像成一張資料表
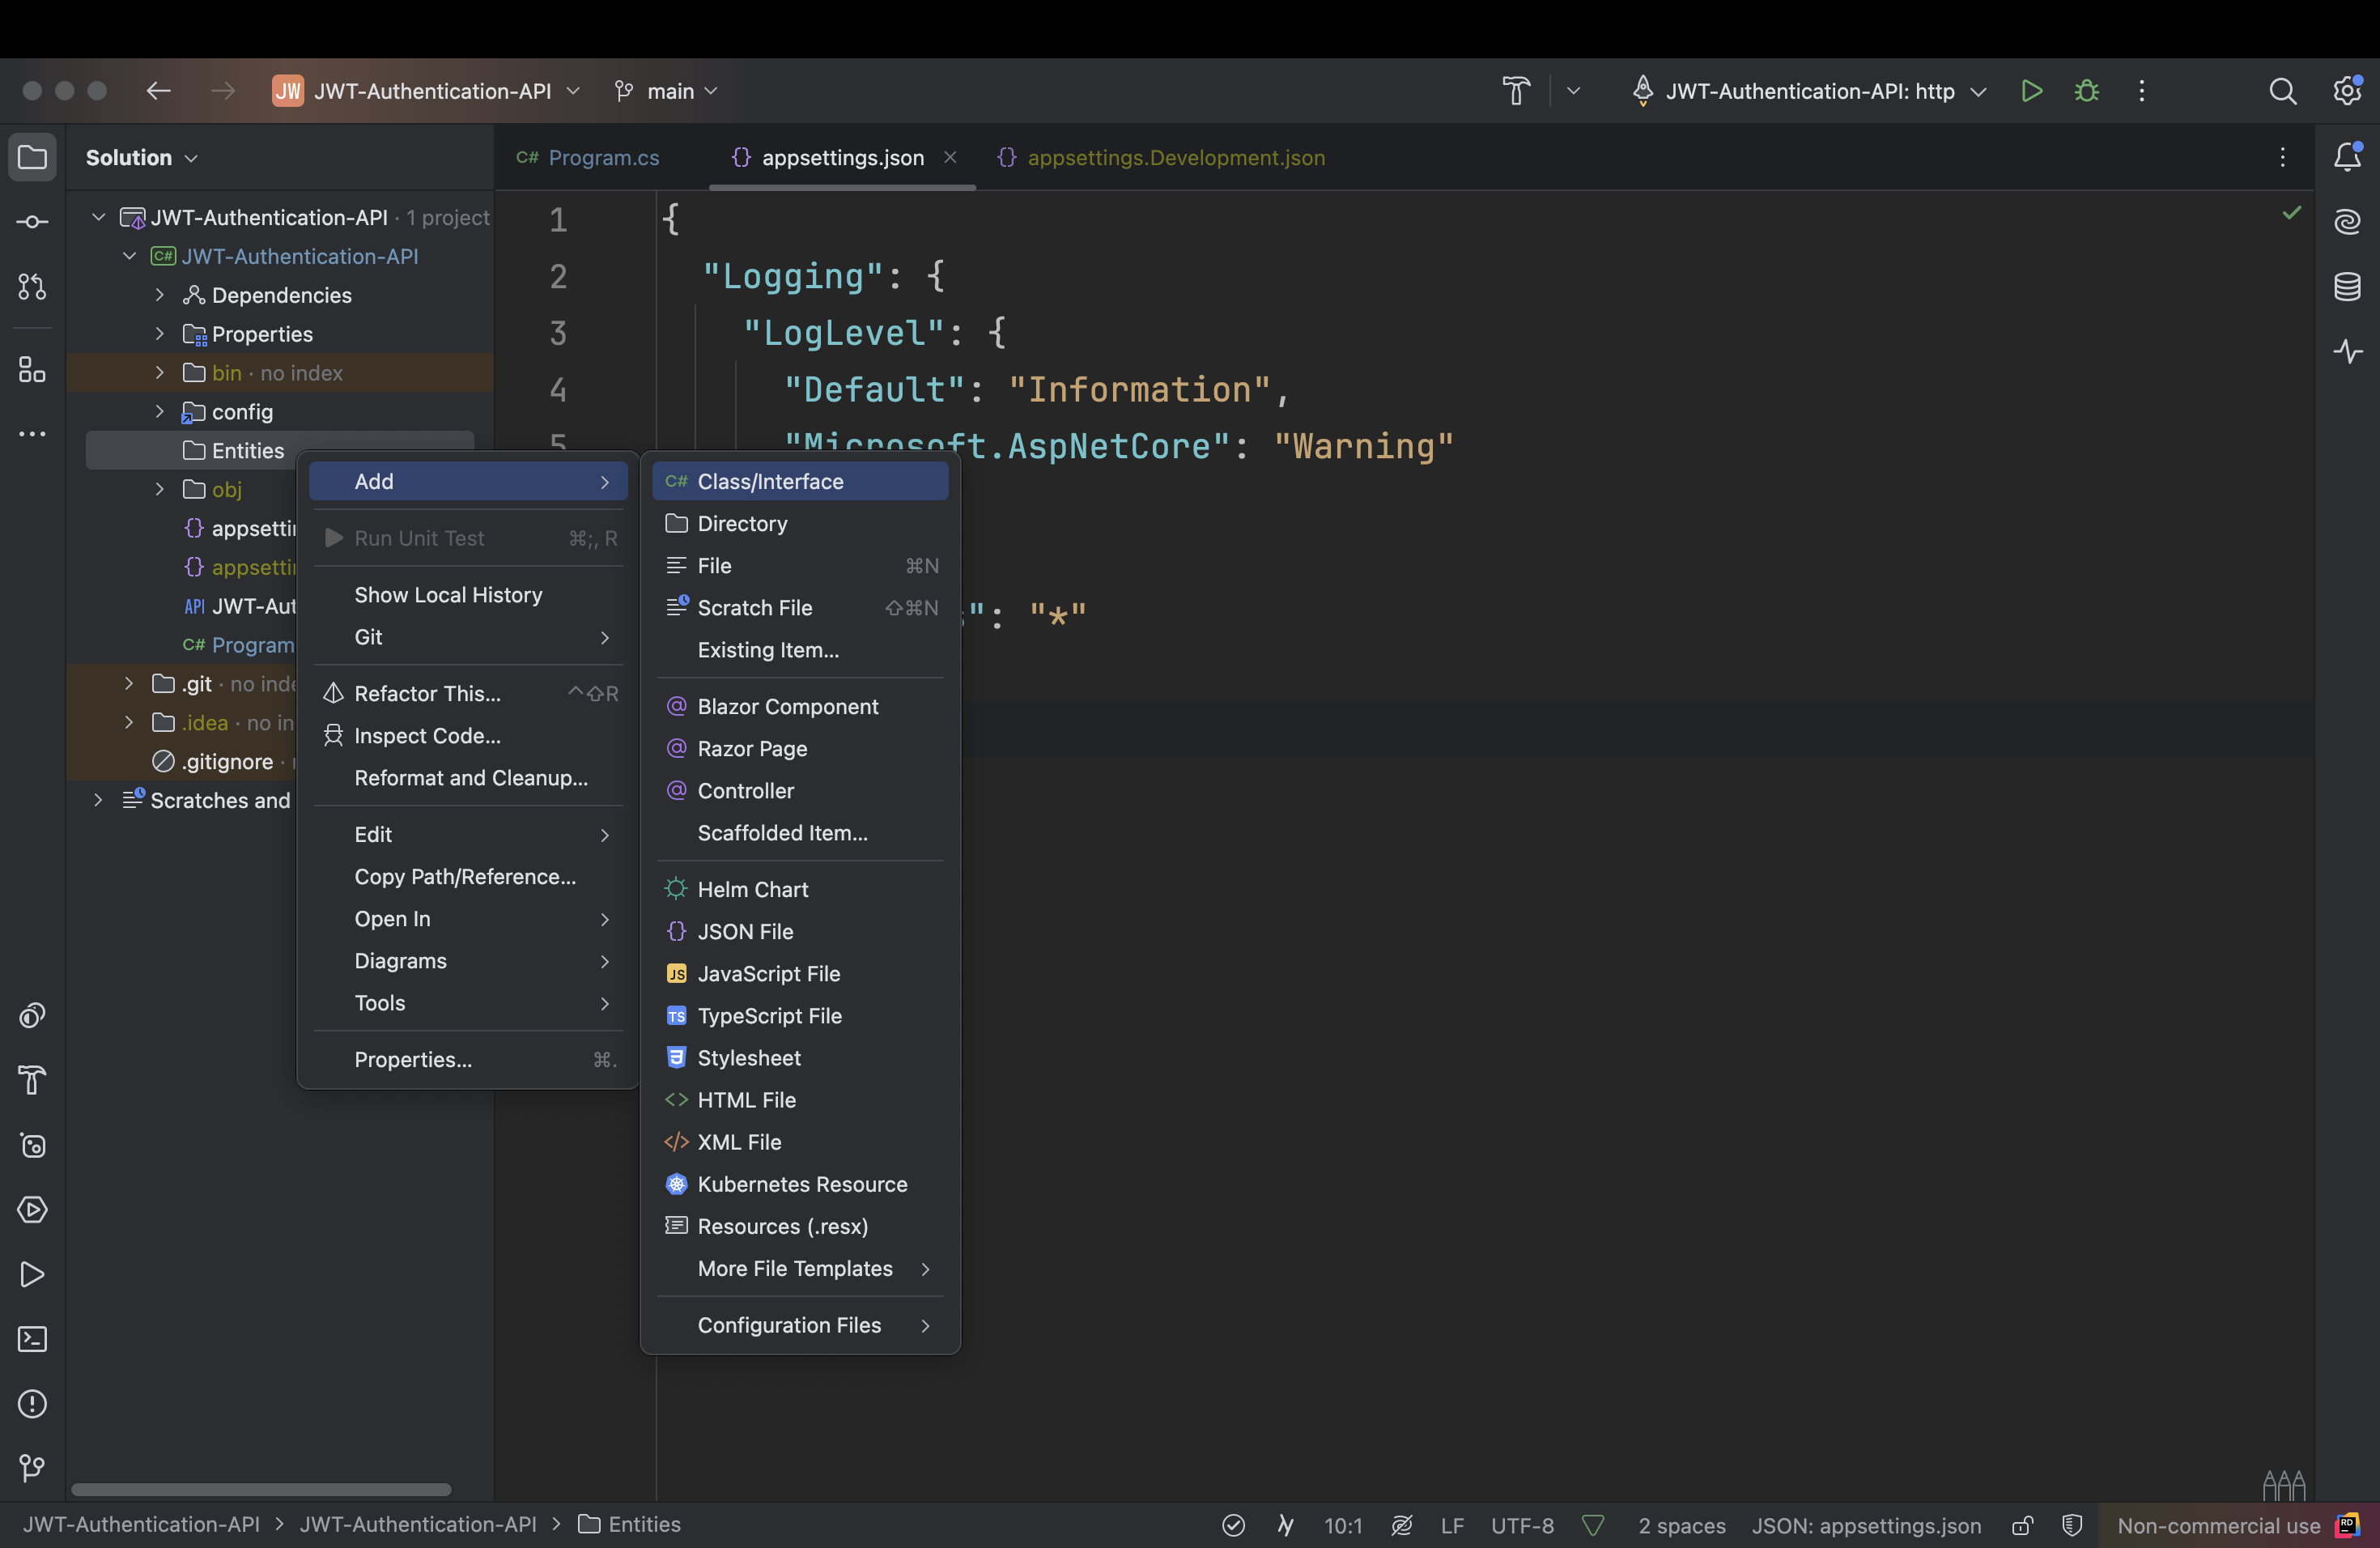
在專案目錄下新增一個 Entities 的目錄,參考下圖,在「class/interface」選項下有一個「Directory」的選項,點擊後輸入目錄名稱 Entities,這個目錄將存放所有與資料庫互動的資料模型檔
Employee
以註冊、登入、登出這三個功能來說,一張員工的資料表已經夠了
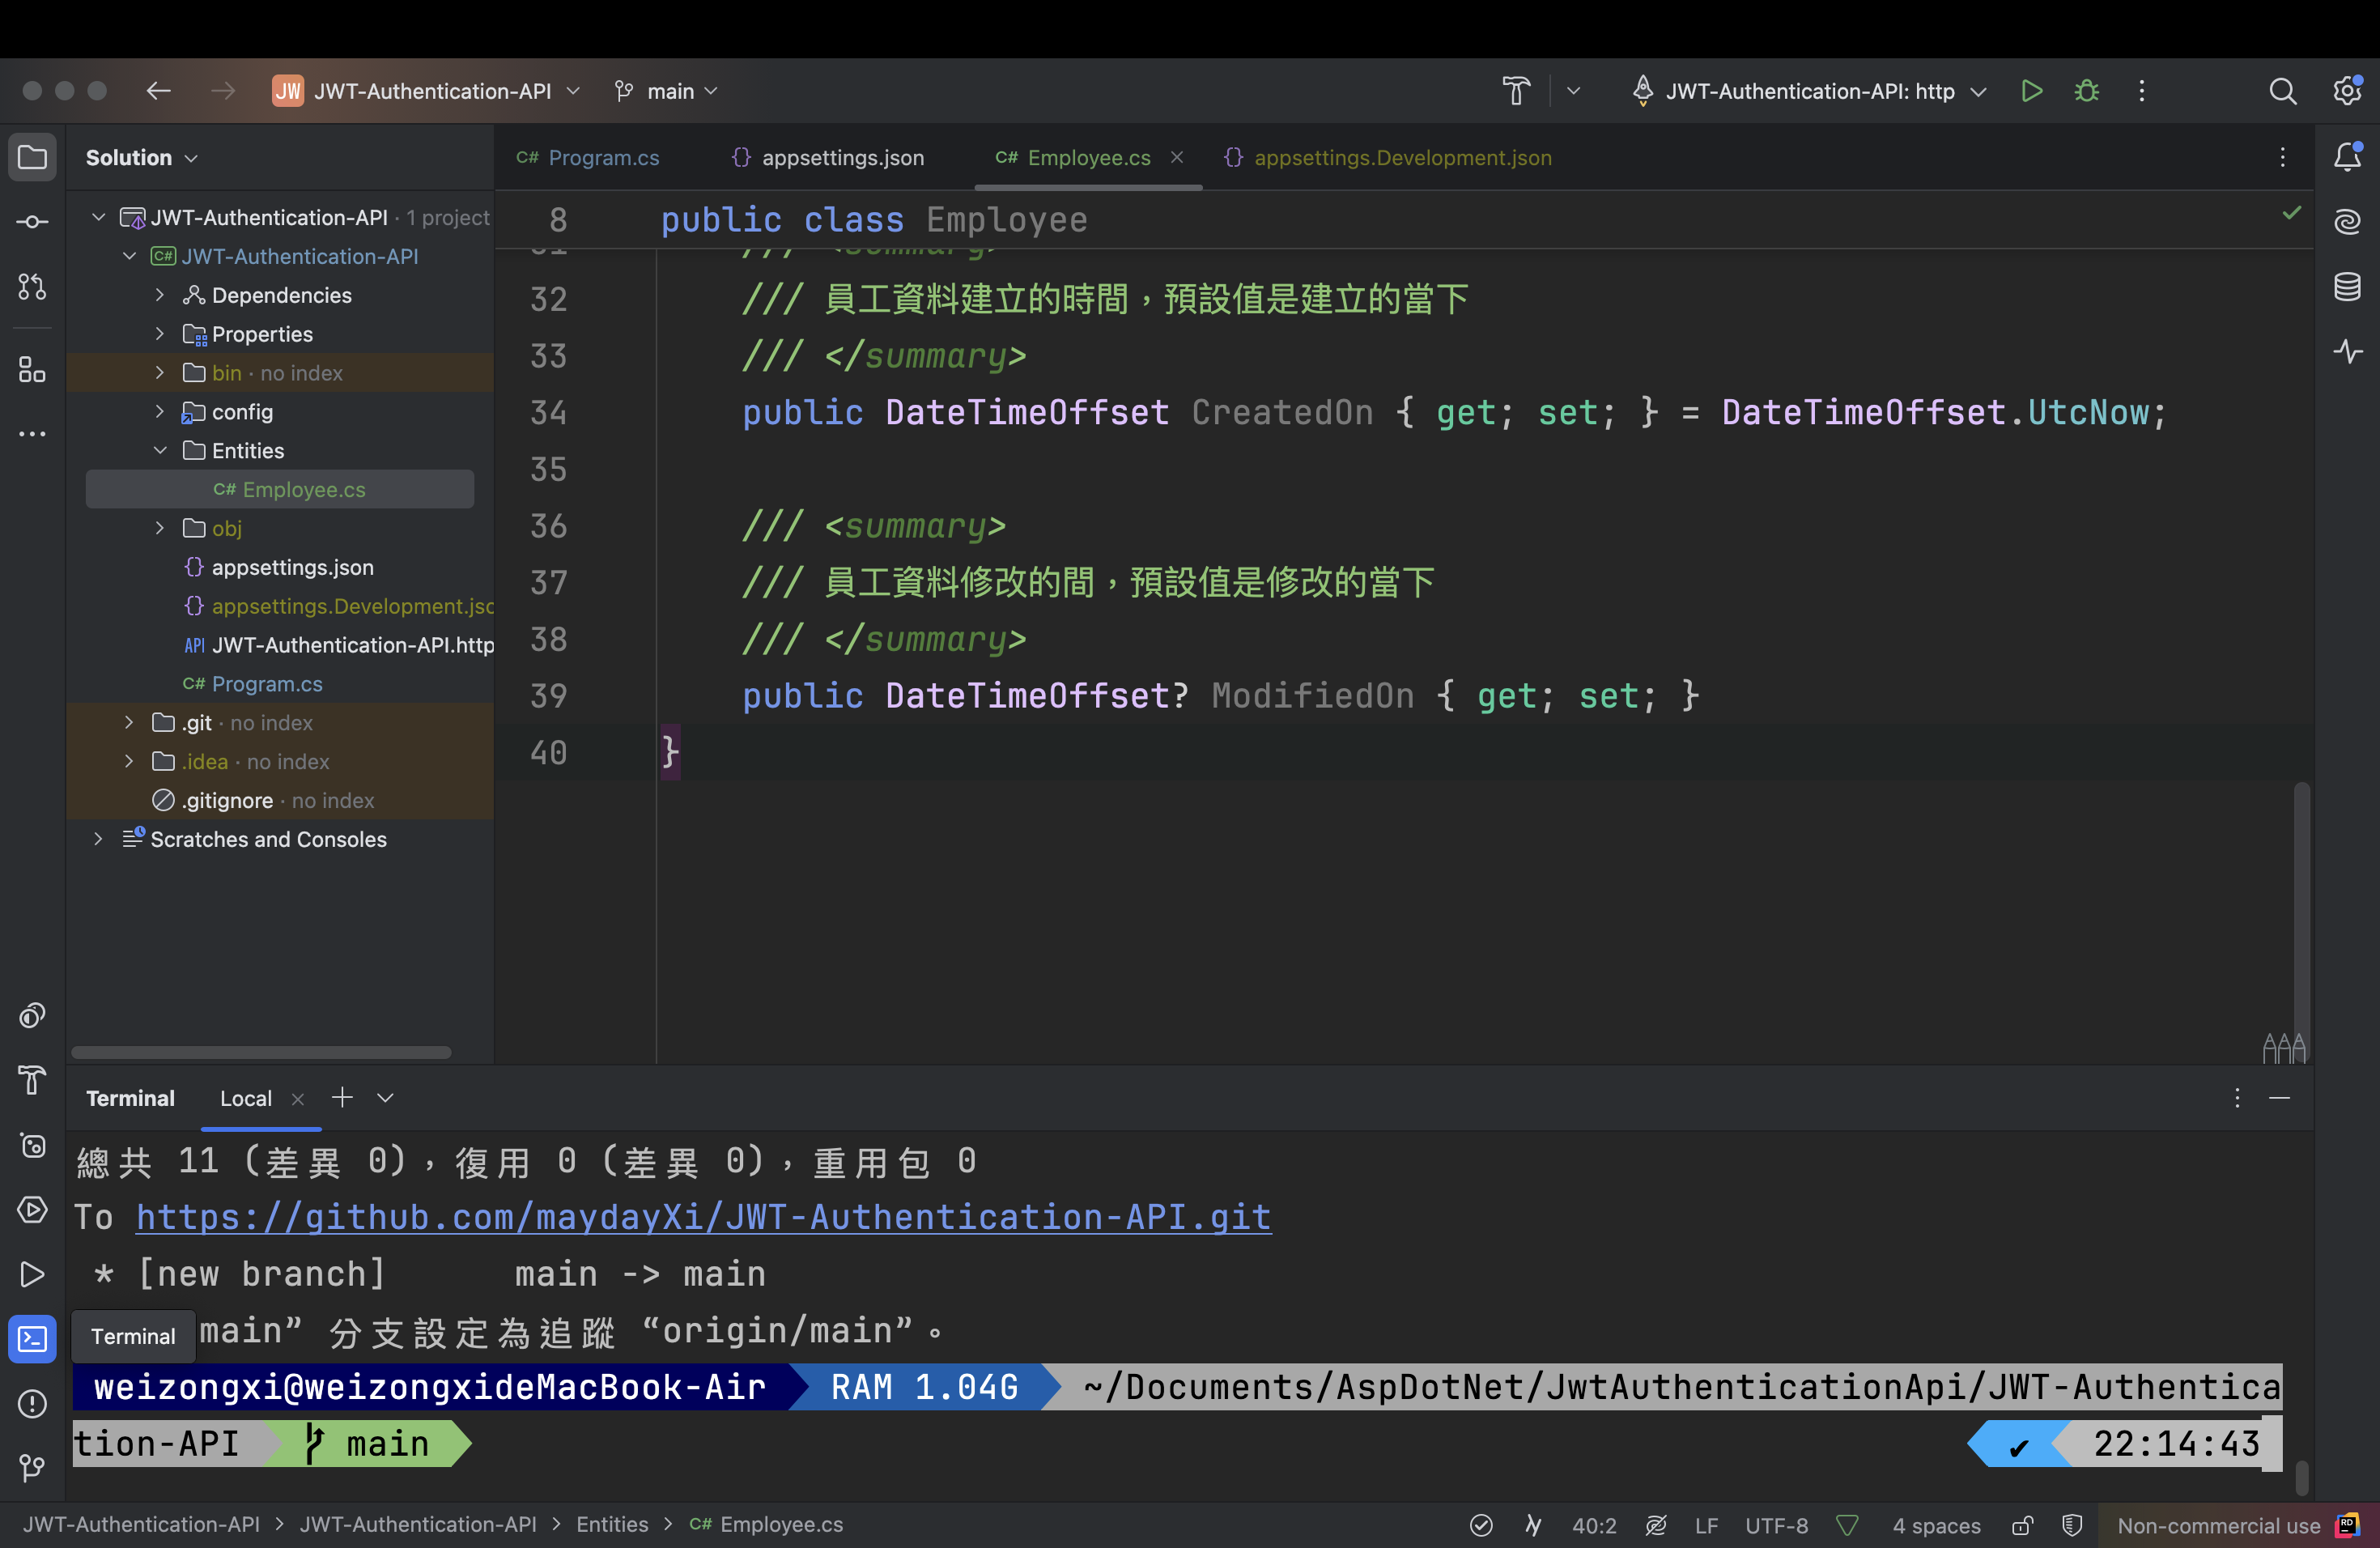
並 Entities 目錄下新增 Employee.cs 檔案,作為員工資料模型,如下圖
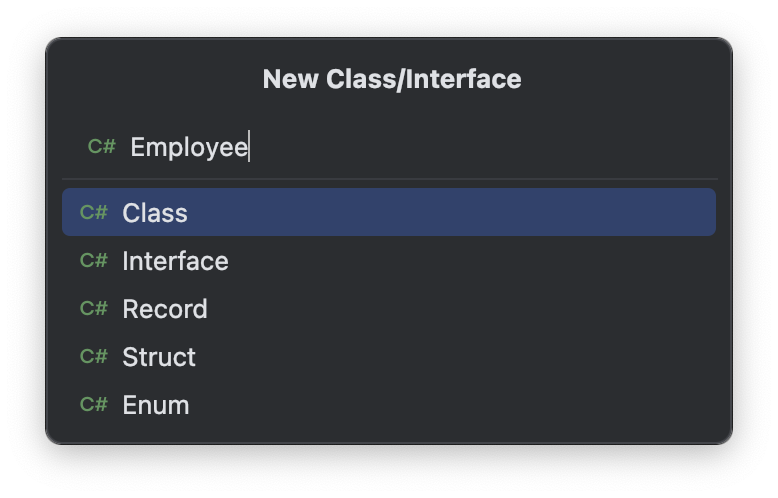
員工資料模型內容如下
 1
 2
 3
 4
 5
 6
 7
 8
 9
10
11
12
13
14
15
16
17
18
19
20
21
22
23
24
25
26
27
28
29
30
31
32
33
34
35
36
37
38
39
40
| using System.ComponentModel.DataAnnotations;
using System.ComponentModel.DataAnnotations.Schema;
namespace JWT_Authentication_API.Entities;
/// <summary>
/// 員工資料模型
/// </summary>
public class Employee
{
/// <summary>
/// 員工資料識別(PK)
/// </summary>
[Key]
// 告訴資料庫這是自動產值的欄位,讓資料庫自行產生 key 值
// 這樣程式就不用處理了
[DatabaseGenerated(DatabaseGeneratedOption.Identity)]
public Guid Id { get; set; }
/// <summary>
/// 員工信箱:必要欄位
/// </summary>
[Required]
public string Email { get; set; } = string.Empty;
/// <summary>
/// 密碼:必要欄位,且是加密過的值
/// </summary>
[Required]
public string PasswordHash { get; set; } = string.Empty;
/// <summary>
/// 員工資料建立的時間,預設值是建立的當下
/// </summary>
public DateTimeOffset CreatedOn { get; set; } = DateTimeOffset.UtcNow;
/// <summary>
/// 員工資料修改的間,預設值是修改的當下
/// </summary>
public DateTimeOffset? ModifiedOn { get; set; }
}
|
欄位說明如註解,特別說明幾個重點
- Email:員工的信箱,一般來而會使用員工的英文名字 + 公司內部的 mail server,因此已包含了姓名相關的資訊,所以為了教學我簡化了姓名「Name」欄位
- CreateOn, ModifyOn:公司內部有時候會有某筆資料出問題的,經由某位員工或使用者反應,如登入失敗,為了要追查使用軌跡,會加入相關的時間欄位
- Password:密碼應該要加密後再存入資料庫,所以這個欄位會存放加密後的值。
建立 DBContext
在建立資料模型有提到,在 ORM 中一個 Entity 是資料表的概念,那 DBContext 就是一個資料庫的概念,所以要建立一個專屬資料庫的類別作為資料庫的 Mapping,這個類別需要繼承「DBContext」
下面在 Entities 中建立一個 AppDbContext.cs 的類別
 1
 2
 3
 4
 5
 6
 7
 8
 9
10
11
12
13
14
15
16
| using Microsoft.EntityFrameworkCore;
namespace JWT_Authentication_API.Entities;
/// <summary>
/// Database Context
/// </summary>
/// <param name="options"> 資料庫連線相關設定,以 DI 形式 </param>
public class AppDbContext(DbContextOptions<AppDbContext> options)
: DbContext(options)
{
/// <summary>
/// 員工資料表
/// </summary>
public DbSet<Employee> Employees { get; set; }
}
|
建立實體資料庫
資料模型及 DBContext 都建立好了之後,就可以建立實體資料庫了,在根目錄下開啟 appsettings.json 並**新增 ConnectionString(資料庫的連線字串)**如下
由於連線字串涉及我的資料庫帳號密碼,這邊需要改成自己的資料庫連線字串,參數說明如下
- Server:資料庫伺服器的 IP,如果像我一樣架在雲端,就會是雲端主機的對外 IP,「,」後面接資料庫的 port,通常都是 1433。
- Database:資料庫的名稱,也就是要連線到的目標資料庫
- user:資料庫使用者的帳號,如果有建立「sa」的話就可以寫 sa
sa(System Admin),是微軟 SQL Server 預設的最高權限帳號,通常安裝資料庫的時候會一起設定。 - password:使用者密碼
- TrustServerCertificate:是否信任伺服器的 SSL 憑證,如果 True 就不會檢查 Server 的憑證,可以自己決定
 1
 2
 3
 4
 5
 6
 7
 8
 9
10
11
12
| {
"Logging": {
"LogLevel": {
"Default": "Information",
"Microsoft.AspNetCore": "Warning"
}
},
"AllowedHosts": "*",
"ConnectionString": {
"AppDb": "Server=YourServerIP,1433;Database=YourDatabaseName;user=username;password=YourDatabasePassword;TrustServerCertificate=True;"
}
}
|
注入資料庫服務
開啟根目錄 Program.cs,注入資料庫服務
1
2
3
4
5
6
7
| // Add SQL Server Database Service
// builder.Configuration 會參考到 `appsettings.json`
// GetConnectionString 方法會抓到資料庫連線字串,參數傳入上面設定的連線字串名字
builder.Services.AddDbContext<AppDbContext>(optionsBuilder =>
{
optionsBuilder.UseSqlServer(builder.Configuration.GetConnectionString("AppDb"));
});
|
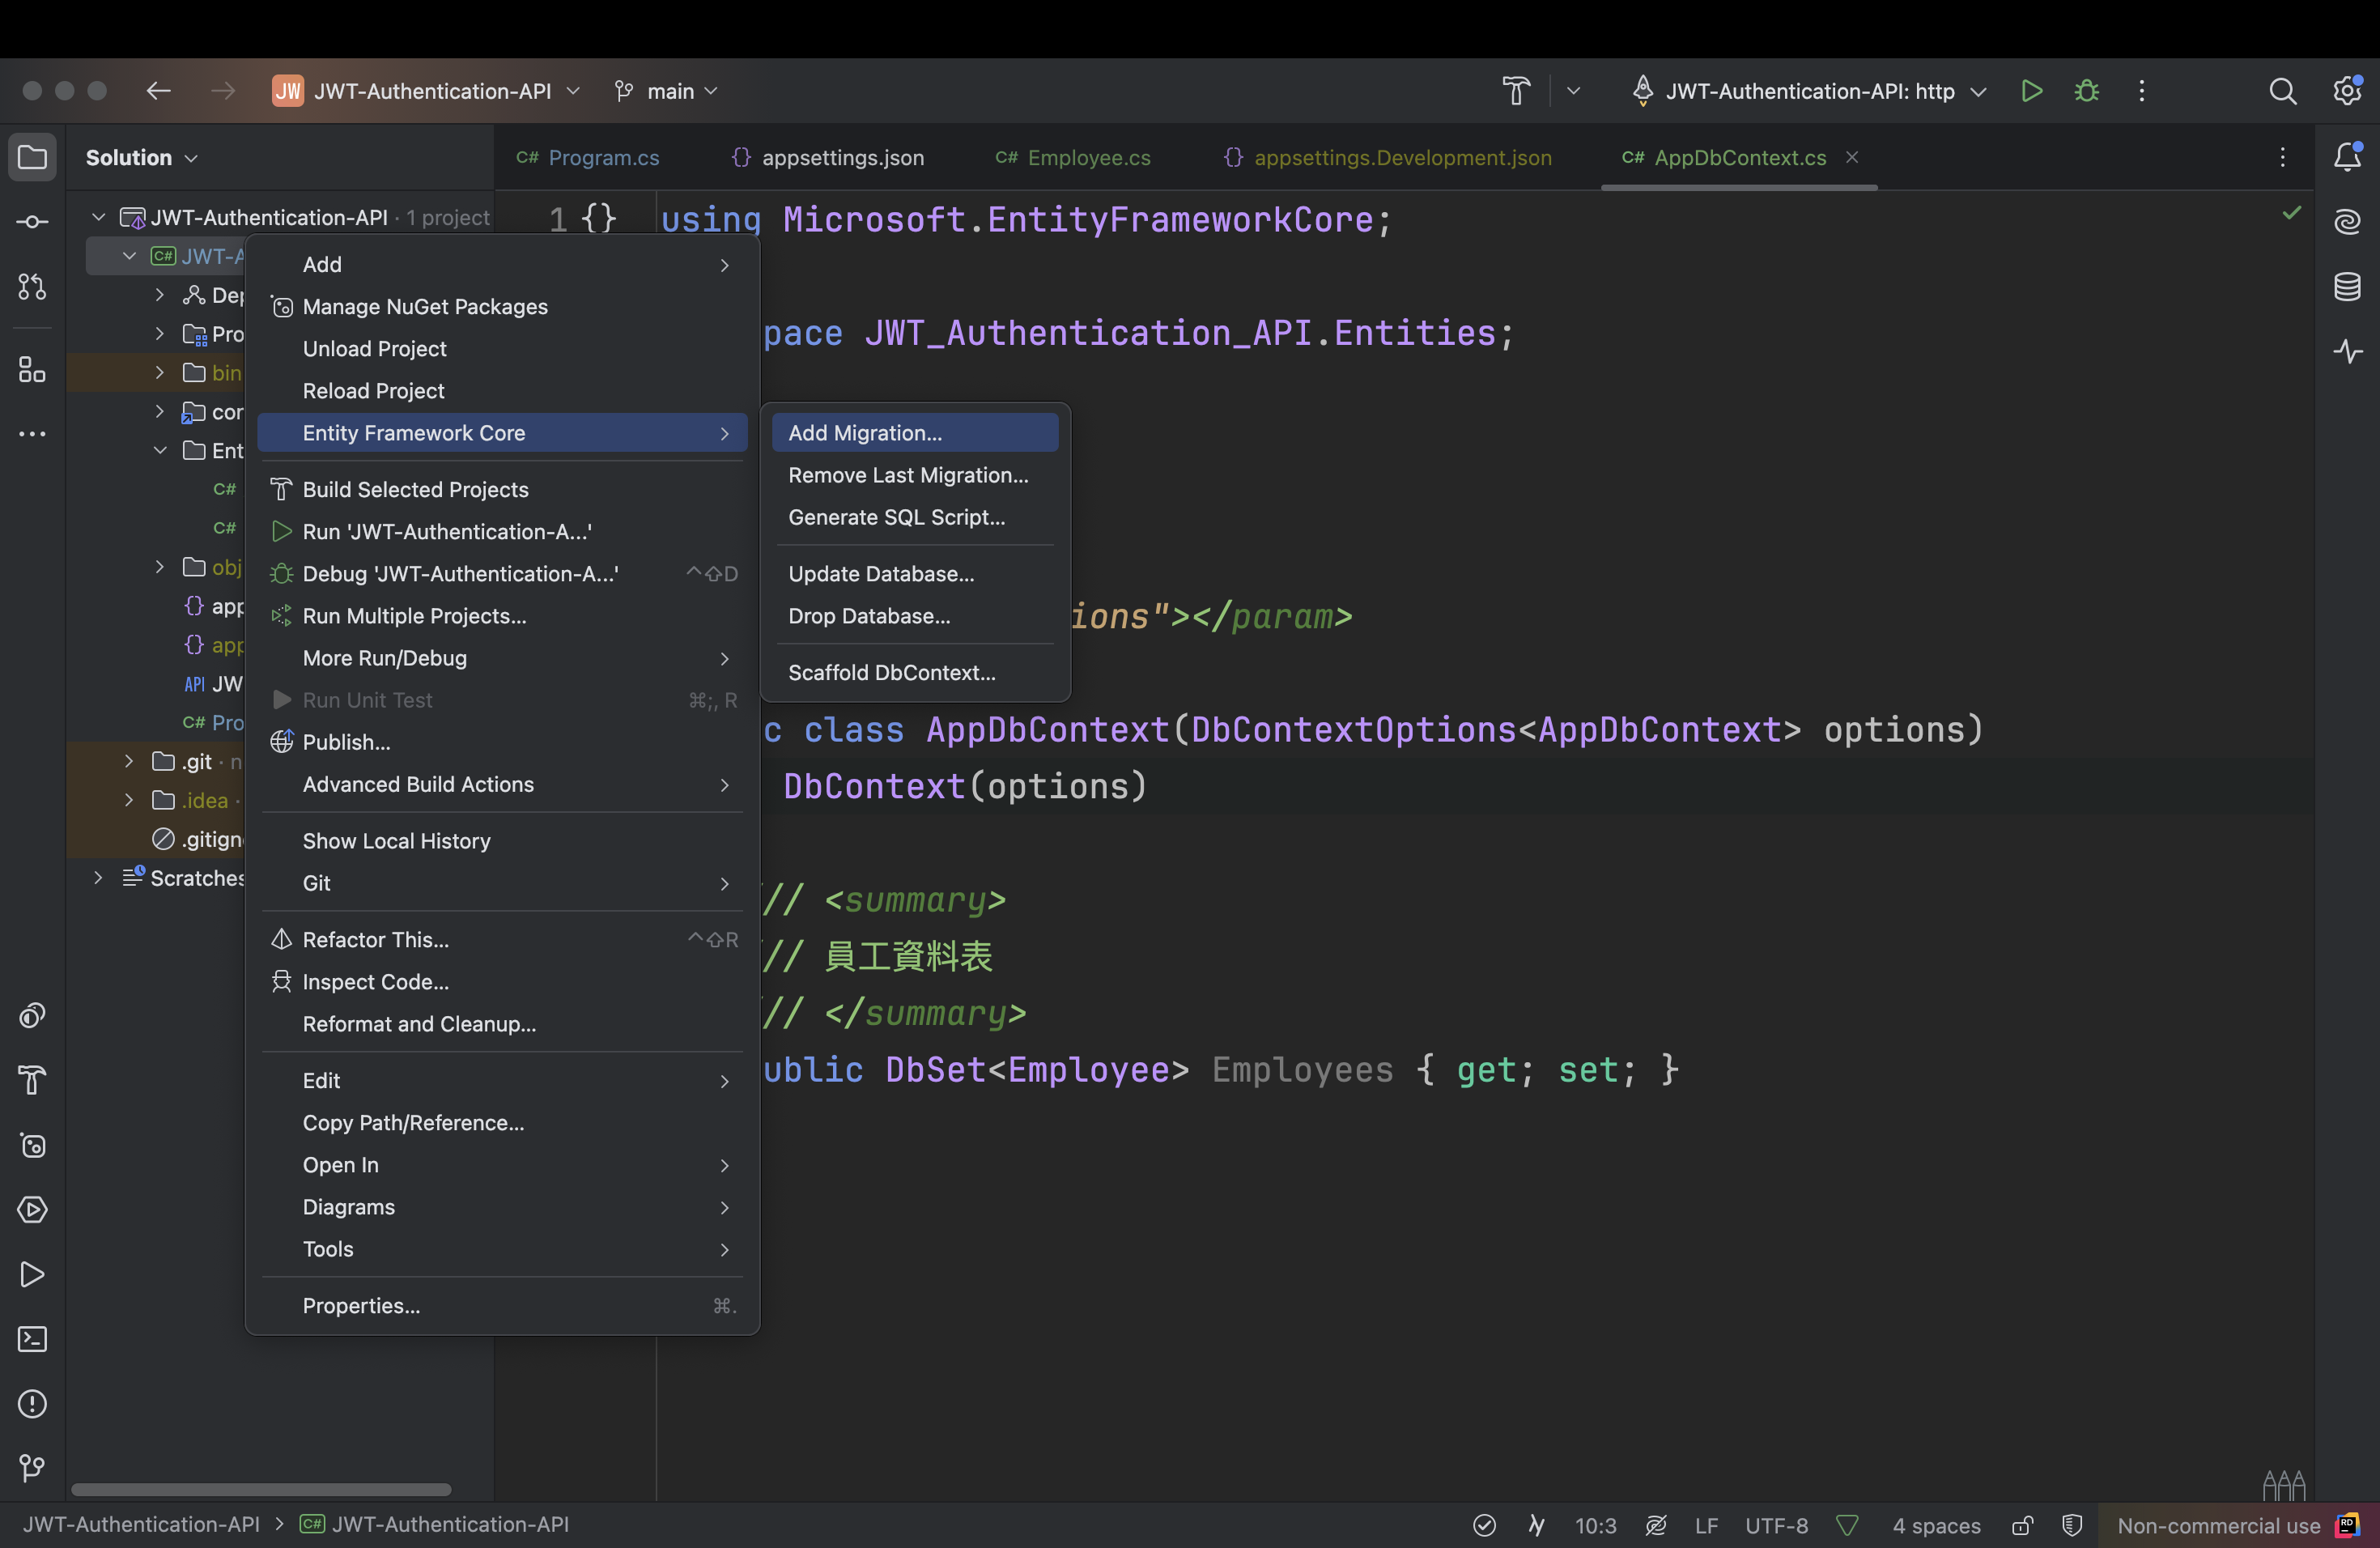
新增 Migration
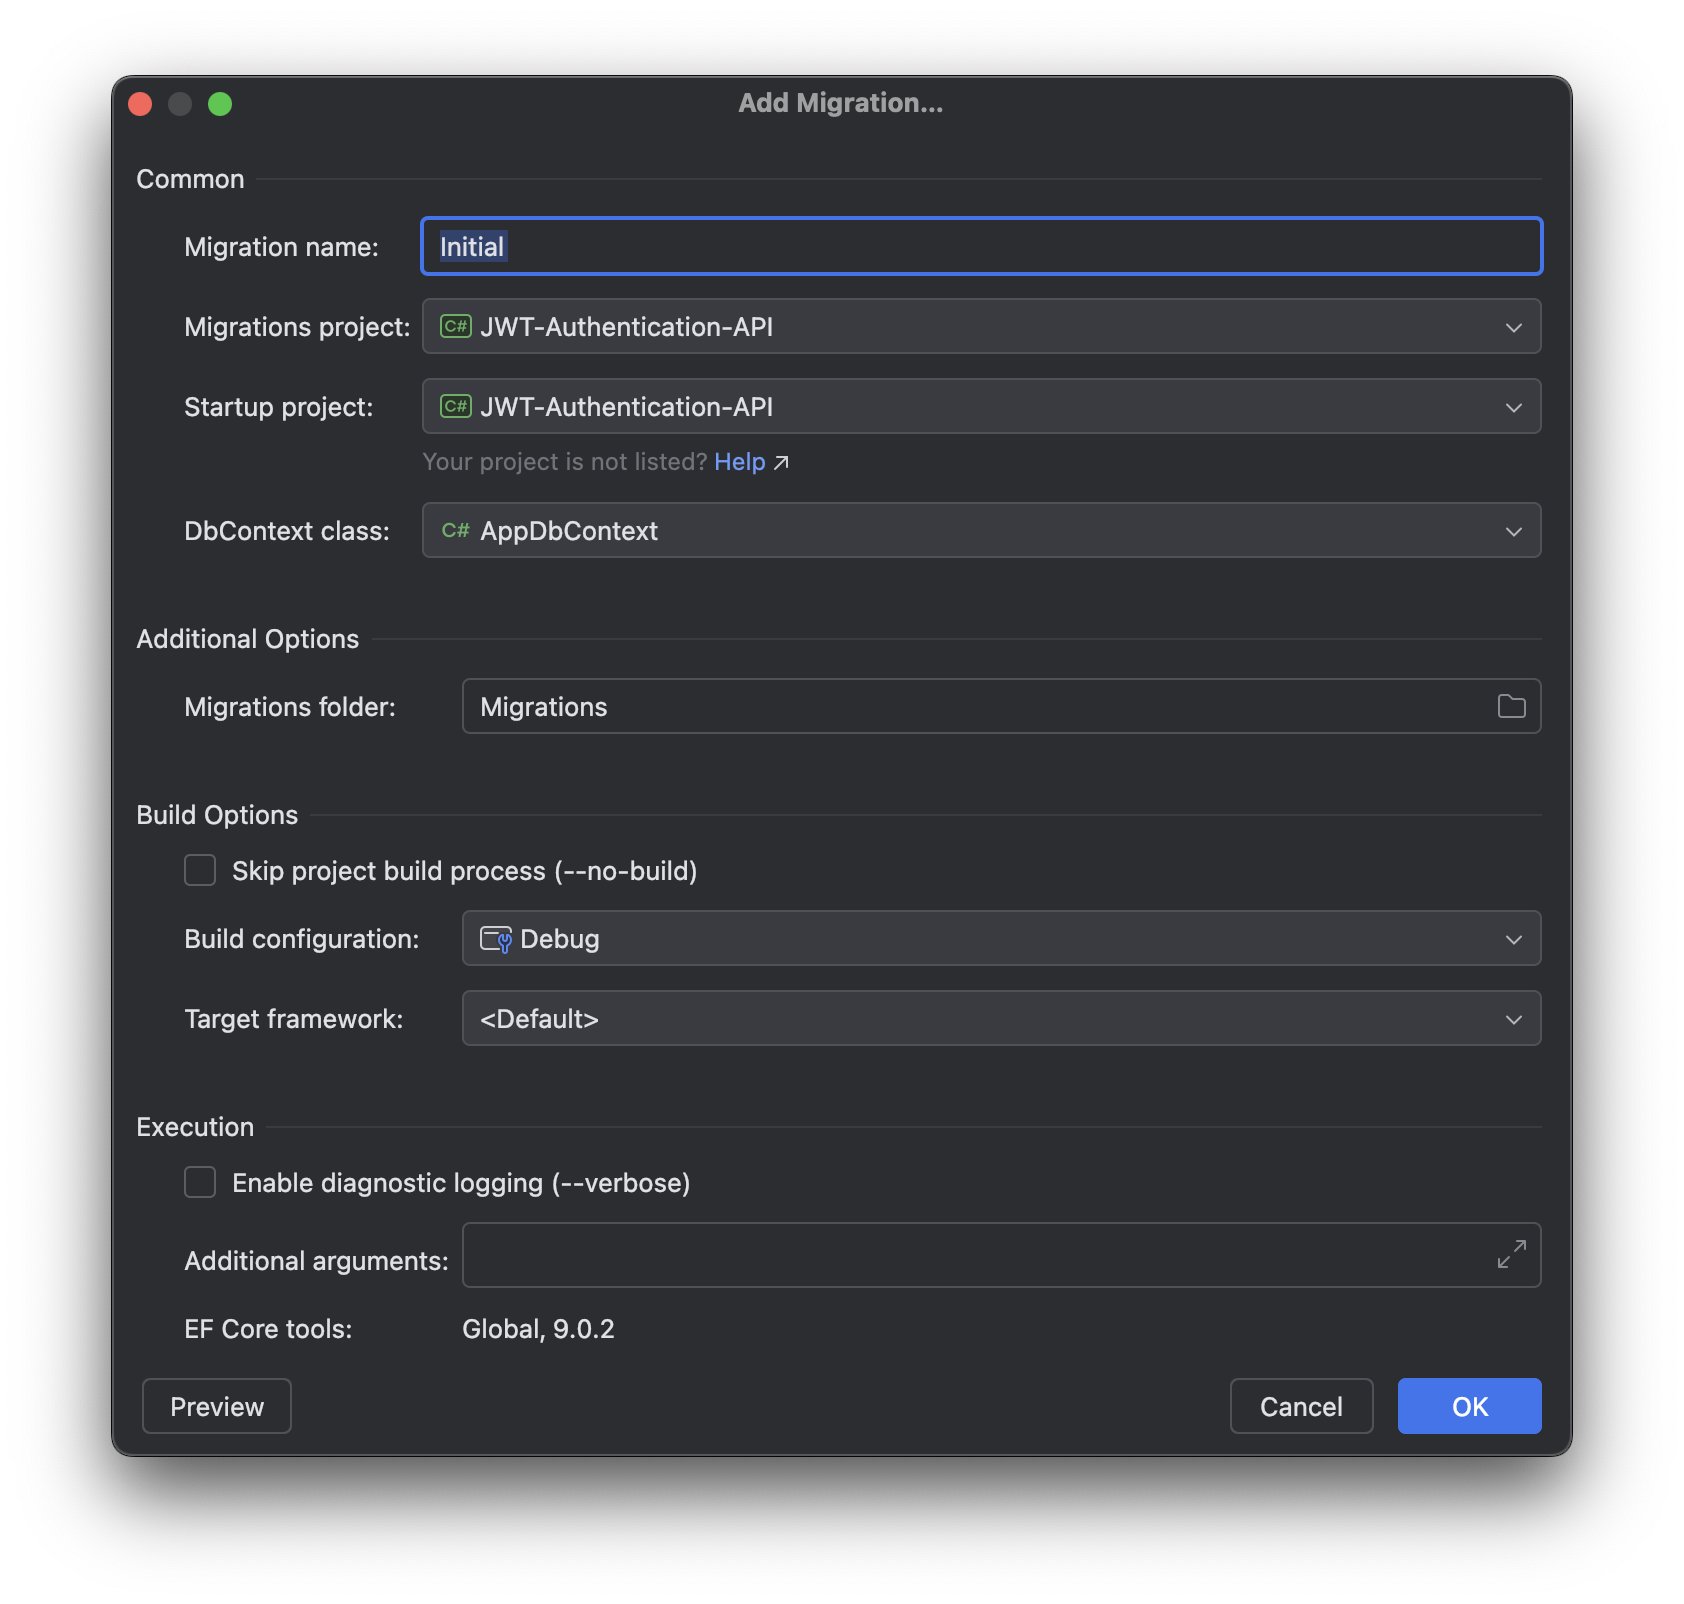
接著在專案右鍵 → Entity Framework Core → Add Migration
按下「OK」
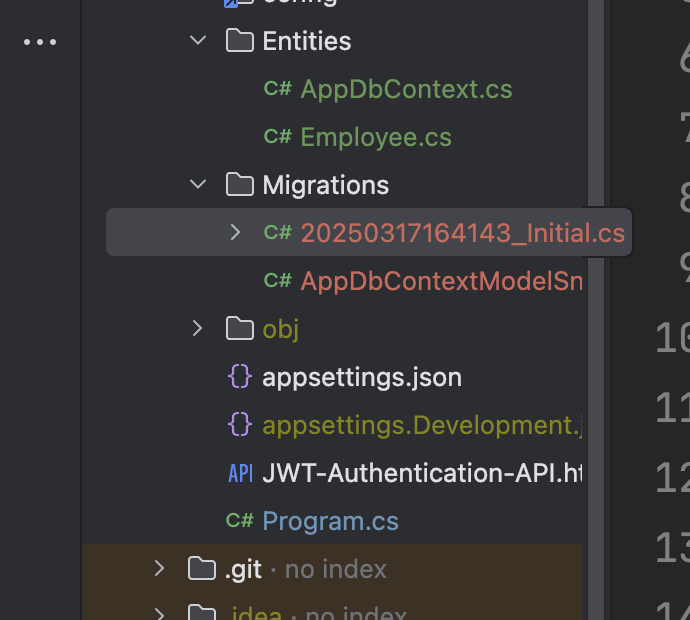
會在下方看到 EF Core 建立 Migration 的結果,如果沒有錯誤訊息(如下),就是成功了

成功後會看到專案下出現了 Migration 的目錄,並且出現兩個檔案,是紀錄資料模型的變更,每更新一次模型,就會再多出兩個檔,其中一個檔案會以「timestamp_MigrationName」命名
更新資料庫
接下來要將變更的模型,對映到資料庫,以產生實際的資料表
在專案右鍵 → Entity Framework Core → Update Database
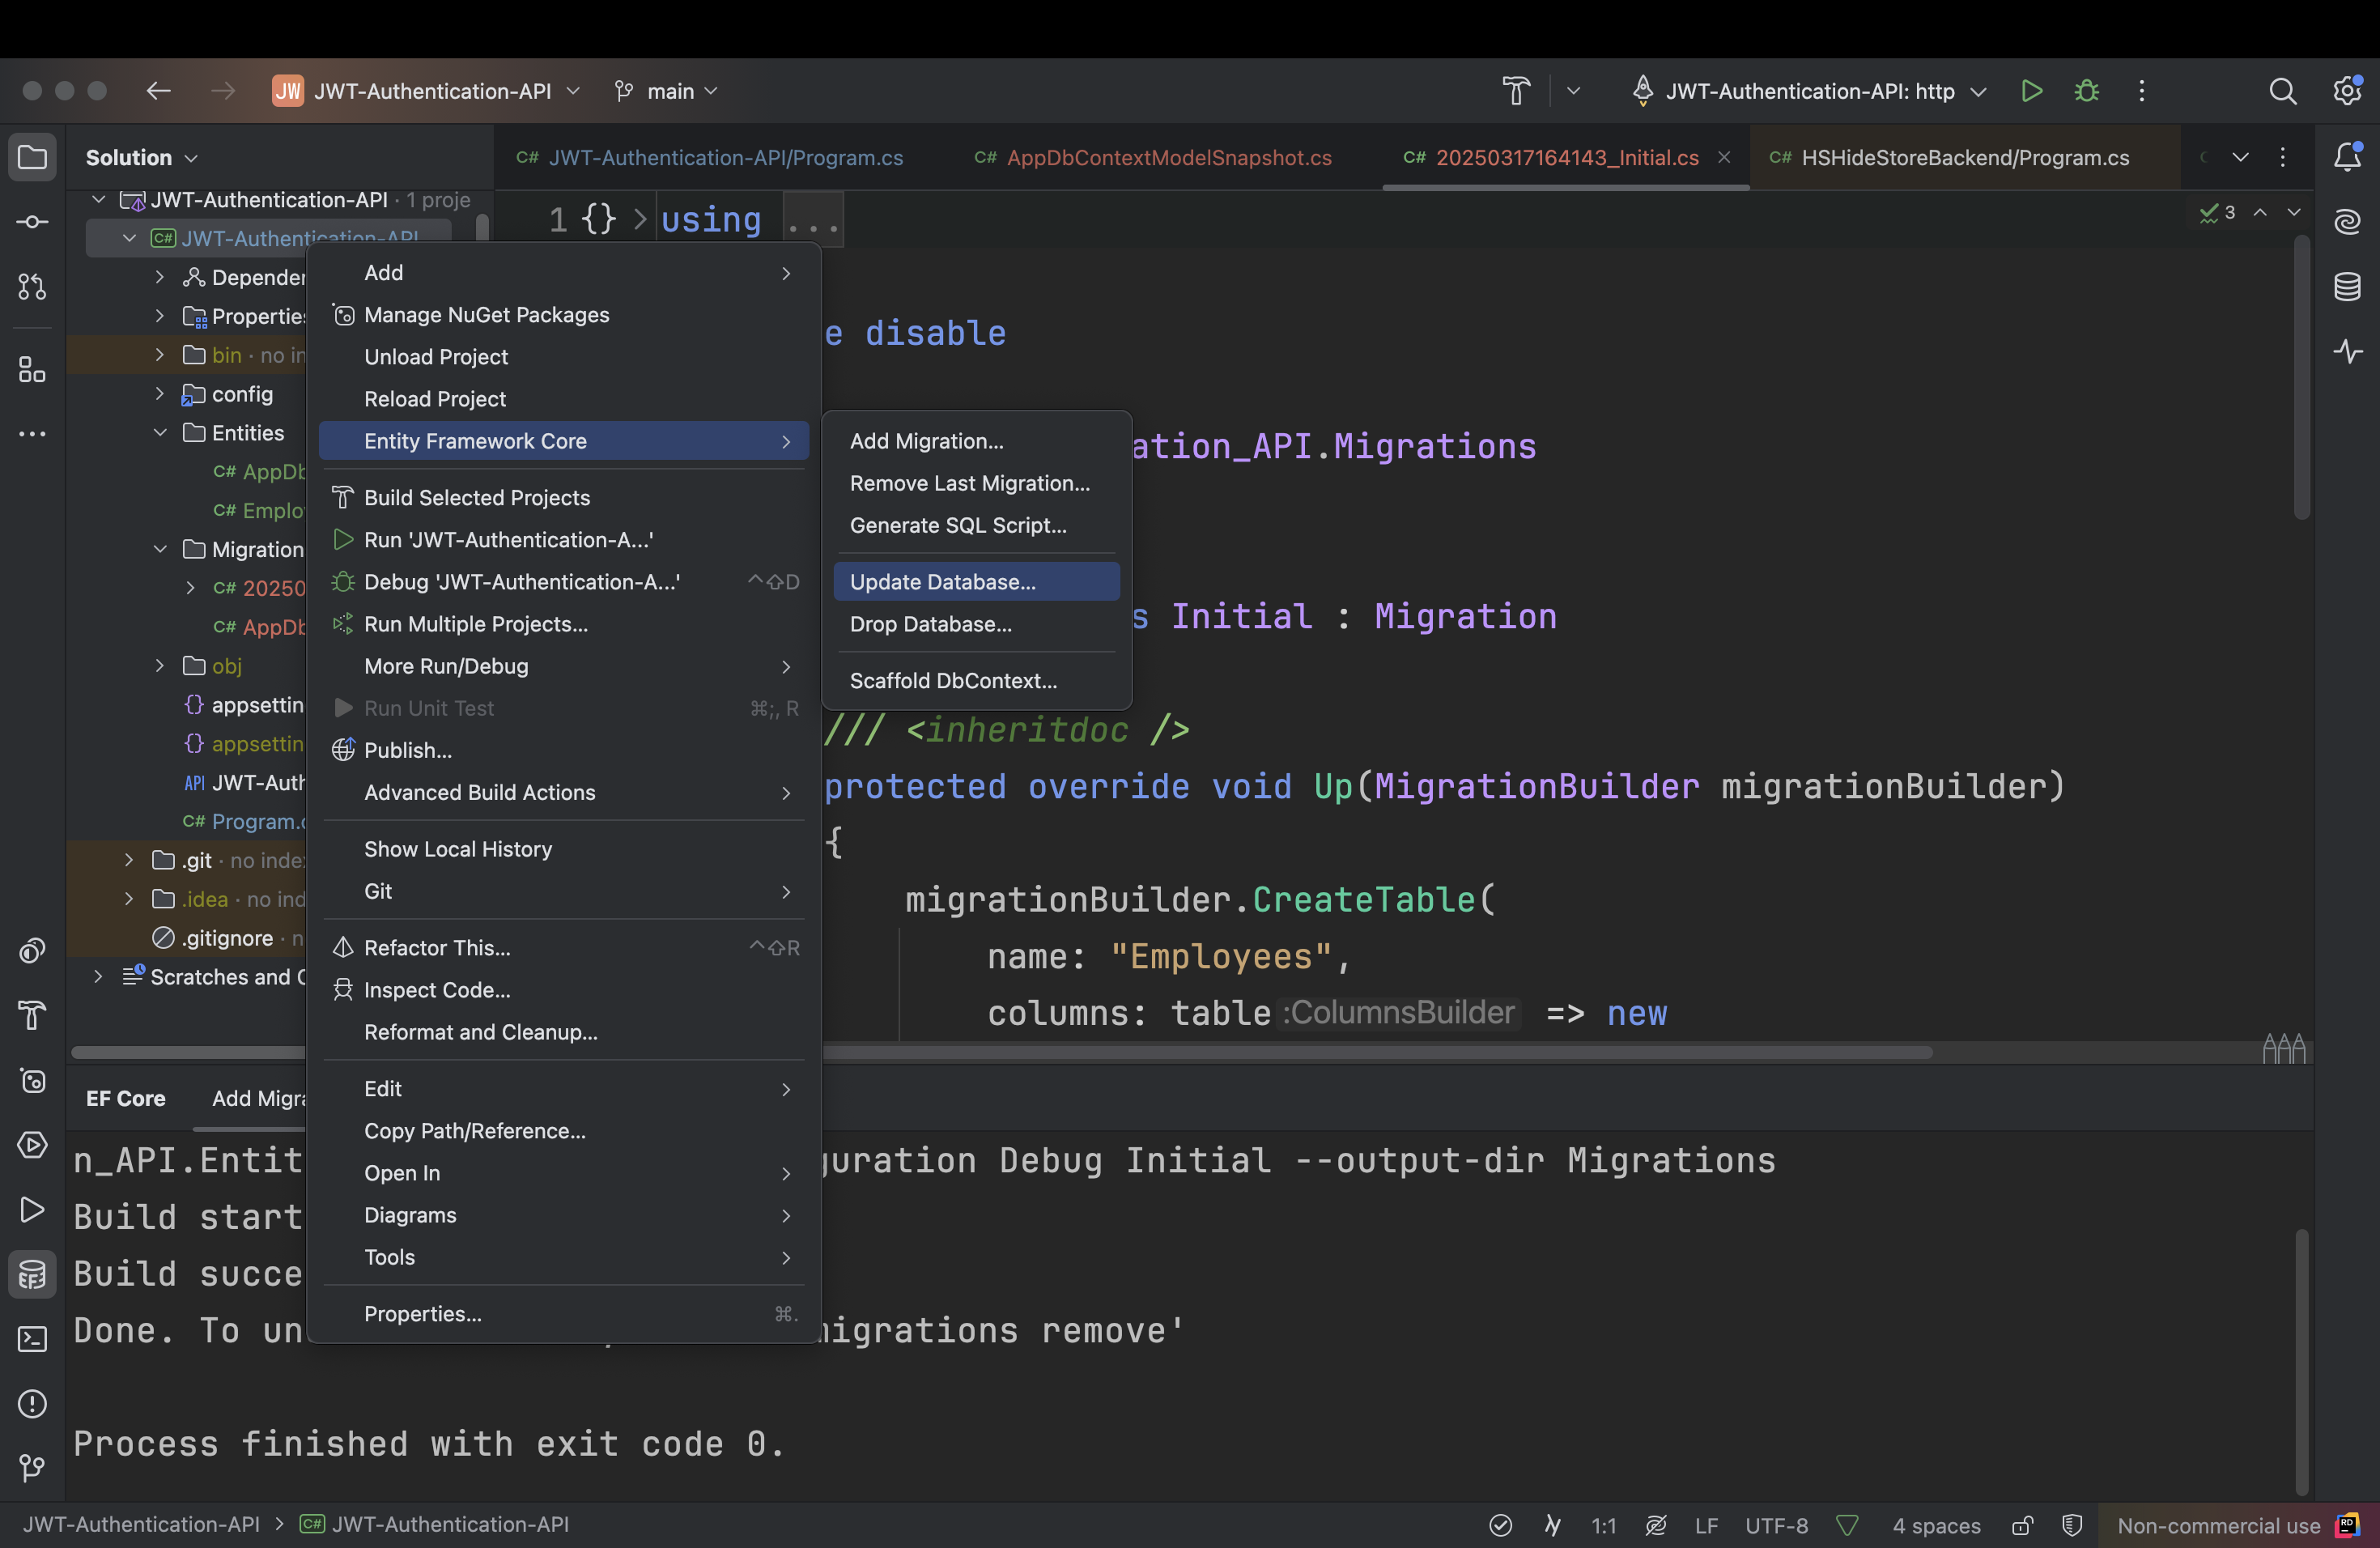
出現更新對話框,Target migration,要設成上面產生的 migration 檔,確認後按下 OK
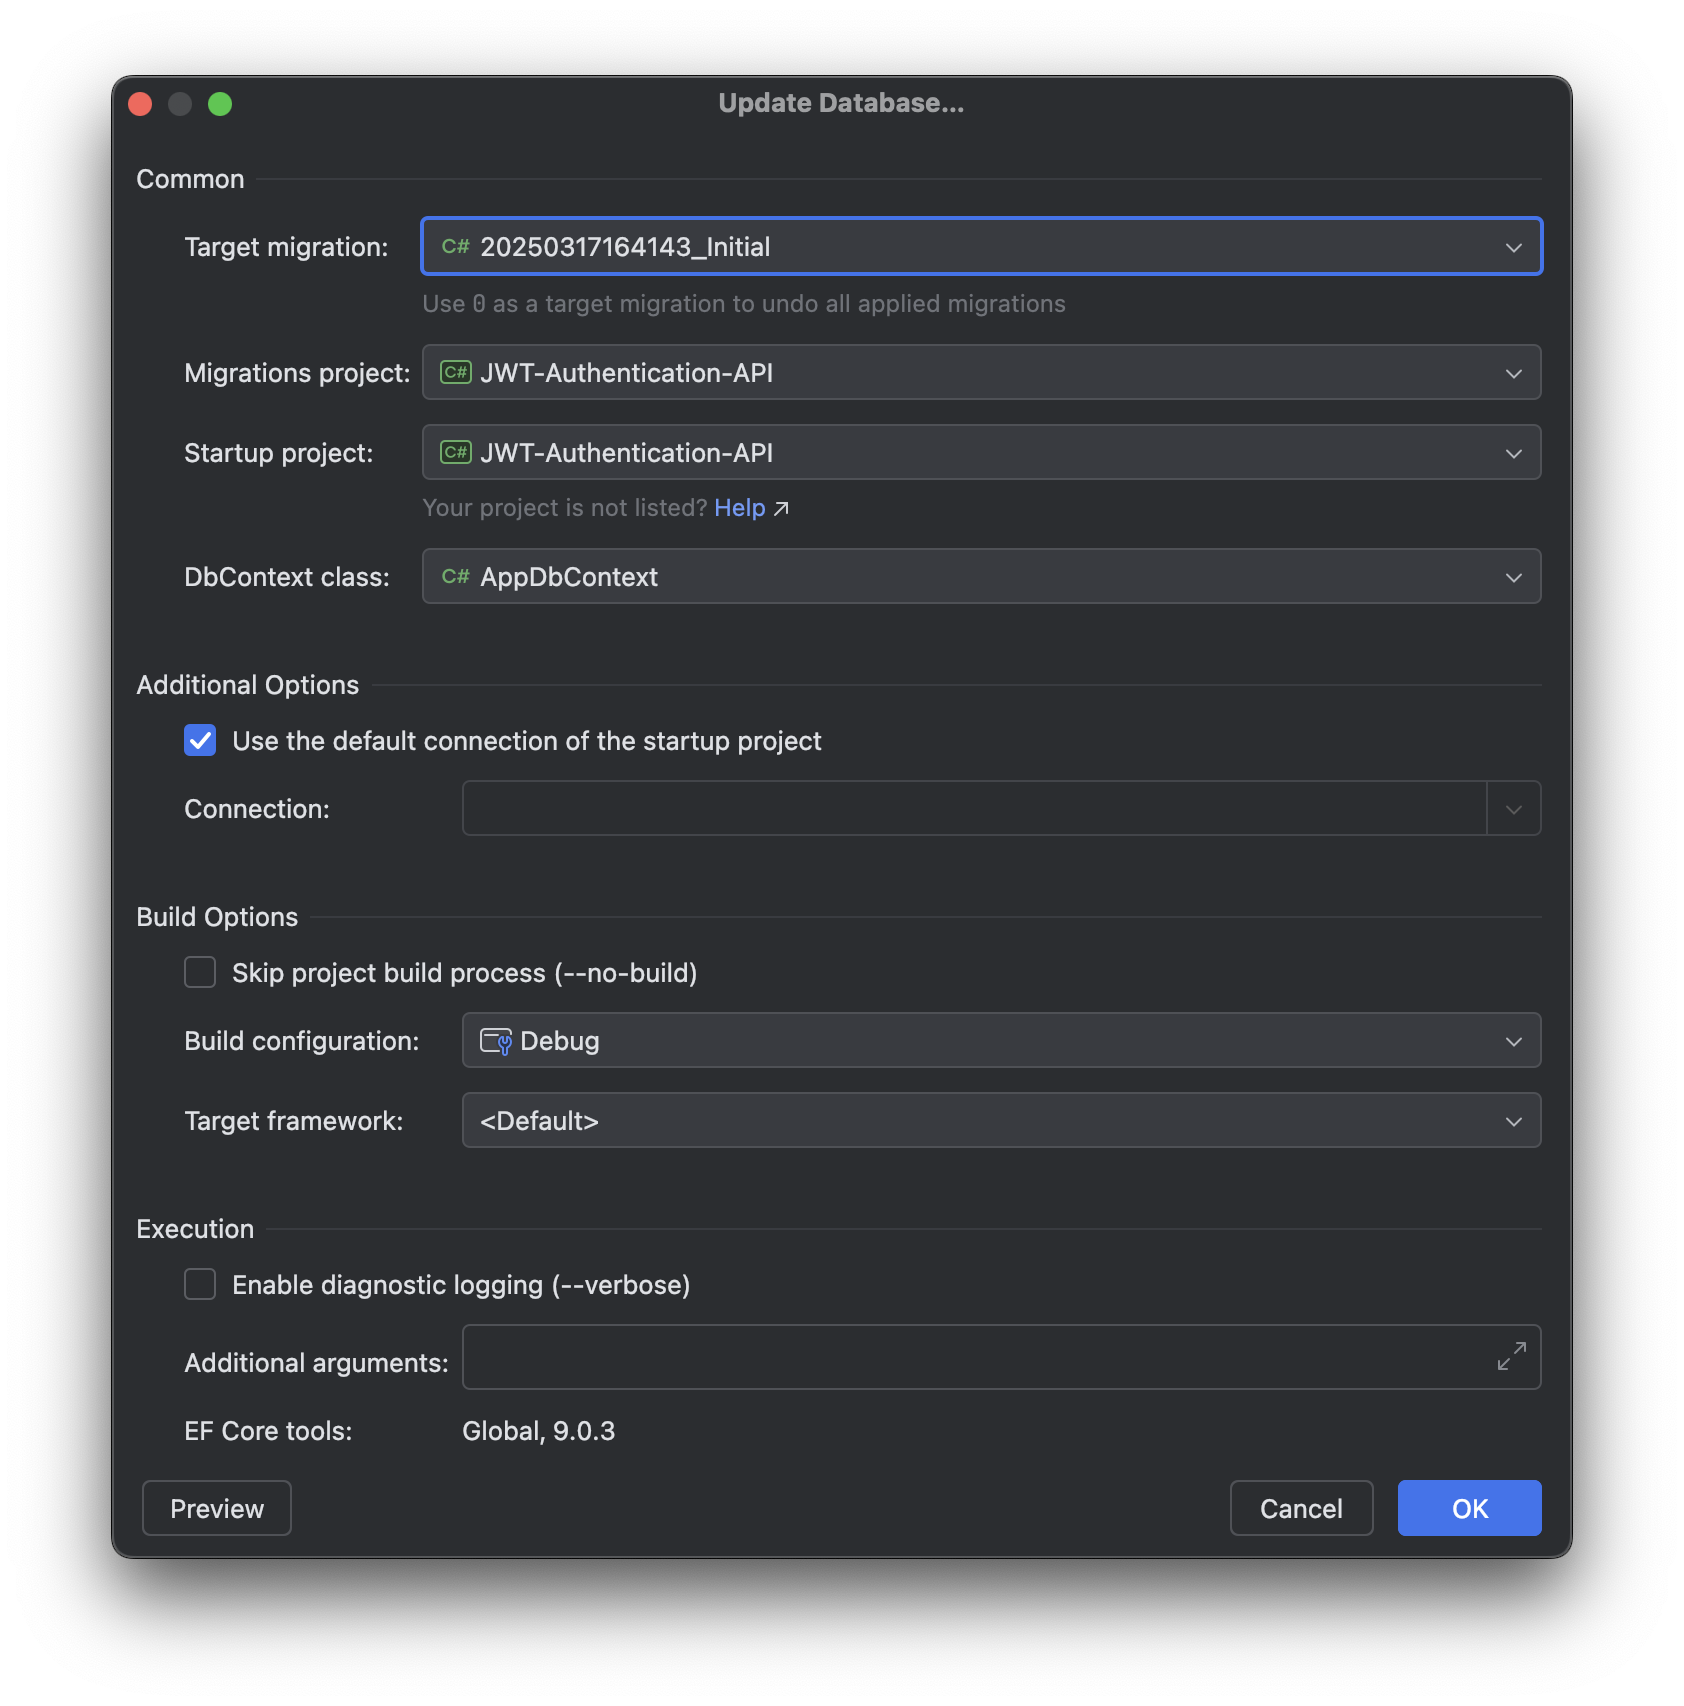
會在下方 EF Core 的視窗中看到執行更新資料庫的過程及執行的 SQL 語法,如果沒有看到錯誤訊息,就是成功了

驗證資料庫
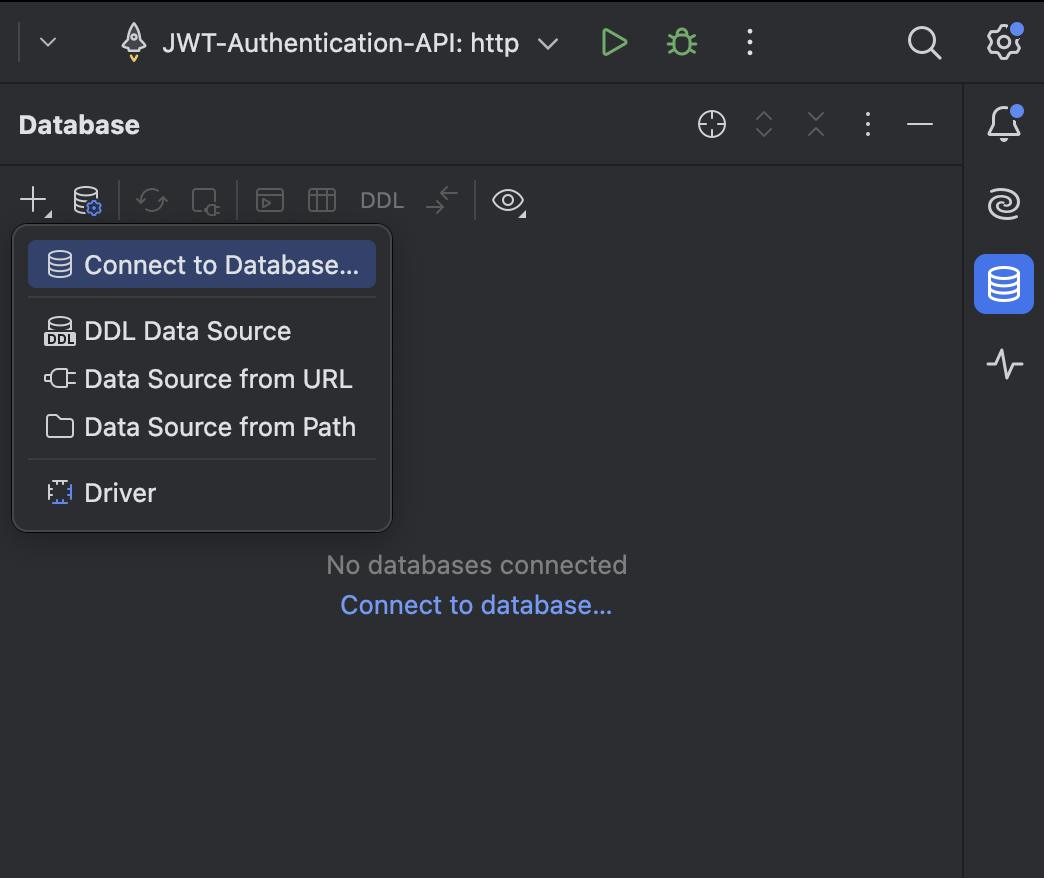
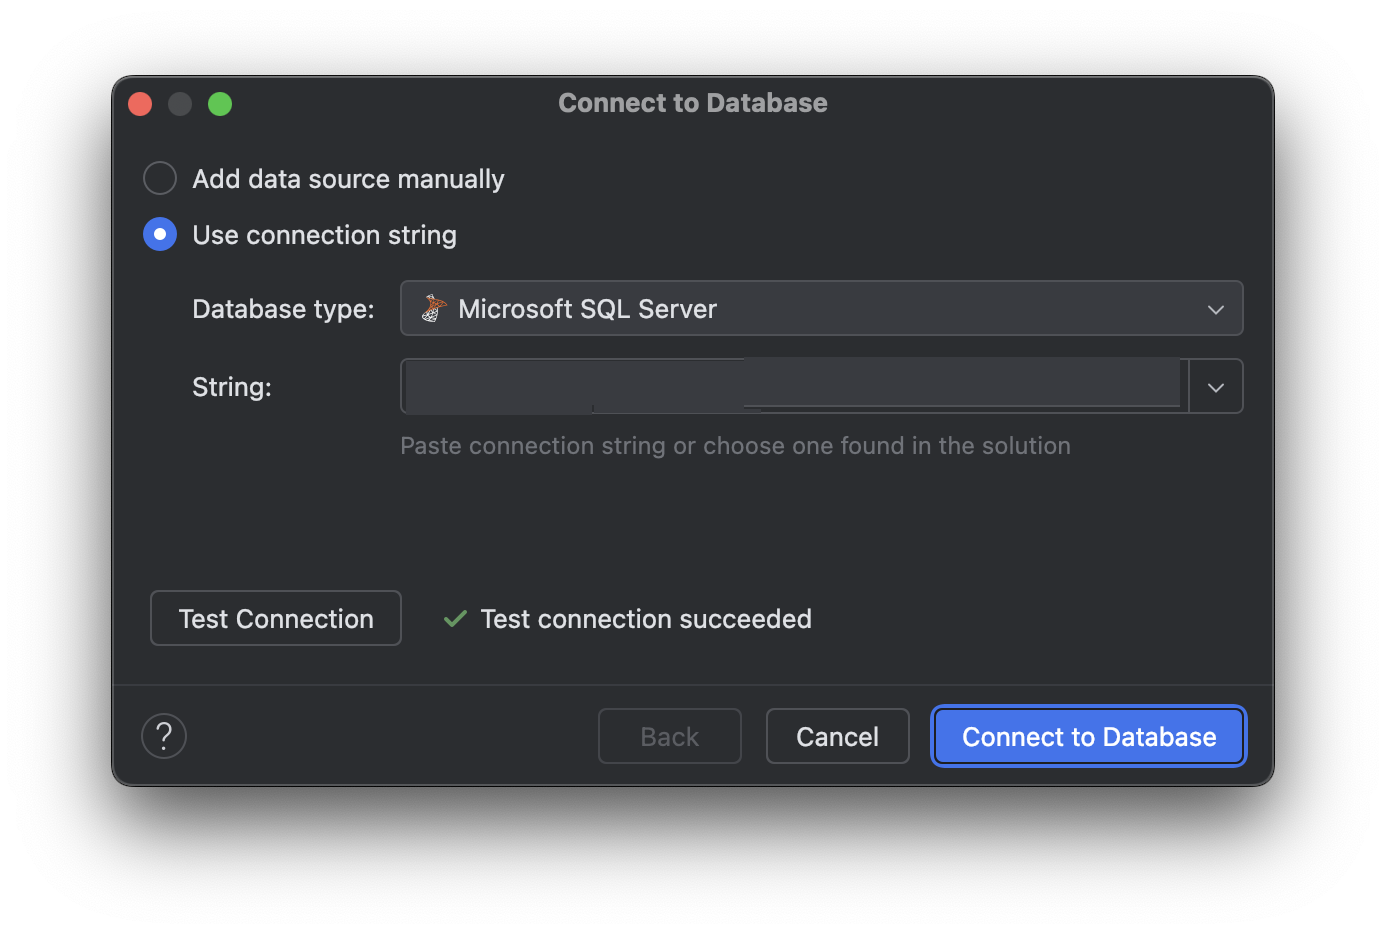
Rider 提供了一個資料庫的圖型介面,讓我們可以確認資料庫的內容,在最右邊會看到一個資料庫的 icon,點擊後有一個「+」,選擇 Connect to Database
出現對話框後,選擇「use connection string」,將 建立實體資料庫 中的連線字串值(AppDB 不用)複製並貼上
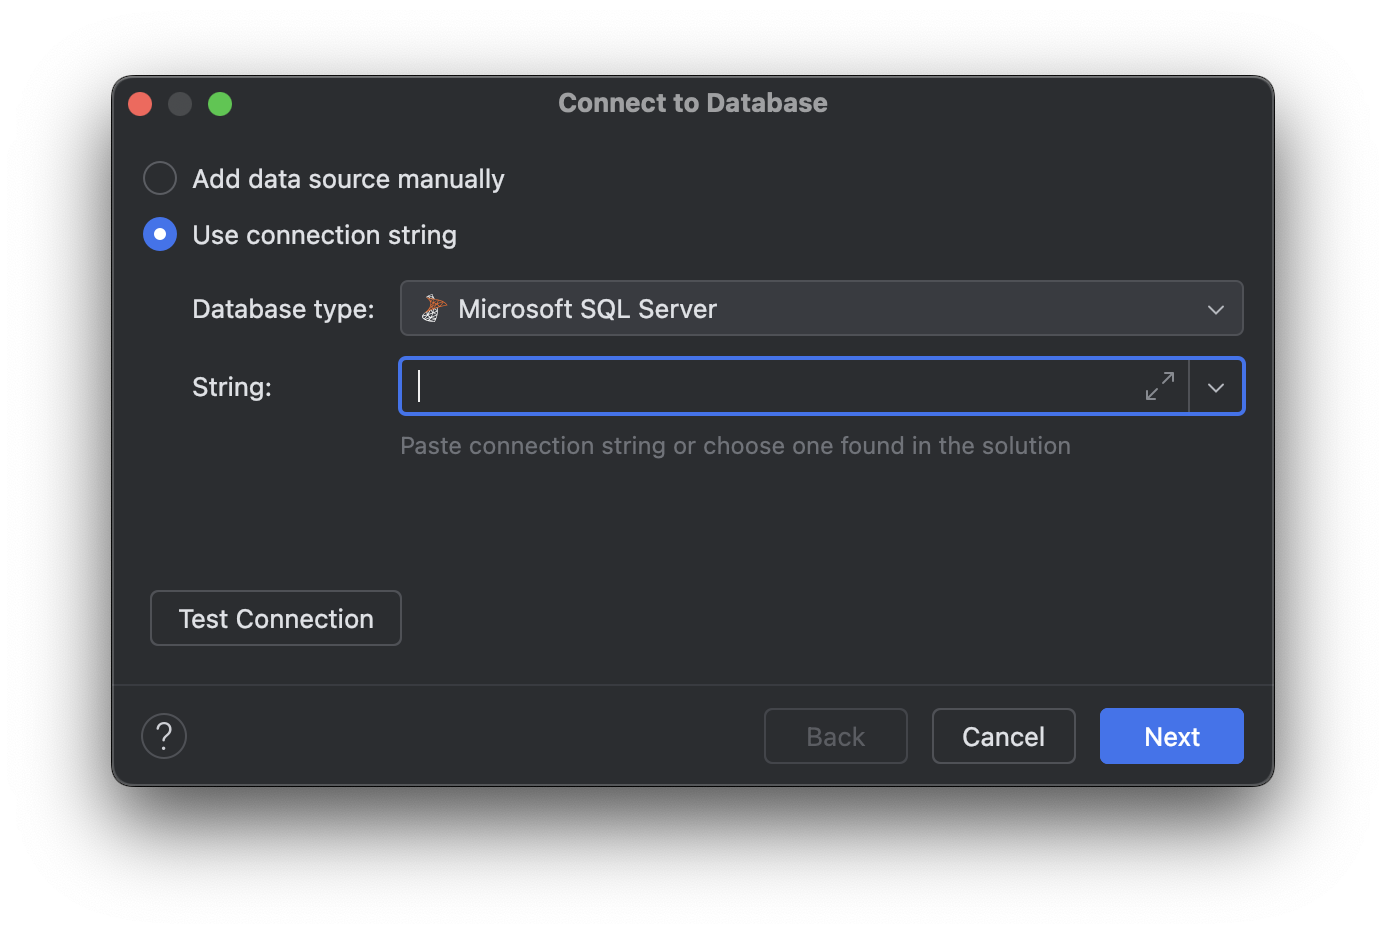
貼上後等它跑一下,會出現 Test Connection,可以測試連線字串正確性,但一般來說,在貼上的時候,Rider 就會自動幫你測試了,確認無誤後可以按下「Connect to Database」連線到資料庫
就可以順利看到資料庫了
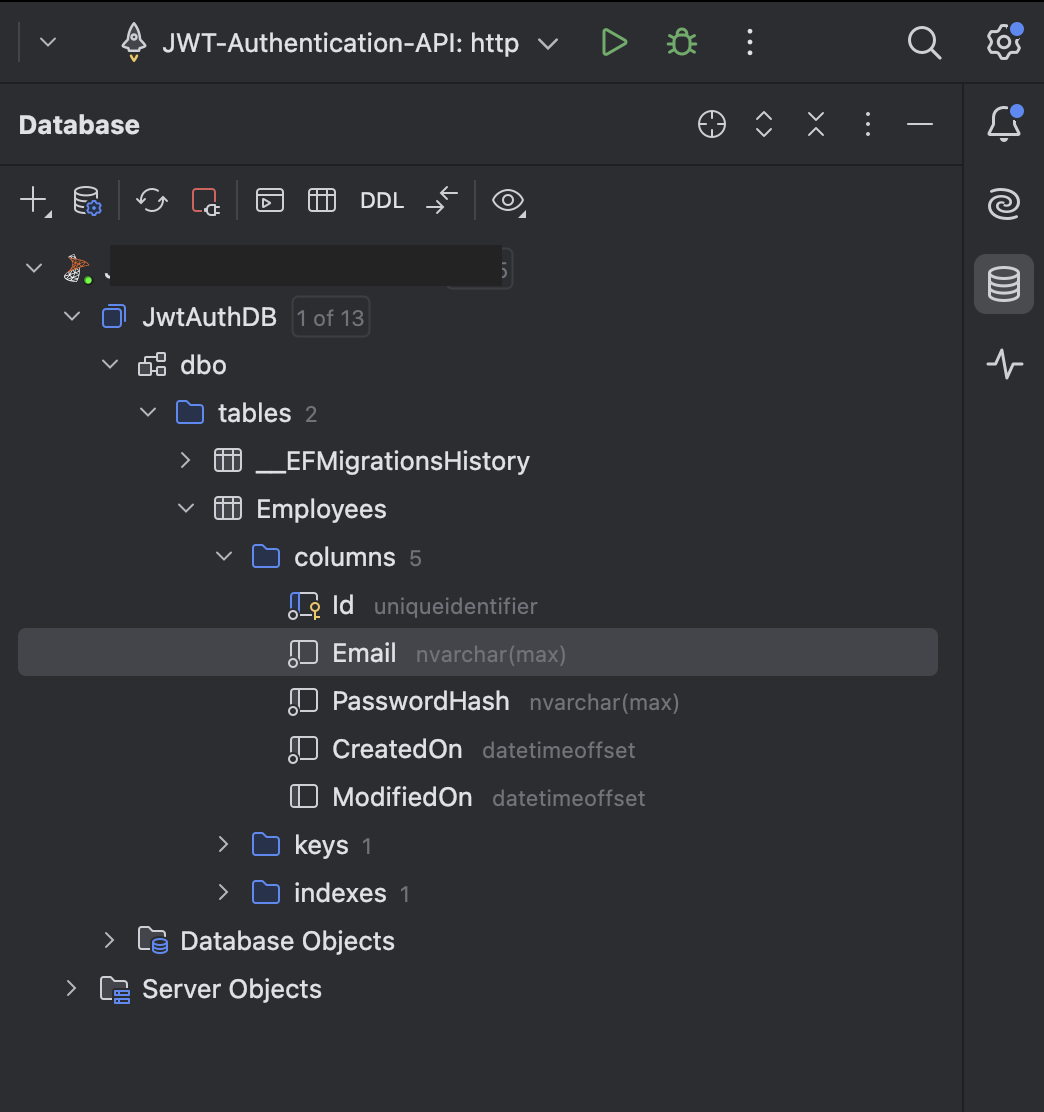
資料庫建立完成後,就可以開始實作「註冊」、「登入」、「登出」功能了
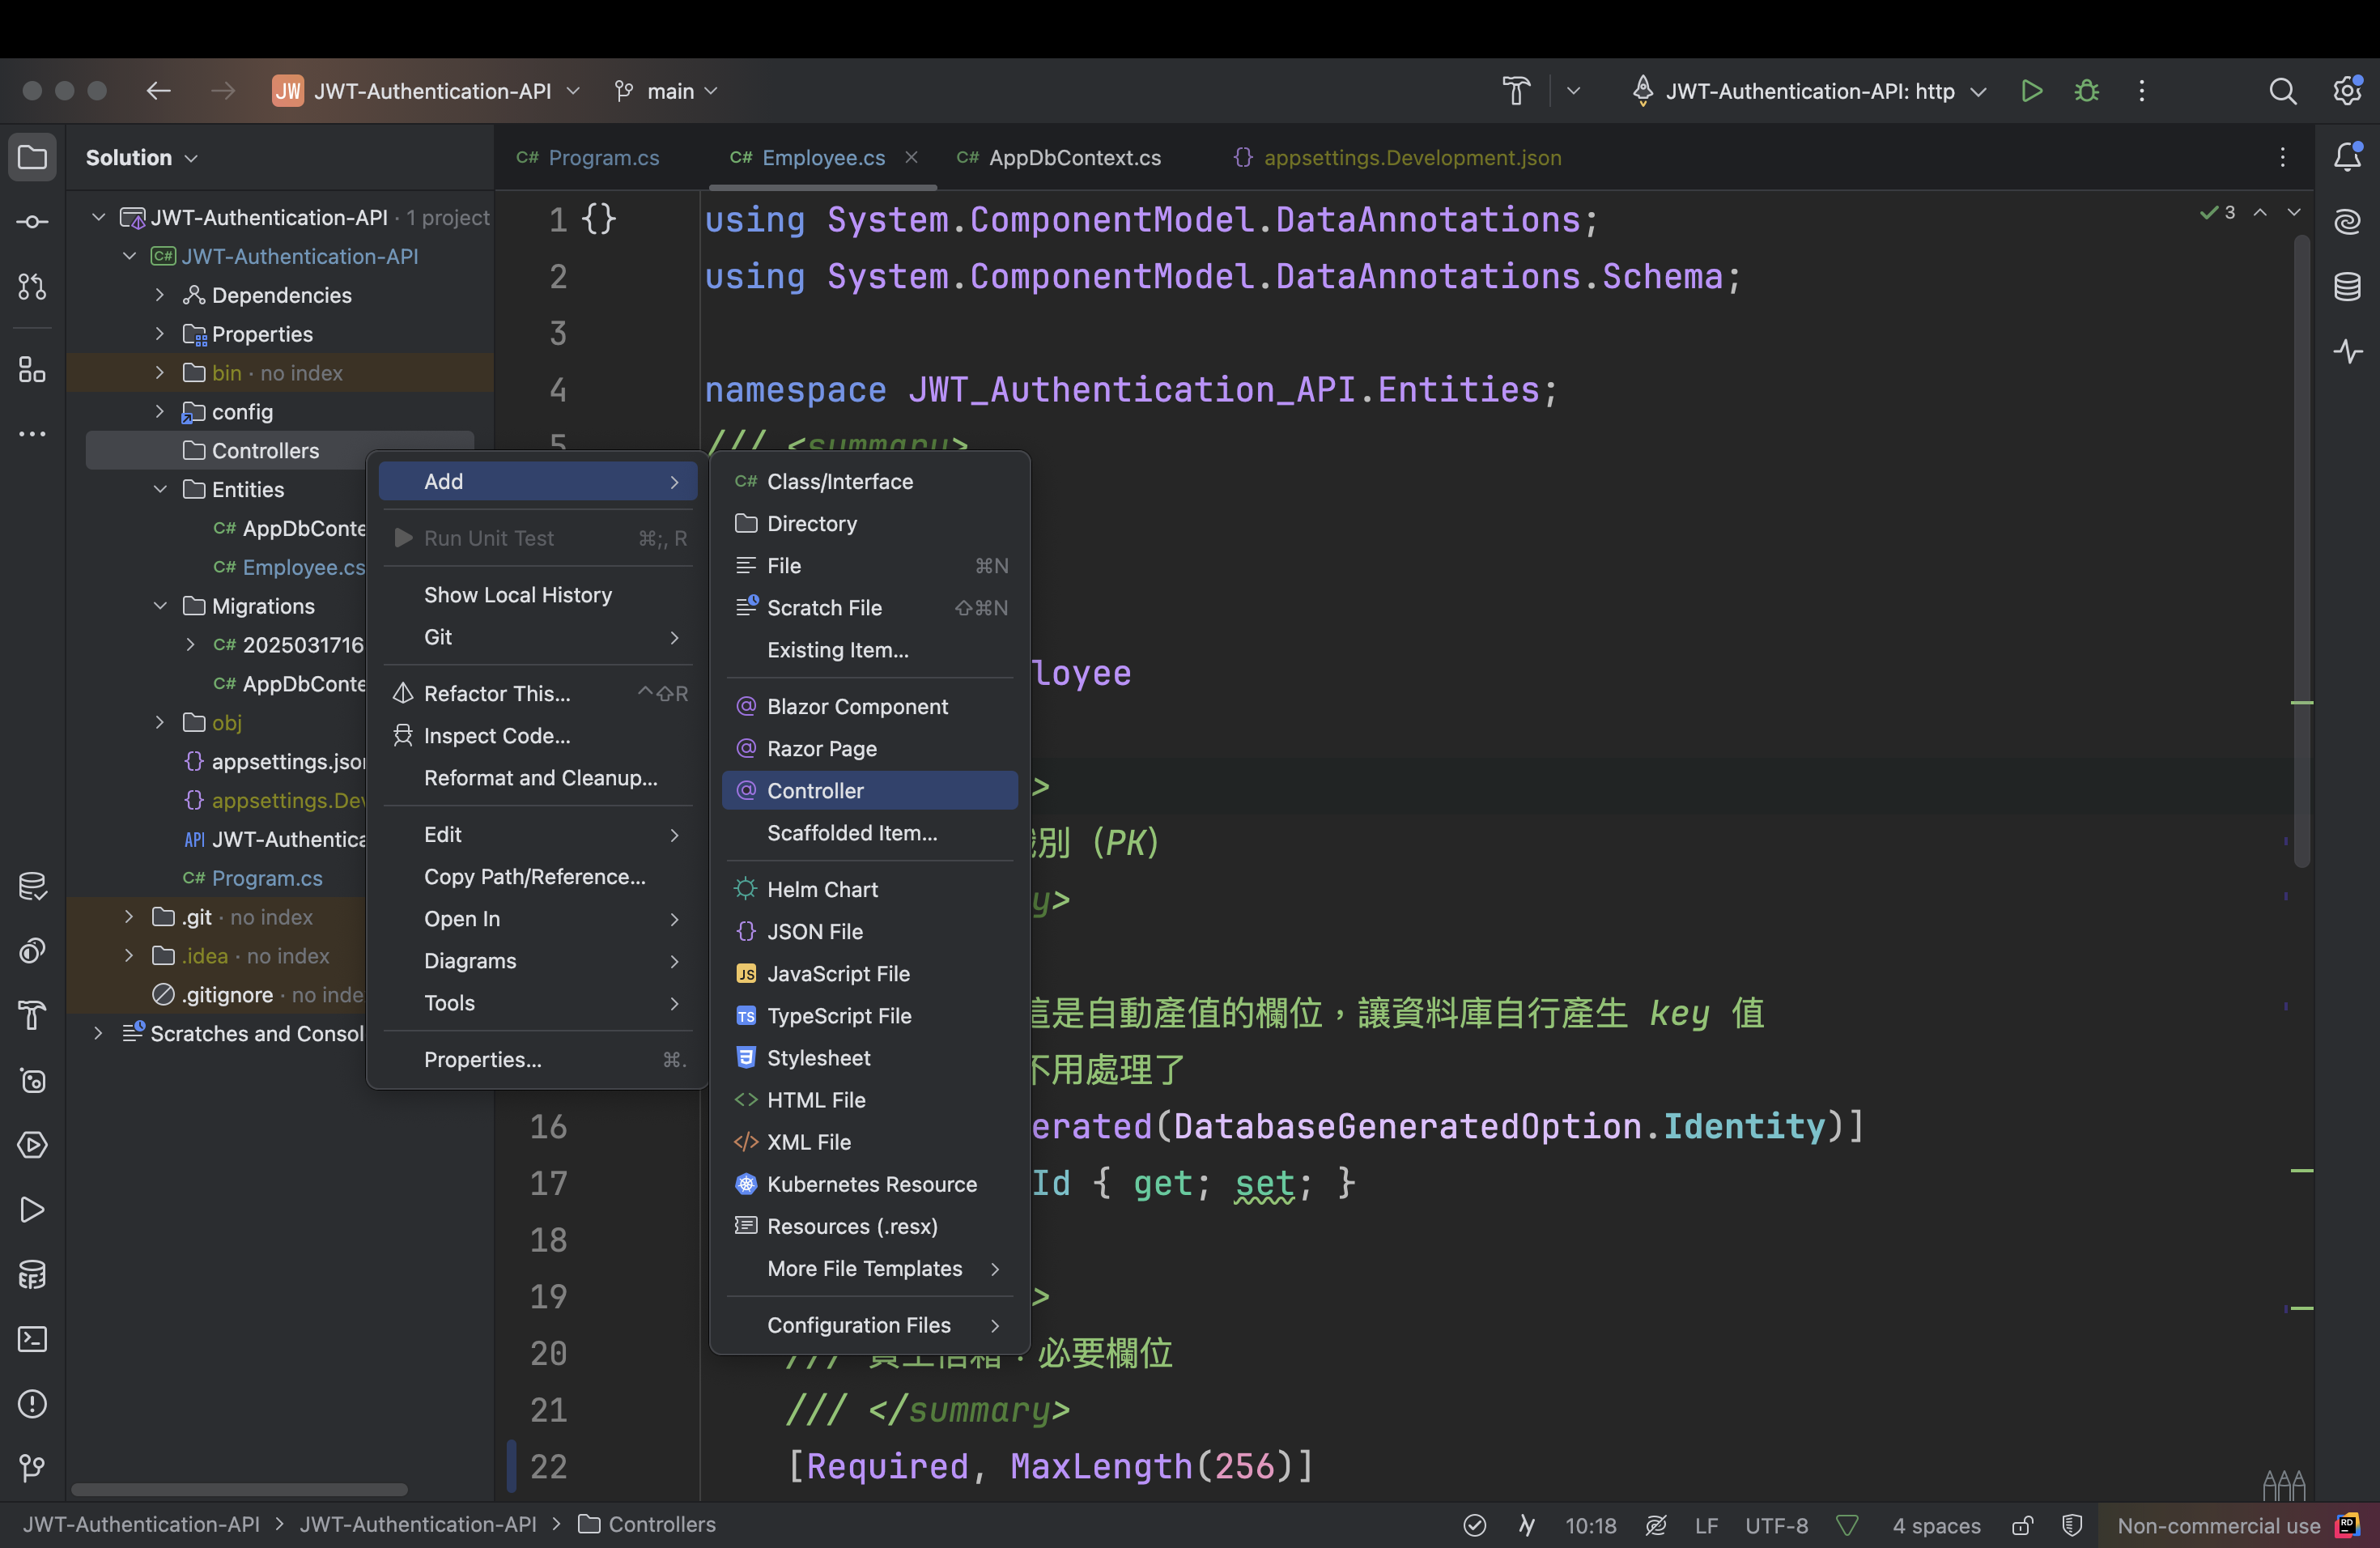
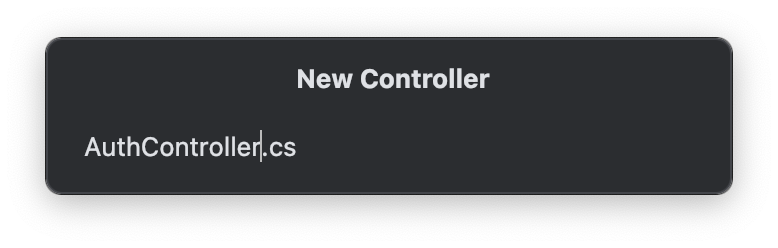
AuthController
首先新增一個 Controllers 目錄,在目錄中再新增 AuthController.cs 作為所有驗證行為的端點
新增完成後,將下 AuthController.cs 預設的方法刪掉,並宣告成 ApiController 如下
 1
 2
 3
 4
 5
 6
 7
 8
 9
10
11
12
| using Microsoft.AspNetCore.Mvc;
namespace JWT_Authentication_API.Controllers;
/// <summary>
/// 將 AuthController 宣告成為 ApiController
/// 並定義路由規則(網址)=> domain/api/auth
/// </summary>
[ApiController, Route("api/[controller]")]
public class AuthController : Controller
{
}
|
- ApiController:將目標控制器宣告成 API 控制器
- Route:定義路由規則,[controller] 會變成目標控制器的名字,最後與 domain 組合成 API 網址
註冊
在 AuthController.cs 中新增註冊方法 register,並且使用 HttpPost 方式呼叫,其中參數 “register” 是路由的一部分,會加在網址的最後,有寫過 ASP.NET NVC 的話,很像傳統 MVC 的路由機制 Controller/Action,所以這個 [HttpPost(“register”)] 最後會變成 domain/api/auth/register 這個網址
1
2
3
4
5
| [HttpPost("register")]
public ActionResult Register()
{
}
|
RegisterDto
接著需要一個 model 來負責接收註冊資料,在根目錄下新增 Models 目錄,在目錄下新增 RegisterDto.cs
如果有寫過 ASP.NET MVC 的話,也可以把它想像成是 ViewModels,不過因為 Api 沒有 View 的部分,我怕混淆所以改放在 Models
 1
 2
 3
 4
 5
 6
 7
 8
 9
10
11
12
13
14
15
16
| namespace JWT_Authentication_API.Models;
/// <summary>
/// 註冊使用的資料模型
/// </summary>
public class RegisterDto
{
/// <summary>
/// 使用者帳號
/// </summary>
public string Email { get; set; } = string.Empty;
/// <summary>
/// 使用者密碼(未加密)
/// </summary>
public string Password { get; set; } = string.Empty;
}
|
Register with HttpPost
回到 AuthController.cs 補上註冊方法的程式碼如下,說明如註解
 1
 2
 3
 4
 5
 6
 7
 8
 9
10
11
12
13
14
15
16
17
18
19
20
21
22
| /// <summary>
/// 註冊 API
/// </summary>
/// <param name="registerDto"> 使用者傳送的員工註冊資料 </param>
/// <returns> 註冊完成的員工資料 </returns>
[HttpPost("register")]
public ActionResult Register(RegisterDto registerDto)
{
// 驗證註冊資料
if (string.IsNullOrEmpty(registerDto.Email)
|| string.IsNullOrEmpty(registerDto.Password))
return BadRequest("Please provide 'Email' and 'Password'");
// 建立員工資料
Employee employee = new() { Email = registerDto.Email };
// 將密碼加密
employee.PasswordHash = new PasswordHasher<Employee>()
.HashPassword(employee, registerDto.Password);
// 回傳建立完成的員工資料
return Ok(employee);
}
|
安裝 scalar
註冊方法完成後,為方便測試,需要安裝 scalar 套件,在 NuGet 中搜尋「scalar」找到「Scalar.AspNetCore」並安裝
在 Program.cs 進行 scalar 的服務注入,影片中使用的版本是 .NET 9 的版本配置方式,我的環境是 .NET 8 的版本,所以略有不同
可以參考 Scalar 基本設定 及 .NET 8 的 Scalar 設定方式
開啟 Program.cs,改寫如下,其中 if 區塊是原本就有的,只需要更改區塊內的內容
 1
 2
 3
 4
 5
 6
 7
 8
 9
10
11
12
13
14
15
16
17
18
19
20
21
22
23
24
25
26
27
28
29
| // Add services to the container.
// Learn more about configuring Swagger/OpenAPI at https://aka.ms/aspnetcore/swashbuckle
// 補上服務對控制器的注入
builder.Services.AddControllers();
#region Swagger Service
// Add Swagger service
builder.Services
.AddEndpointsApiExplorer()
.AddSwaggerGen();
#endregion
// Configure the HTTP request pipeline.
if (app.Environment.IsDevelopment())
{
// See https://github.com/scalar/scalar/blob/main/integrations/aspnetcore/README.md#usage
app.UseSwagger(options =>
options.RouteTemplate = "swagger/{documentName}/swagger.json"
);
// 因為要使用 scalar 的 UI,所以這邊將 Swagger UI 關閉
// app.UseSwaggerUI();
// See https://github.com/scalar/scalar/blob/main/documentation/integrations/dotnet.md#openapi-document-route
app.MapScalarApiReference(options =>
options.WithOpenApiRoutePattern("swagger/{documentName}/swagger.json"));
}
// 啟用控制器的 Route
app.MapControllers();
|
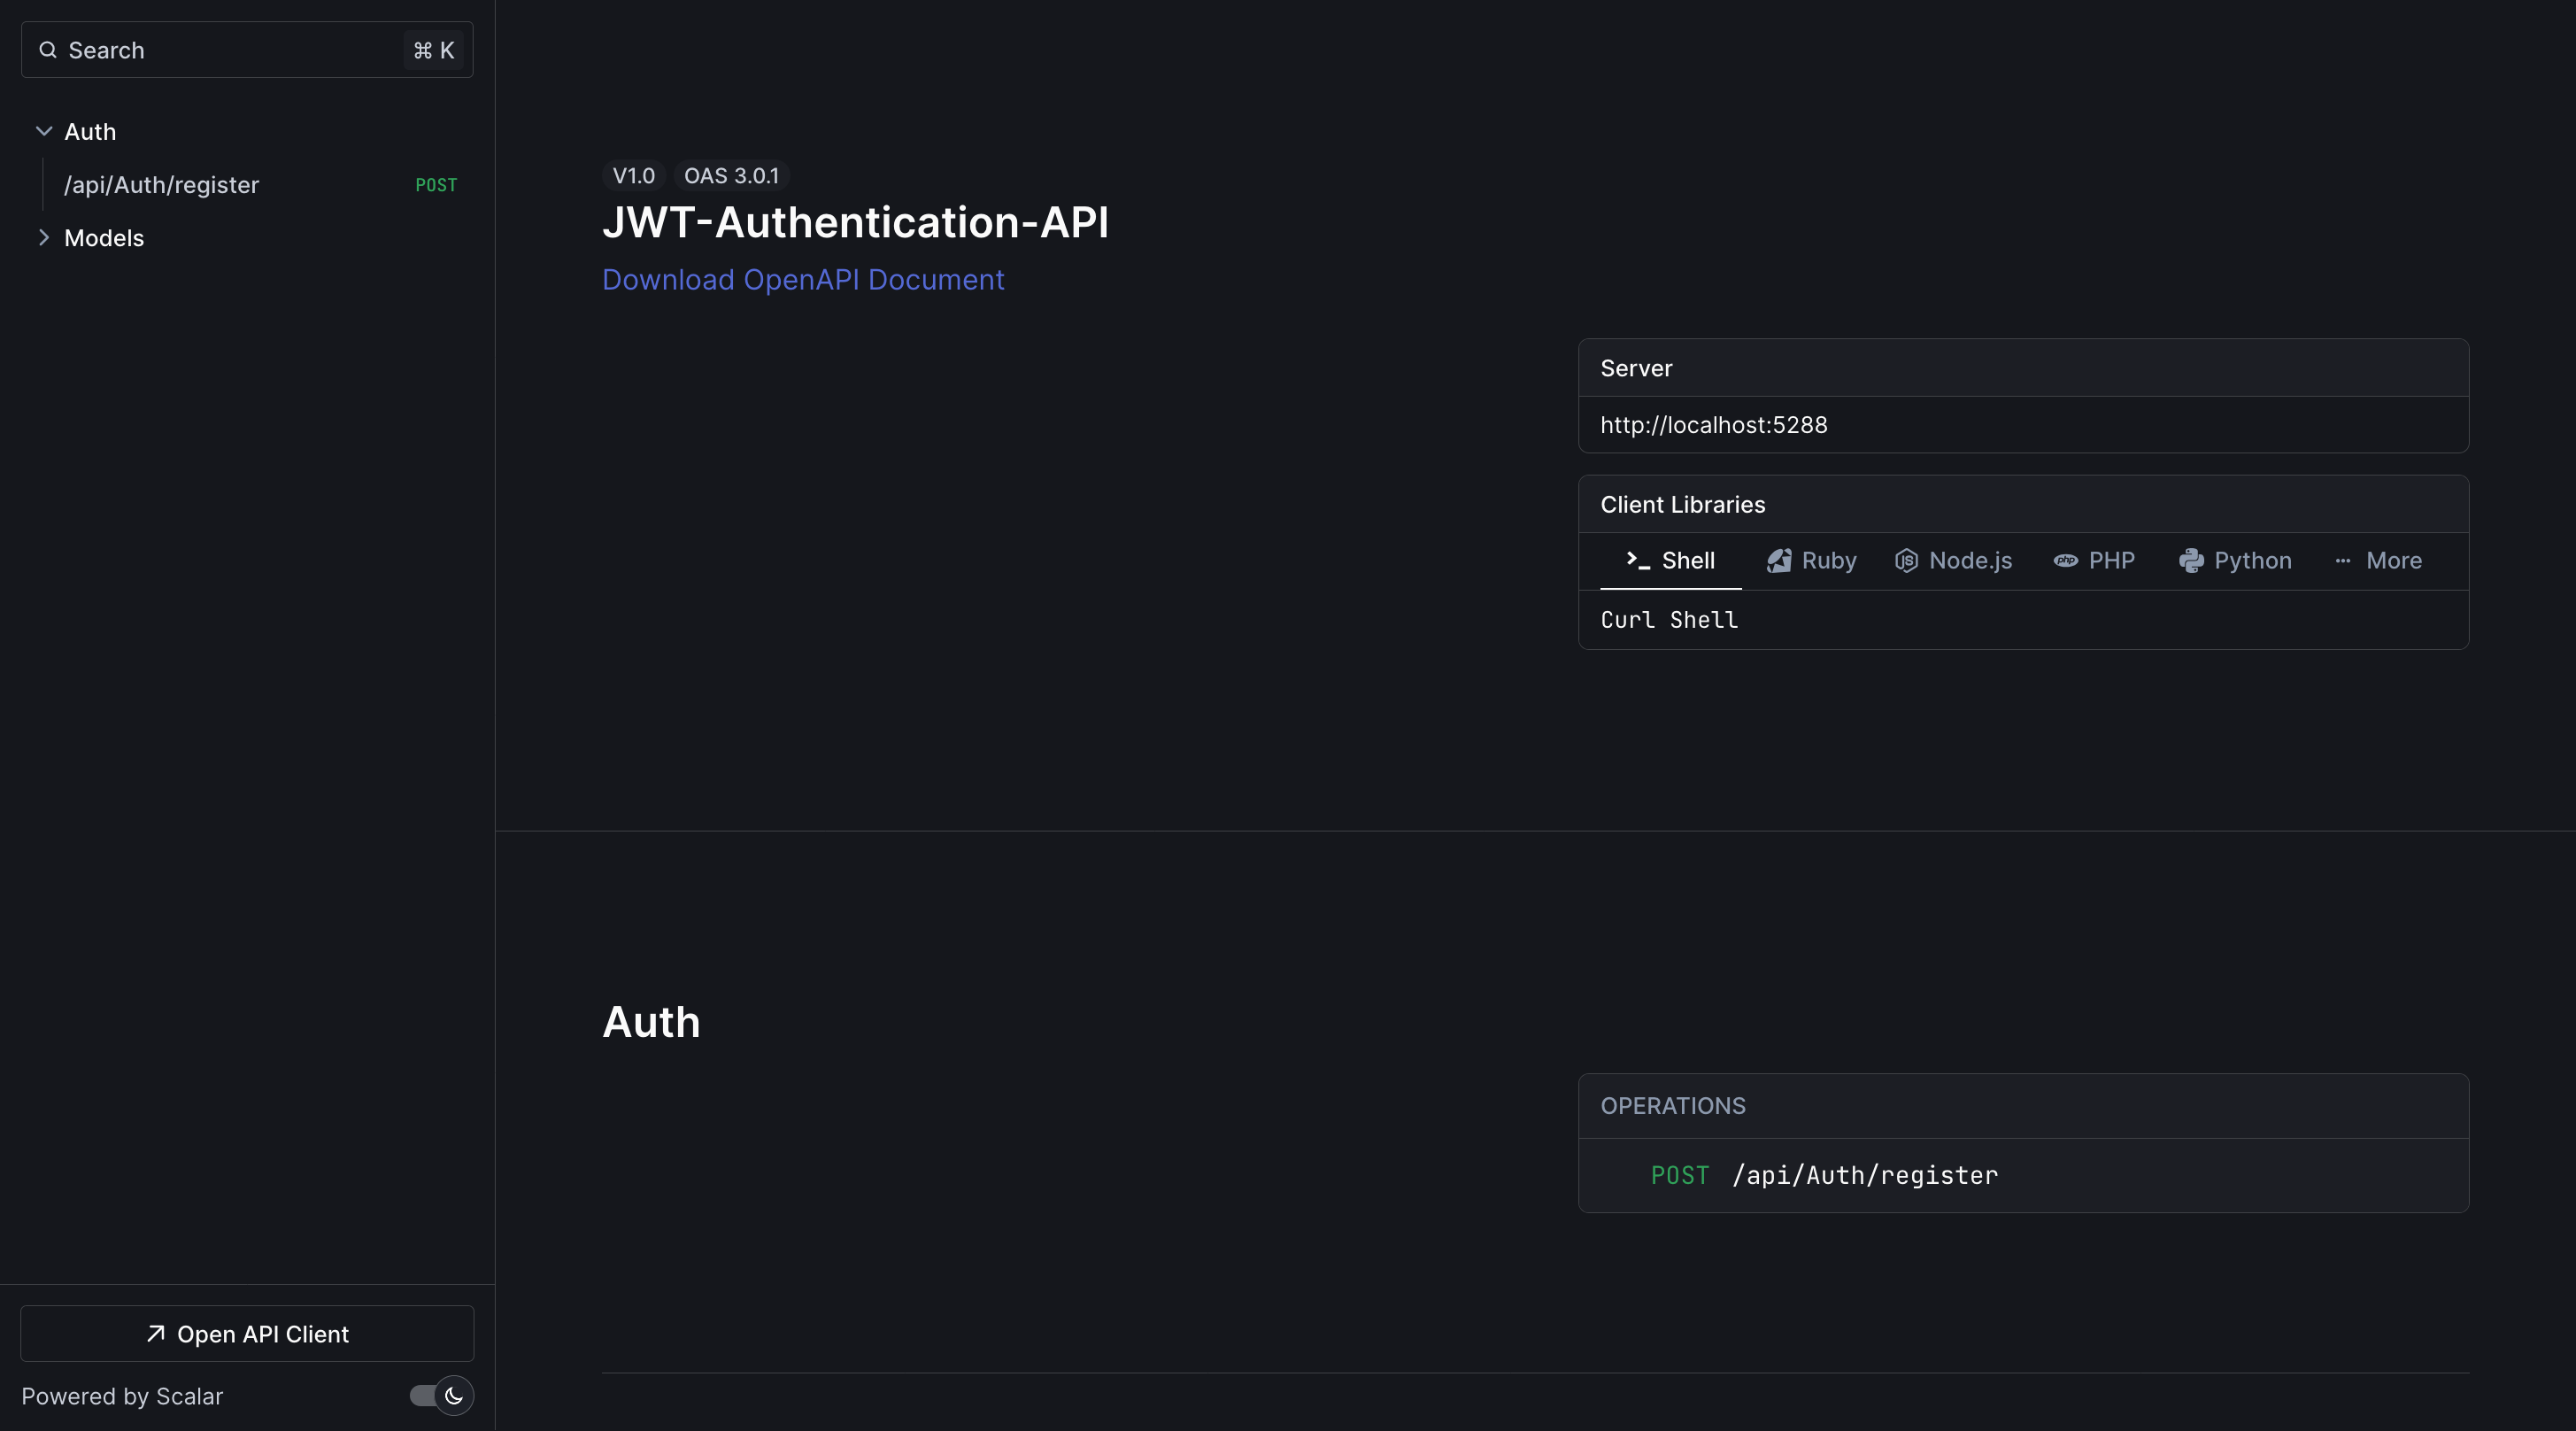
參考 建立專案 的執行方式執行網站,將網址改成 http://localhost:7274/scalar/v1,你的 port 可能跟我的不一樣
測試註冊
有兩種測試方式
- 執行後使用瀏覽器測試
- 使用 Postman 測試
瀏覽器測試
這裡先採用瀏覽測試的方法,在上面執行的網頁畫面,點 Auth 下面的 Api 網址,再按下「Test Request」
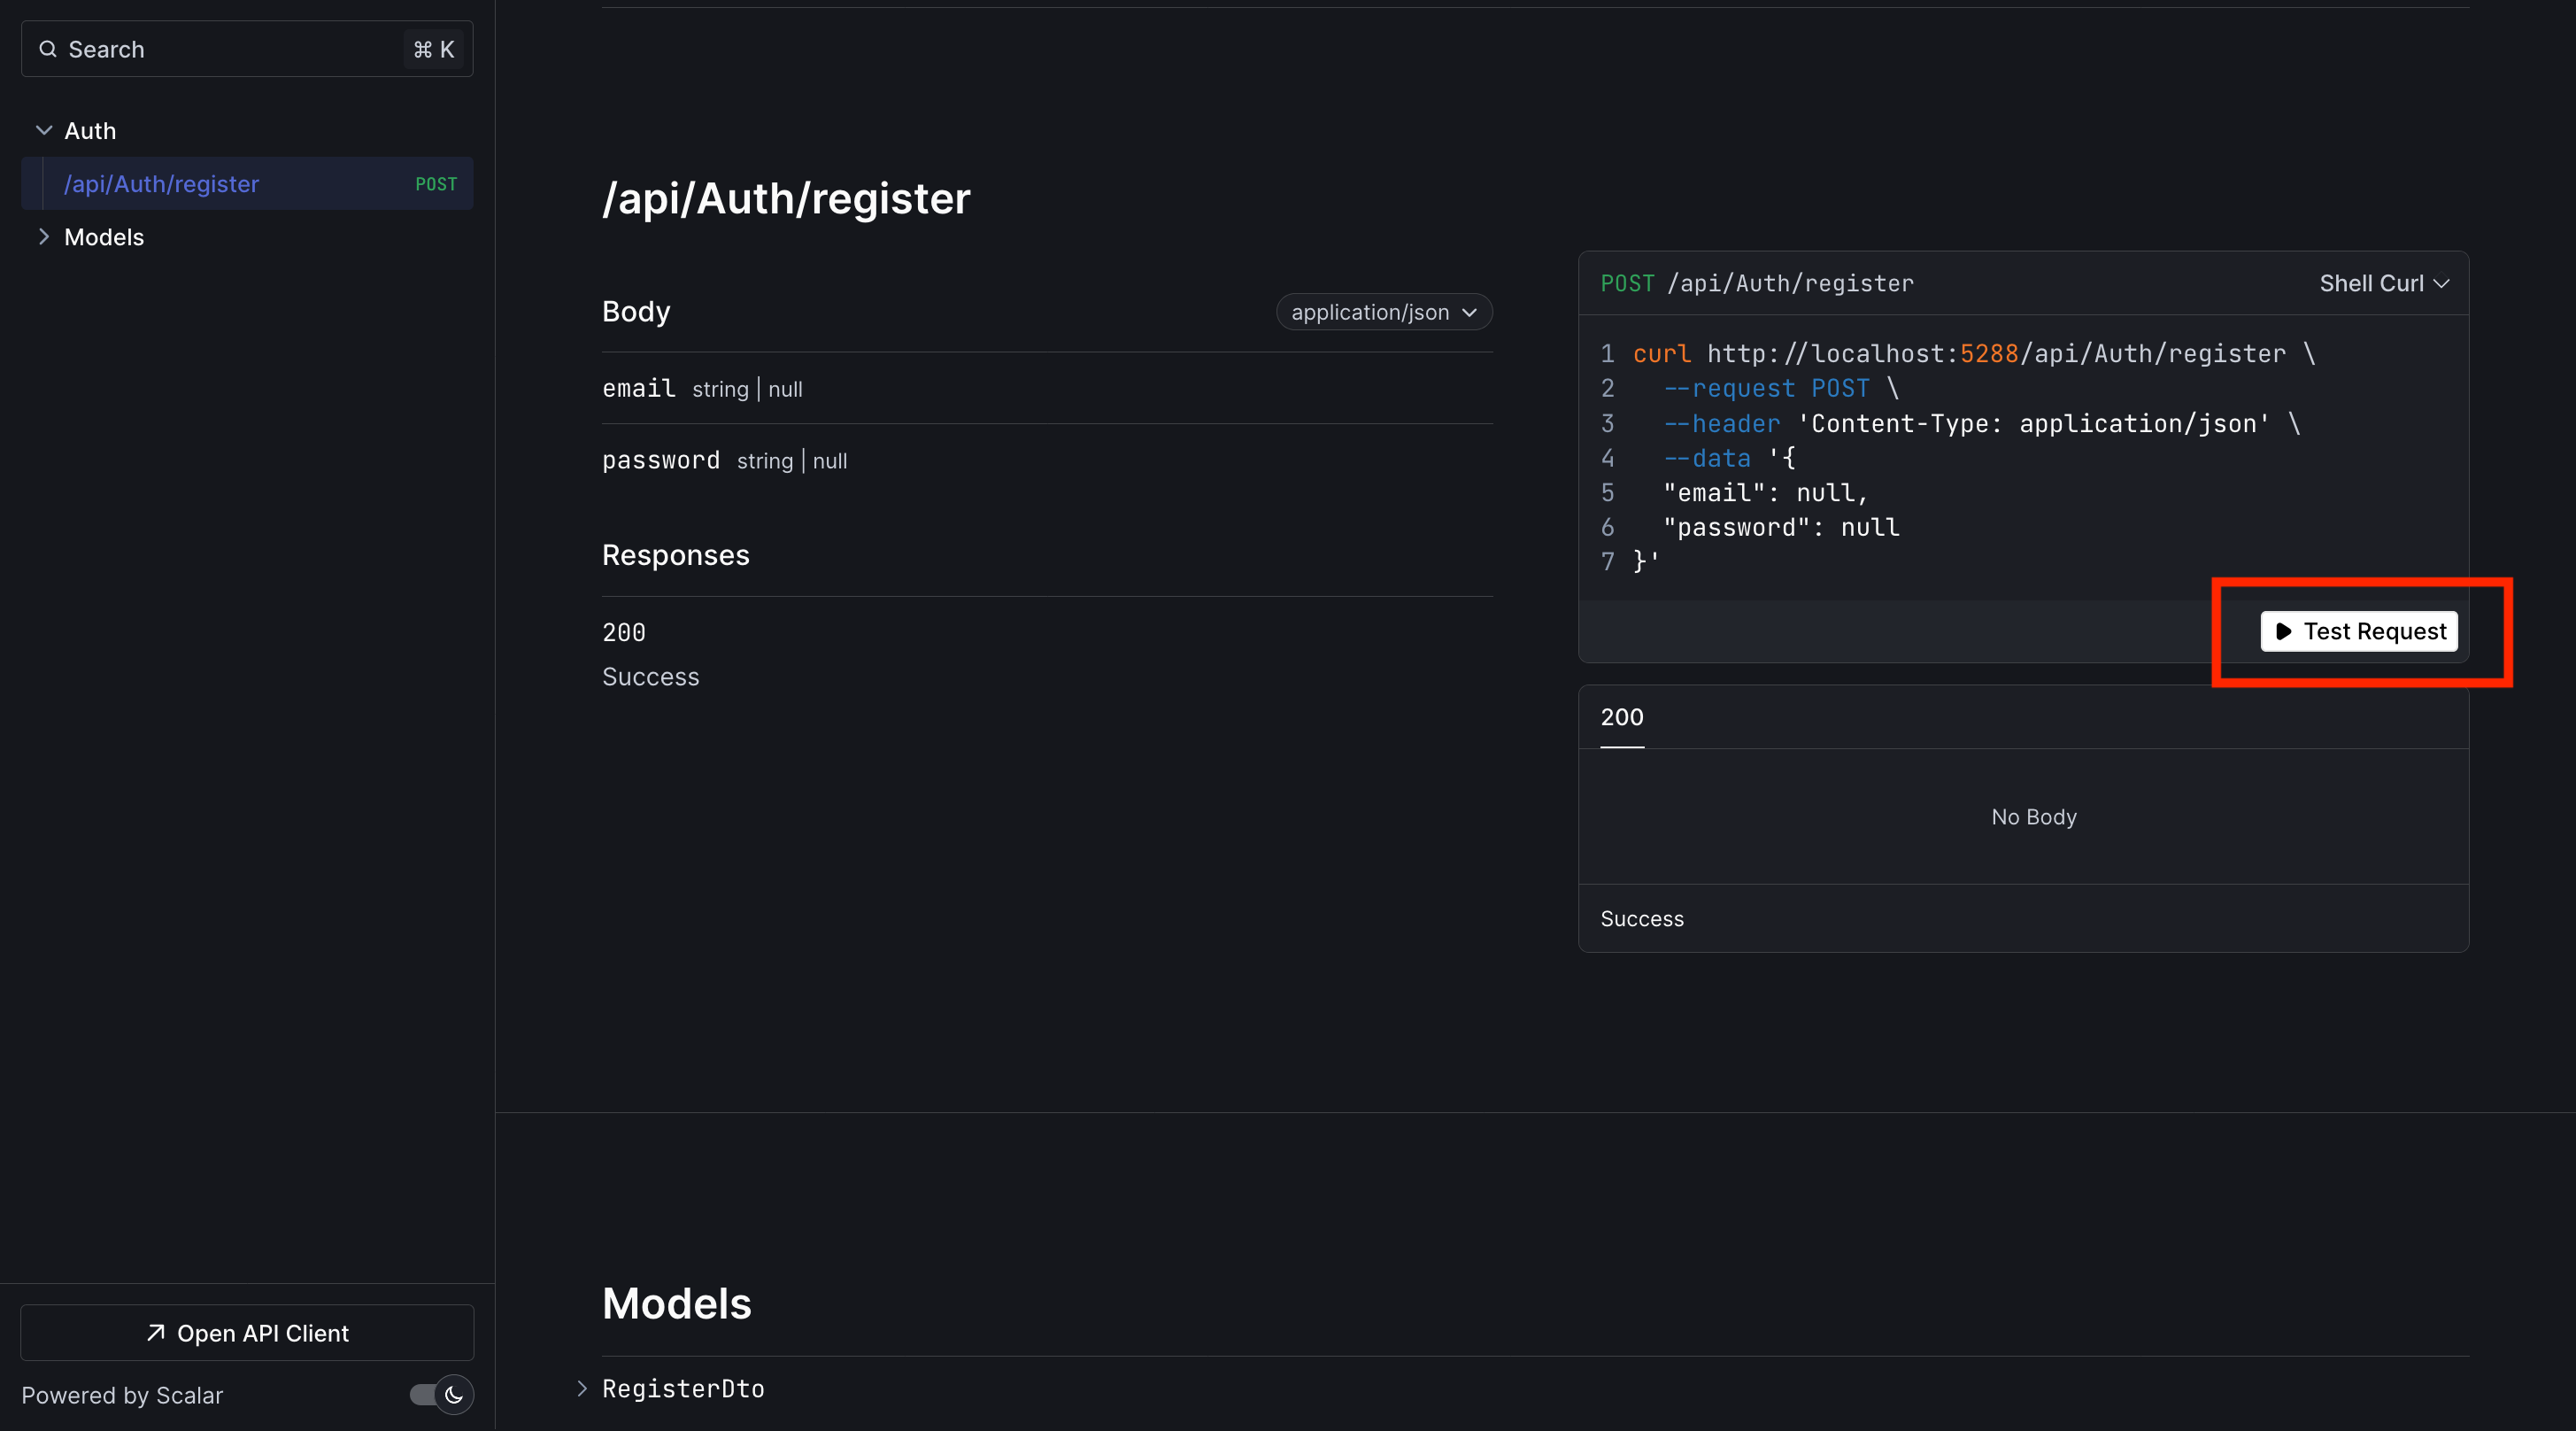
接著輸入要註冊的帳號密碼如下圖,只要有看到 200 及使用者註冊資料回傳就算成功了
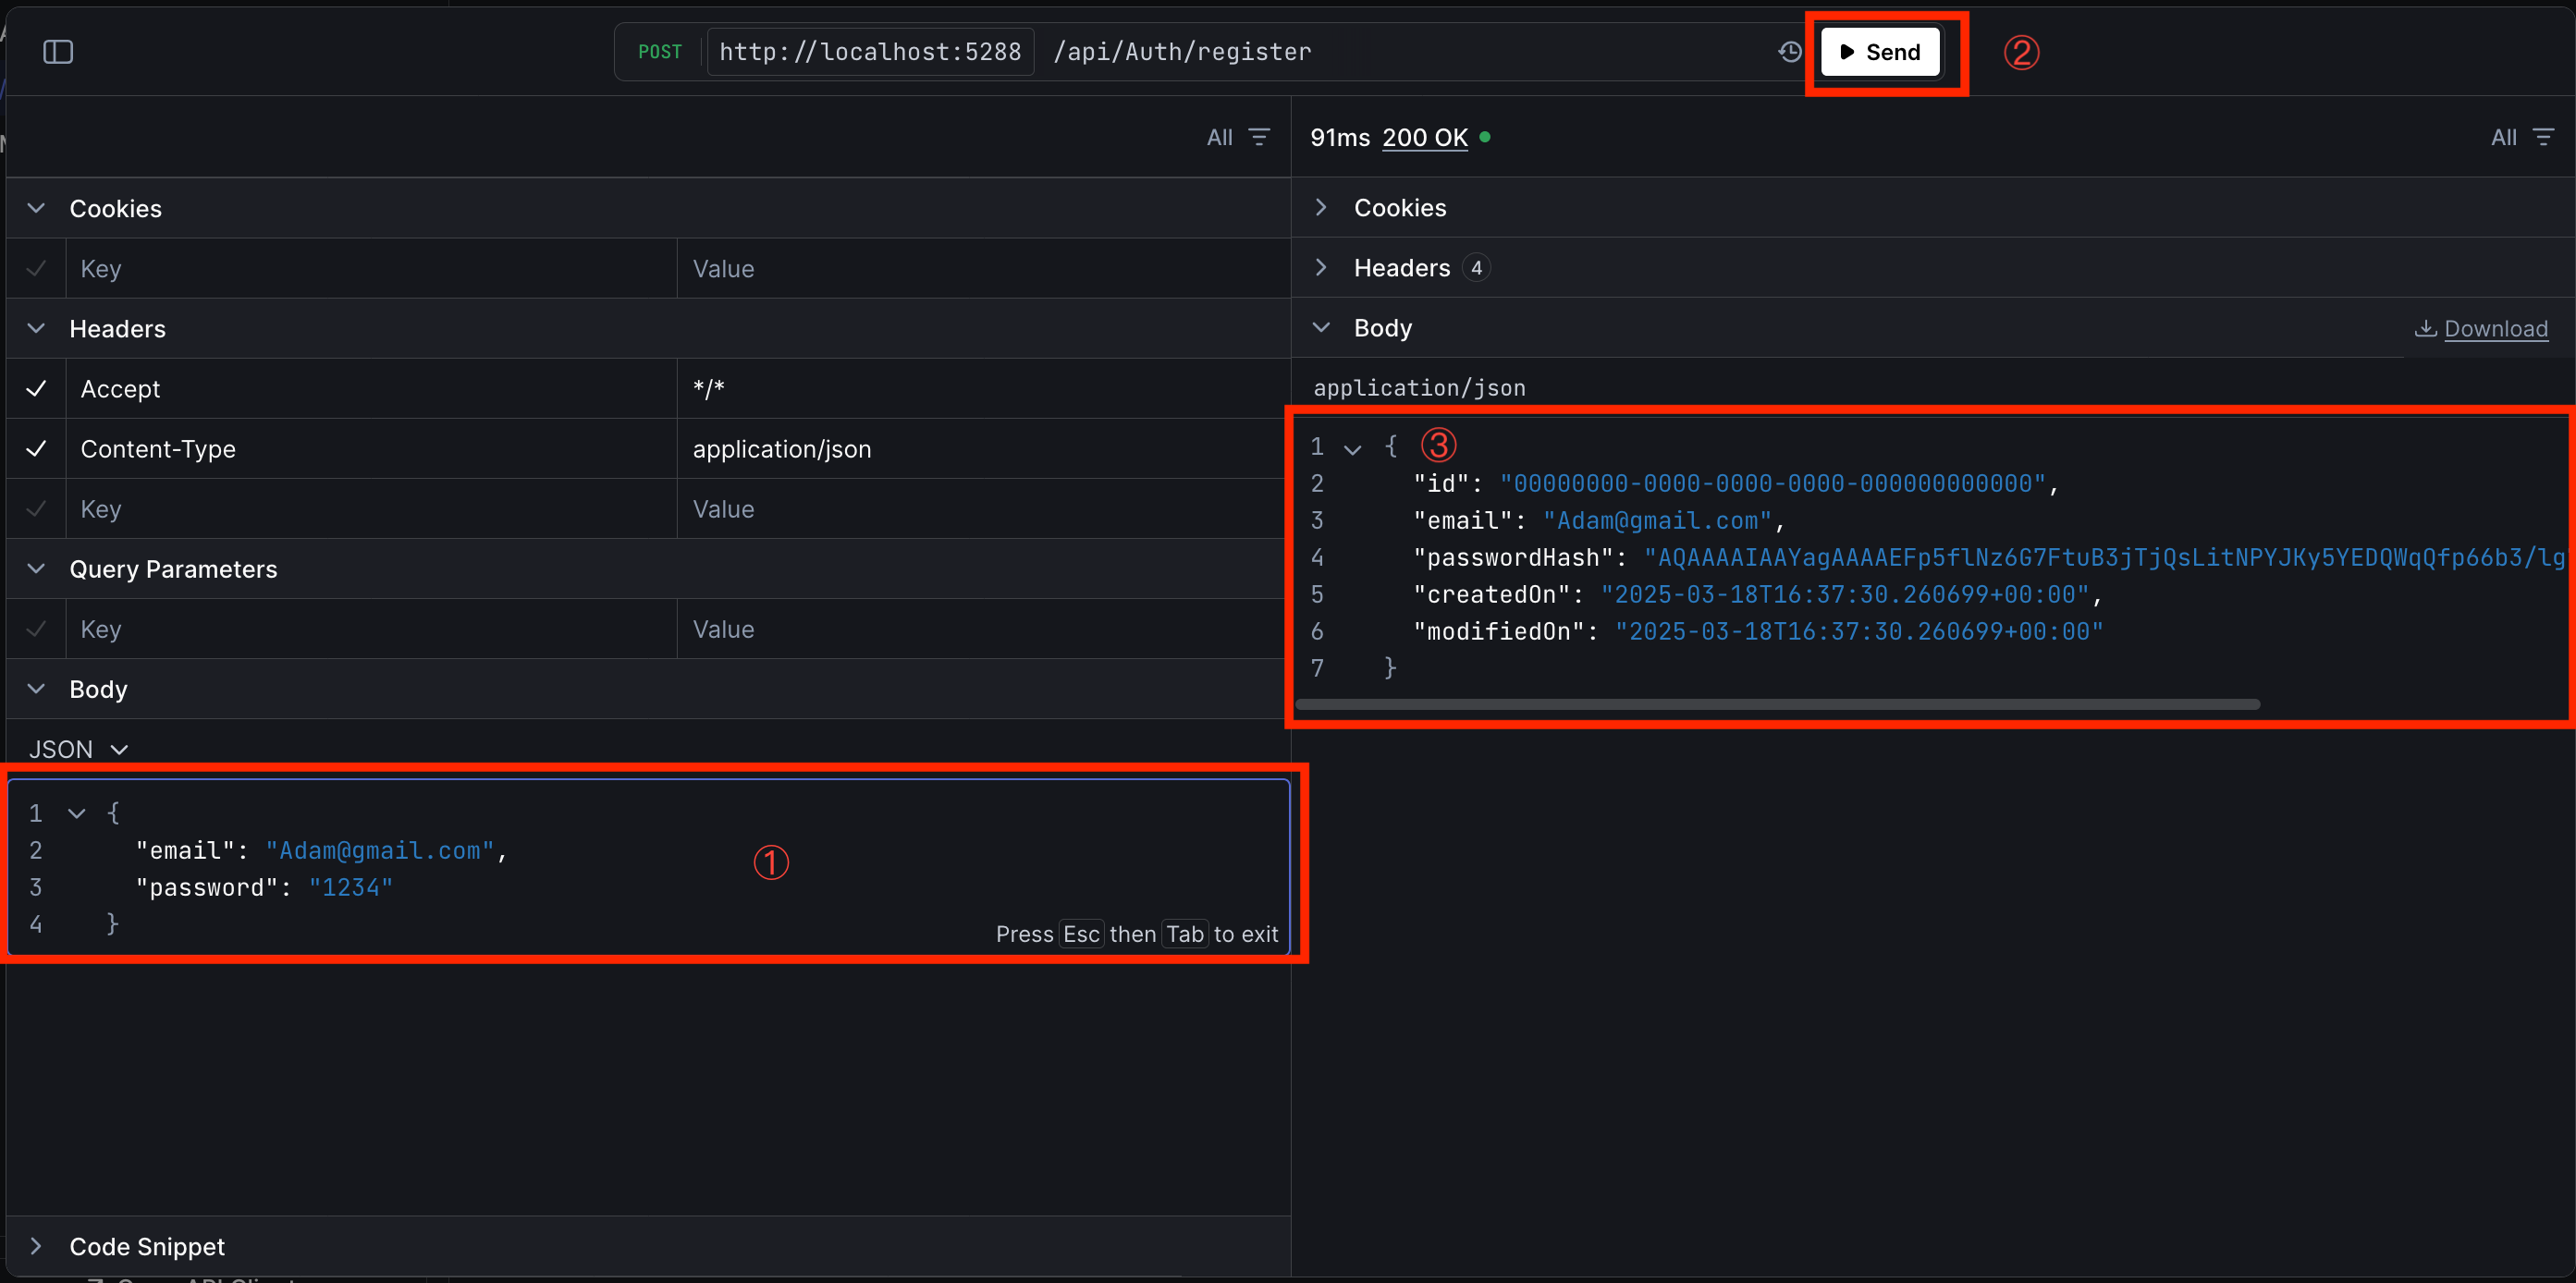
當然也可以測試,沒有帳號或沒有密碼的情況,看看驗證訊息是否正確,參考 Register 方法 的第 10 ~ 12 行,有得到預期的驗證訊息就算成功了
登入
登入功能會涉及到資料庫,因為需要將員工的註冊資料儲存到資料庫,並在登入時進行驗證,所以會複雜一些
LoginDto
跟註冊一樣,需要一個 Model 來紀錄傳送的登入資訊,所以在 Model 目錄下新增 LoginDto.cs
由於教學的場景假設「註冊」與「登入」都只有傳送「帳號/密碼」,所以可以偷懶一點直接繼承 RegisterDto.cs,但其他真實的場景可能會有一些差異,因些不建議直接繼承,且基於可讀性原則,我還是建一個 LoginDto
 1
 2
 3
 4
 5
 6
 7
 8
 9
10
11
12
13
14
15
16
| namespace JWT_Authentication_API.Models;
/// <summary>
/// 使用者登入的資料模型
/// </summary>
public class LoginDto
{
/// <summary>
/// 使用者帳號
/// </summary>
public string Email { get; set; } = string.Empty;
/// <summary>
/// 使用者密碼(未加密)
/// </summary>
public string Password { get; set; } = string.Empty;
}
|
偷懶的作法
1
2
3
4
5
6
| namespace JWT_Authentication_API.Models;
public class LoginDto: RegisterDto
{
}
|
分層架構
接下來要將 Register 方法做一些修改,將使用者註冊資料存到資料庫中,好讓之後的「登入」方法可以使用,並採用分層架構,讓程式碼可讀性更高
首先將建立員工資料的部分抽出來,不直接將資料存取功能放在 Controller,在專案下建立 Services 及 Interfaces 兩個目錄
- Services:用來放存取資料的相關服務
- Interfaces:服務的介面,供服務實作
當然分層架構還可以再抽出一層 Repository 不過這篇為教學簡化,所以只先抽 Service
IEmployeeService
在 Interfaces 目錄下新增 IEmployeeService.cs,新增員工服務介面,用來定義員工資料的存取功能,註冊就是新增一筆員工資料,所以在介面加入方法定義如下
- 新增員工
- 取得員工資料:用來檢查是否有重複註冊
 1
 2
 3
 4
 5
 6
 7
 8
 9
10
11
12
13
14
15
16
17
18
19
20
21
22
23
| using JWT_Authentication_API.Models;
namespace JWT_Authentication_API.Interfaces;
/// <summary>
/// 員工資料存取介面
/// </summary>
public interface IEmployeeService
{
/// <summary>
/// 新增員工資料
/// </summary>
/// <param name="registerDto"> 員工註冊資料 </param>
/// <returns> 註冊結果 </returns>
Task<bool> AddEmployeeAsync(RegisterDto registerDto);
/// <summary>
/// 依帳號取得員工資料
/// </summary>
/// <param name="email"> 員工帳號 </param>
/// <returns> 員工資料,如果找不到就 null </returns>
Task<RegisterDto?> GetEmployeeByEmailAsync(string email);
}
|
EmployeeService
在 Services 目錄新增一個 EmployeeService.cs 並實作 IEmployeeService.cs 介面定義的方法如下
 1
 2
 3
 4
 5
 6
 7
 8
 9
10
11
12
13
14
15
16
17
18
19
20
21
22
23
24
25
26
27
28
29
30
31
32
33
34
35
36
37
38
39
40
41
42
43
44
45
46
47
48
49
50
51
52
53
54
55
56
57
58
59
60
| using System.ComponentModel.DataAnnotations;
using JWT_Authentication_API.Entities;
using JWT_Authentication_API.Interfaces;
using JWT_Authentication_API.Models;
using Microsoft.AspNetCore.Identity;
namespace JWT_Authentication_API.Services;
/// <summary>
/// 員工資料存取服務
/// </summary>
public class EmployeeService(AppDbContext dbContext) : IEmployeeService
{
private readonly AppDbContext _appDb = dbContext;
/// <summary>
/// 新增員工資料
/// </summary>
/// <param name="registerDto"> 員工註冊資料 </param>
/// <returns> 註冊結果 </returns>
public async Task<bool> AddEmployeeAsync(RegisterDto registerDto)
{
// 這裡也可以不用檢查,`Controller` 檢查過一次了
// 但基於安全性,我再檢查一次
if (string.IsNullOrEmpty(registerDto.Email)
|| string.IsNullOrEmpty(registerDto.Password))
throw new ValidationException("Email or password is required");
// Create new employee data.
Employee employee = new() { Email = registerDto.Email };
// Hash password
employee.PasswordHash = new PasswordHasher<Employee>()
.HashPassword(employee, registerDto.Password);
// Insert into database
await _appDb.Employees.AddAsync(employee);
// Save changes
var result = await _appDb.SaveChangesAsync();
return result > 0;
}
/// <summary>
/// 依帳號取得員工資料
/// </summary>
/// <param name="email"> 註冊信箱/登入信箱 </param>
/// <returns> 員工資料 或 null </returns>
public async Task<RegisterDto?> GetEmployeeByEmailAsync(string email)
{
var employee = await _appDb.Employees
.FirstOrDefaultAsync(e => e.Email == email);
return employee == null
? null
: new RegisterDto
{
Email = employee.Email,
Password = employee.PasswordHash
};
}
}
|
修改註冊方法
回到 AuthController 的 Register 方法並加入員工服務物件的注入,修改如下
 1
 2
 3
 4
 5
 6
 7
 8
 9
10
11
12
13
14
15
16
17
18
19
20
21
22
23
24
25
26
27
28
29
30
31
32
33
34
35
36
37
38
39
40
41
42
43
44
45
46
47
48
| using JWT_Authentication_API.Interfaces;
using JWT_Authentication_API.Models;
using Microsoft.AspNetCore.Mvc;
namespace JWT_Authentication_API.Controllers;
/// <summary>
/// 將 AuthController 宣告成為 ApiController
/// 並定義路由規則(網址)=> domain/api/auth
/// </summary>
/// <param name="employeeService"> 員工資料存取服務 </param>
[ApiController, Route("api/[controller]")]
public class AuthController(IEmployeeService employeeService) : Controller
{
/// <summary>
/// 員工資料存取的服務
/// </summary>
private readonly IEmployeeService _employeeService = employeeService;
/// <summary>
/// 註冊 API
/// </summary>
/// <param name="registerDto"> 使用者傳送的員工註冊資料 </param>
/// <returns> 註冊完成的員工資料 </returns>
[HttpPost("register")]
public async Task<ActionResult> RegisterAsync(RegisterDto registerDto)
{
// 驗證註冊資料
if (string.IsNullOrEmpty(registerDto.Email)
|| string.IsNullOrEmpty(registerDto.Password))
return BadRequest("Please provide 'Email' and 'Password'");
// 先查詢有沒有重複的員工資料
var employee = await _employeeService.GetEmployeeByEmailAsync(registerDto.Email);
// 如果沒有就透過服務註冊員工資料
var registerResult =
employee == null &&
await _employeeService.AddEmployeeAsync(registerDto);
// 回傳註冊結果
return registerResult
? Ok("Register successfully!")
: employee != null
? BadRequest("User already exists!")
: BadRequest("Failed to register user");
}
}
|
Employee DI
因為 AuthController 使用了 EmployeeService 依賴注入,所以需要去 Program.cs 註冊 EmployeeService 的服務,讓 AuthController 可以透過建構函式注入服務
特別注意一定要新增在 builder.Build() 的上面任一地方,因為 呼叫 Build 方法後,就不能在註冊服務了
1
2
3
4
5
| #region CustomService
builder.Services.AddScoped<IEmployeeService, EmployeeService>();
#endregion
WebApplication app = builder.Build();
|
Login
正式開始實作登入,在 AuthController.cs 新增 Login 方法,接收參數為使用者輸入的帳號密碼
登入的部分可以分成兩步
- 檢查有沒有註冊這個員工,上面在 分層架構 已經完成了,如果沒有就回傳錯誤訊息。
- 驗證員工帳號密碼:如果第 1 步有找到註冊的員工資料,就要驗證輸入的帳號密碼,最後回傳驗證結果。
流程圖
 1
 2
 3
 4
 5
 6
 7
 8
 9
10
11
12
13
14
15
16
17
18
19
20
21
22
23
24
25
26
27
28
29
30
31
32
33
34
35
| ┌─────┐
│Start│
└──┬──┘
_______▽________ _________________
╱ ╲ ╱ ╲ ┌─────────────────────┐
╱ Missing Username ╲__________________________________________╱ Missing Username? ╲___│Username is required!│
╲ or Password ╱yes ╲ ╱yes└──────────┬──────────┘
╲________________╱ ╲_________________╱ │
│no │no │
┌────────▽───────┐ ┌──────────▽─────────┐ │
│Check Username │ │Password is required│ │
│and PasswordHash│ └──────────┬─────────┘ │
└────────┬───────┘ │ │
_______▽________ │ │
╱ ╲ ┌──────────────────┐ │ │
╱ Invalid Username ╲_____________________│Username not found│ │ │
╲ ╱yes └─────────┬────────┘ │ │
╲________________╱ │ │ │
│no │ │ │
┌──────────▽──────────┐ │ │ │
│Validate PasswordHash│ │ │ │
└──────────┬──────────┘ │ │ │
_________▽__________ │ │ │
╱ ╲ ┌──────────────┐ │ │ │
╱ Invalid PasswordHash ╲___│Wrong Password│ │ │ │
╲ ╱yes└───────┬──────┘ │ │ │
╲____________________╱ │ │ │ │
│no │ │ │ │
┌─────────▽────────┐ │ │ │ │
│Login successfully│ │ │ │ │
└─────────┬────────┘ │ │ │ │
└───────────────────────┴┬────────────────┴────────────────────┴────────────────────────┘
┌─▽─┐
│End│
└───┘
|
新增一個 [HttpPost] 的 LoginAsync 方法
 1
 2
 3
 4
 5
 6
 7
 8
 9
10
11
12
13
14
15
16
17
18
19
20
| /// <summary>
/// 登入
/// </summary>
/// <param name="loginDto"> 使用者的輸入資料 </param>
/// <returns> 登入結果 </returns>
[HttpPost("login")]
public async Task<string> LoginAsync(LoginDto loginDto)
{
// 登入資料驗證
if (string.IsNullOrEmpty(loginDto.Email) ||
string.IsNullOrEmpty(loginDto.Password))
return "Please provide 'Email' and 'Password'";
// 檢查員工帳號
if (await _employeeService.GetEmployeeByEmailAsync(loginDto.Email) == null)
return "User does not exist!";
// 檢查員工密碼並回傳登入結果
return result;
}
|
驗證員工密碼
員工密碼的檢查屬於「驗證」的範疇,所以不能寫在 Employee 的相關服務及定義
在 Interface 目錄下新增 IAuthService.cs,在 Services 目錄下新增 AuthService.cs
目錄結構如下
1
2
3
4
5
| JwtAuthenticationAPI.csproj
├─Services
│ └─AuthService.cs
└─Interfaces
└─IAuthService.cs
|
在 IAuthService.cs 新增驗證密碼方法定義
 1
 2
 3
 4
 5
 6
 7
 8
 9
10
11
12
13
14
15
16
| using JWT_Authentication_API.Models;
namespace JWT_Authentication_API.Interfaces;
/// <summary>
/// 驗證服務介面
/// </summary>
public interface IAuthService
{
/// <summary>
/// 驗證員工登入
/// </summary>
/// <param name="loginDto"> 員工登入資料 </param>
/// <returns> 驗證結果</returns>
Task<bool> ValidateUserAsync(LoginDto loginDto);
}
|
在 AuthService.cs 實作驗證方法
 1
 2
 3
 4
 5
 6
 7
 8
 9
10
11
12
13
14
15
16
17
18
19
20
21
22
23
24
25
26
27
28
29
30
31
32
33
34
35
36
37
| using JWT_Authentication_API.Interfaces;
using JWT_Authentication_API.Models;
using Microsoft.AspNetCore.Identity;
namespace JWT_Authentication_API.Services;
/// <summary>
/// 驗證服務
/// </summary>
public class AuthService(IEmployeeService employeeService): IAuthService
{
/// <summary>
/// 員工資料存取服務
/// </summary>
private readonly IEmployeeService _employeeService = employeeService;
/// <summary>
/// 驗證員工登入密碼
/// </summary>
/// <param name="loginDto"> 員工登入資料 </param>
/// <returns> 驗證結果 </returns>
public async Task<bool> ValidateUserAsync(LoginDto loginDto)
{
if(string.IsNullOrEmpty(loginDto.Email)
|| string.IsNullOrEmpty(loginDto.Password))
throw new ArgumentException($"Invalid {nameof(loginDto.Email)} or {nameof(loginDto.Password)}!");
// 取得員工資料進行驗證
var employee = await _employeeService.GetEmployeeByEmailAsync(loginDto.Email);
if (employee == null) throw new NullReferenceException("Employee not found!");
// 回傳驗證結果
return new PasswordHasher<RegisterDto>().VerifyHashedPassword(employee,
employee.Password, loginDto.Password)
== PasswordVerificationResult.Success;
}
}
|
最後再回到 AuthController.cs 注入驗證的服務物件,並在 LoginAsync 方法加入驗證的程式
 1
 2
 3
 4
 5
 6
 7
 8
 9
10
11
12
13
14
15
16
17
18
19
20
21
22
23
24
25
26
27
28
29
30
31
32
33
34
35
36
37
38
39
40
41
42
43
44
45
46
47
48
49
50
51
52
53
54
55
56
57
58
59
60
61
62
63
64
65
66
67
68
69
70
71
72
73
74
75
76
77
78
| using JWT_Authentication_API.Interfaces;
using JWT_Authentication_API.Models;
using Microsoft.AspNetCore.Mvc;
namespace JWT_Authentication_API.Controllers;
/// <summary>
/// 將 AuthController 宣告成為 ApiController
/// 並定義路由規則(網址)=> domain/api/auth
/// </summary>
/// <param name="employeeService"> 員工資料存取服務 </param>
/// <param name="authService"> 登入驗證服務 </param>
[ApiController, Route("api/[controller]")]
public class AuthController(
IEmployeeService employeeService,
IAuthService authService) : Controller
{
/// <summary>
/// 員工資料存取的服務
/// </summary>
private readonly IEmployeeService _employeeService = employeeService;
/// <summary>
/// 登入驗證的服務
/// </summary>
private readonly IAuthService _authService = authService;
/// <summary>
/// 註冊 API
/// </summary>
/// <param name="registerDto"> 使用者傳送的員工註冊資料 </param>
/// <returns> 註冊完成的員工資料 </returns>
[HttpPost("register")]
public async Task<ActionResult> RegisterAsync(RegisterDto registerDto)
{
// 驗證註冊資料
if (string.IsNullOrEmpty(registerDto.Email)
|| string.IsNullOrEmpty(registerDto.Password))
return BadRequest("Please provide 'Email' and 'Password'");
// 先查詢有沒有重複的員工資料
var employee = await _employeeService.GetEmployeeByEmailAsync(registerDto.Email);
// 如果沒有就註冊新員工
var registerResult =
employee == null &&
await _employeeService.AddEmployeeAsync(registerDto);
// 回傳註冊結果
return registerResult
? Ok("Register successfully!")
: employee != null
? BadRequest("User already exists!")
: BadRequest("Failed to register user");
}
/// <summary>
/// 登入
/// </summary>
/// <param name="loginDto"> 使用者的輸入資料 </param>
/// <returns> 登入結果 </returns>
[HttpPost("login")]
public async Task<string> LoginAsync(LoginDto loginDto)
{
// 登入資料驗證
if (string.IsNullOrEmpty(loginDto.Email) ||
string.IsNullOrEmpty(loginDto.Password))
return "Please provide 'Email' and 'Password'";
// 檢查員工帳號
if (await _employeeService.GetEmployeeByEmailAsync(loginDto.Email) == null)
return "User does not exist!";
// 檢查員工密碼並回傳登入結果
return await _authService.ValidateUserAsync(loginDto)
? "jwt-token"
: "Login failed";
}
}
|
基本上,就完成了,下面 JWT 實作的時候會再改成所產生的 JWT,最後因為有注入 IAuthService 驗證相關的服務,所以要去 Program.cs 註冊如下
1
2
3
4
5
| #region CustomService
builder.Services
.AddScoped<IEmployeeService, EmployeeService>()
.AddScoped<IAuthService, AuthService>();
#endregion
|
測試 Login
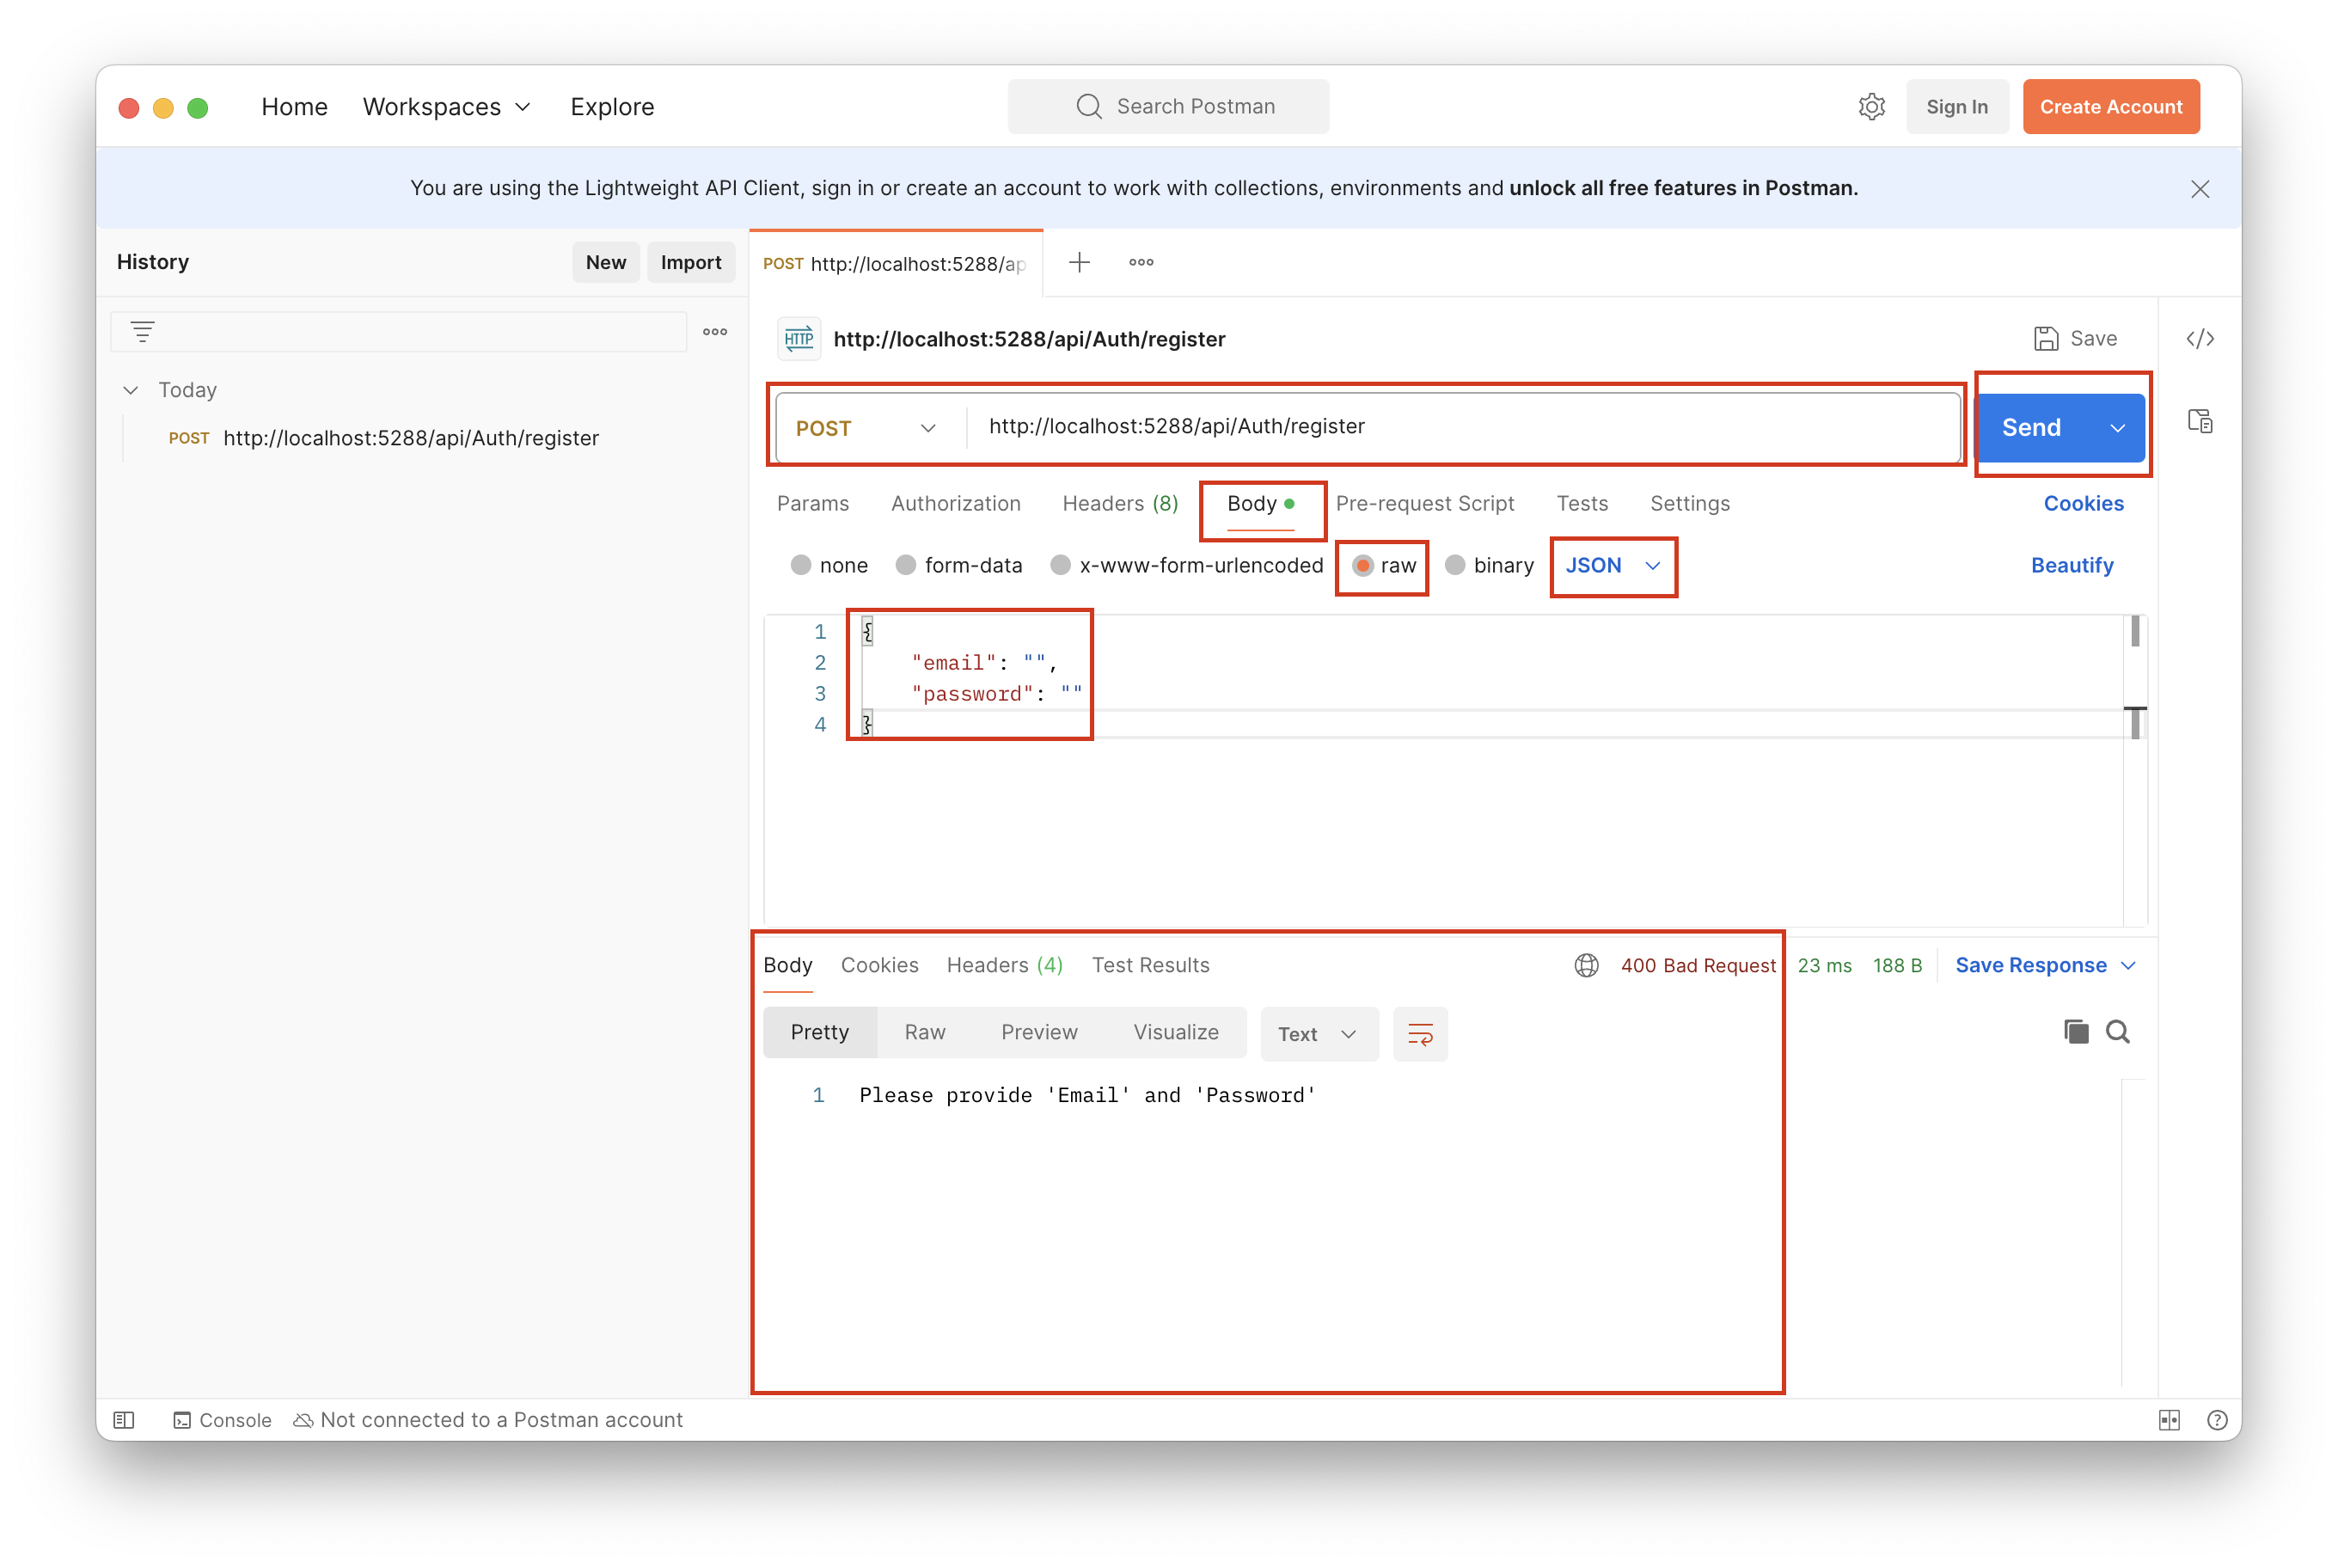
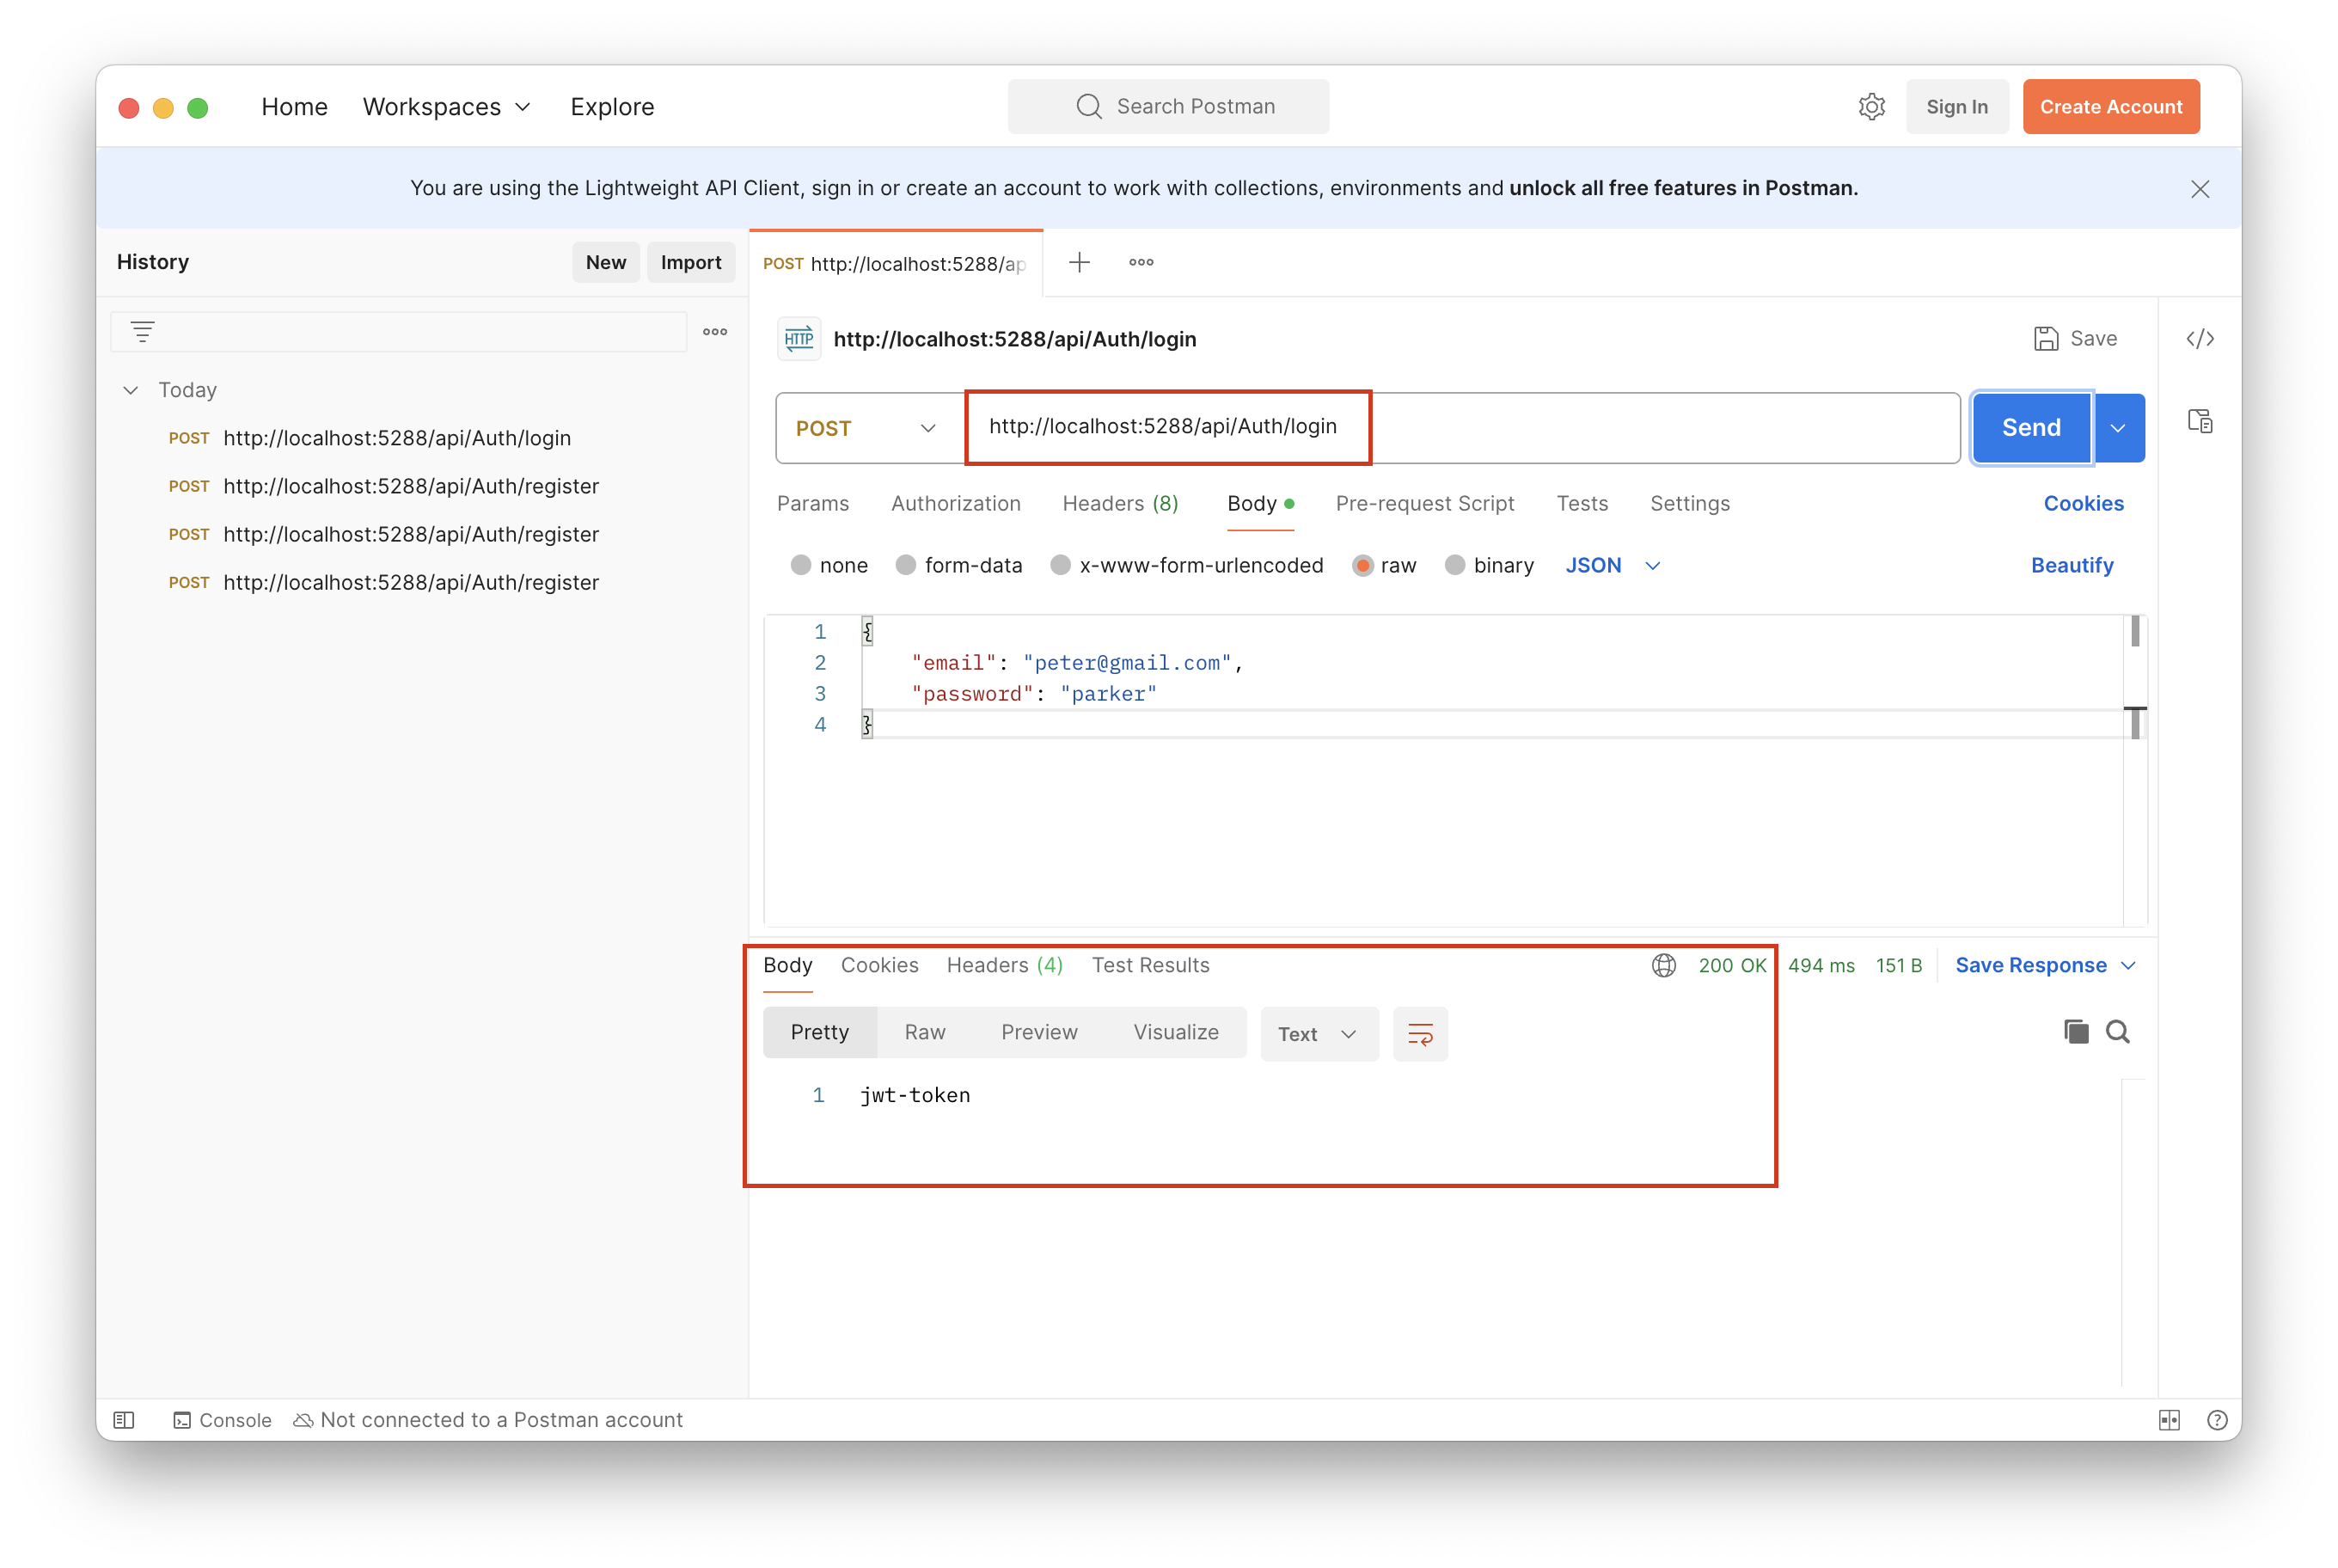
這邊示範用 Postman 進行測試,請先執行專案,確認執行成功後開啟 Postman,並按下「+」新增一個 Request 分頁

將 Request 改成 「POST」,並輸入 API 網址,可以參考 測試註冊 章節最後一張圖的網址
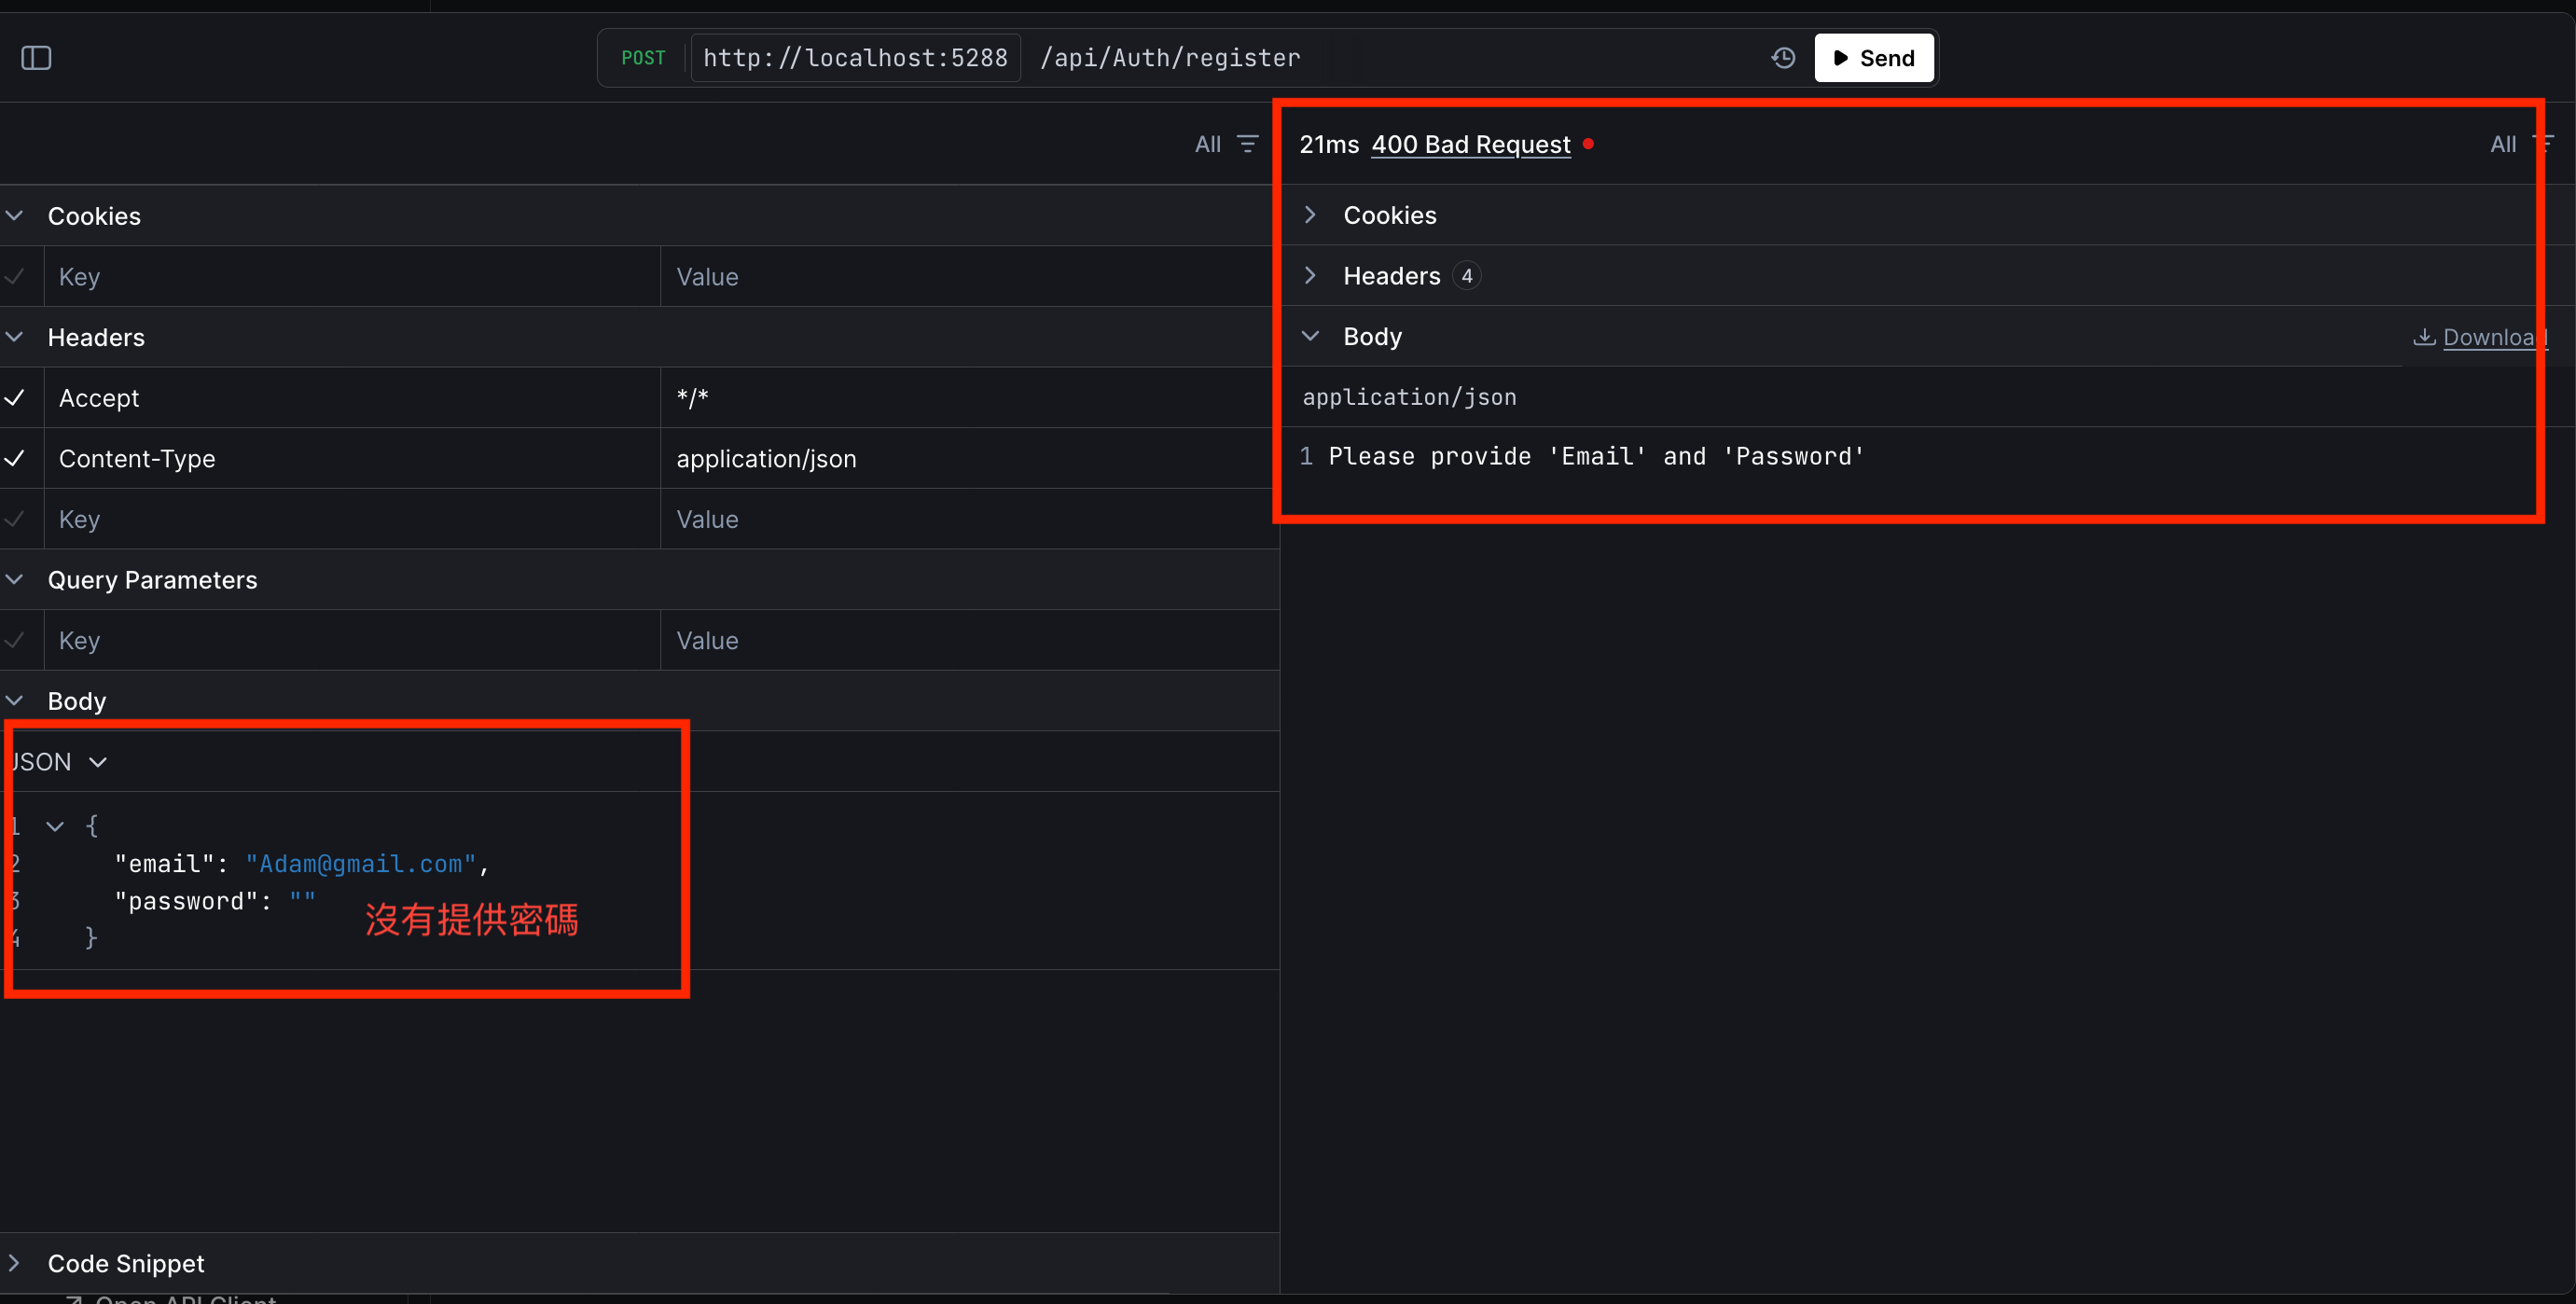
下方選擇「Body」,在 Body 下方圈選「raw」,row 旁邊下拉改成「JSON」
並輸入要註冊的帳號密碼如下,完成後按下「Send」,結果就會出現在下方,如下圖
1
2
3
4
| {
"email": "",
"password": ""
}
|
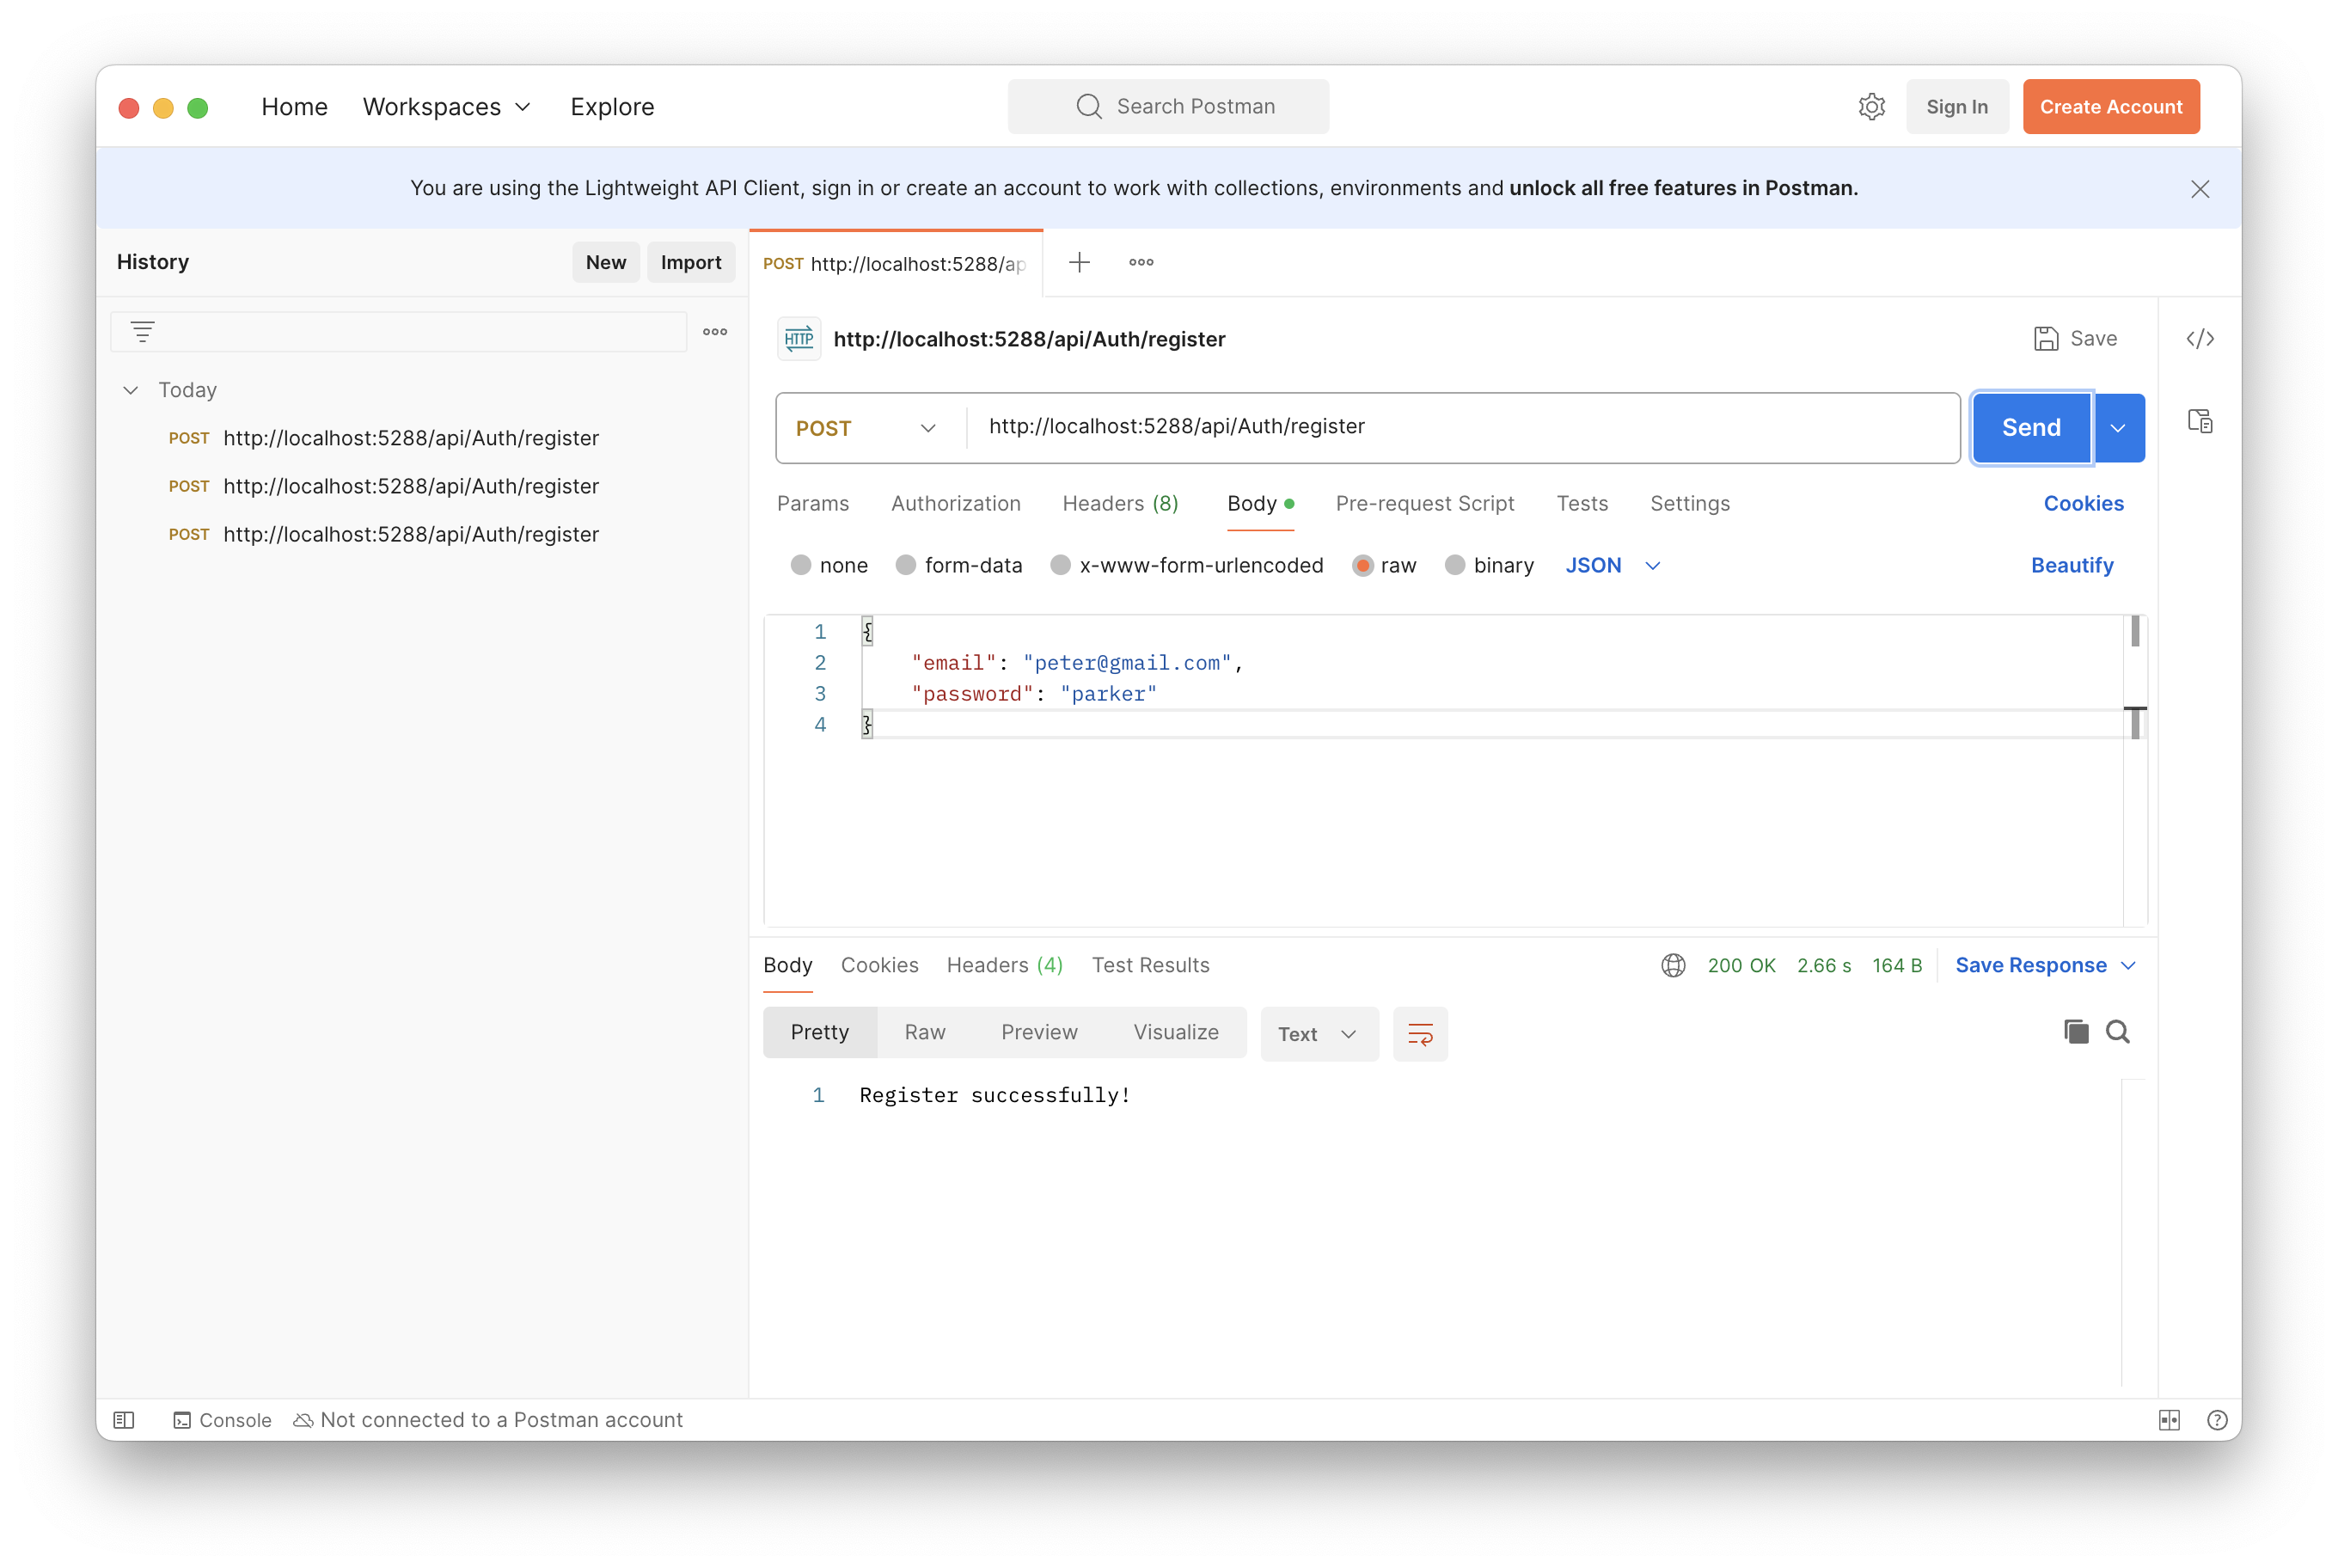
要測試登入,所以一定要先註冊一個使用者,也順便用 Postman 測試註冊功能
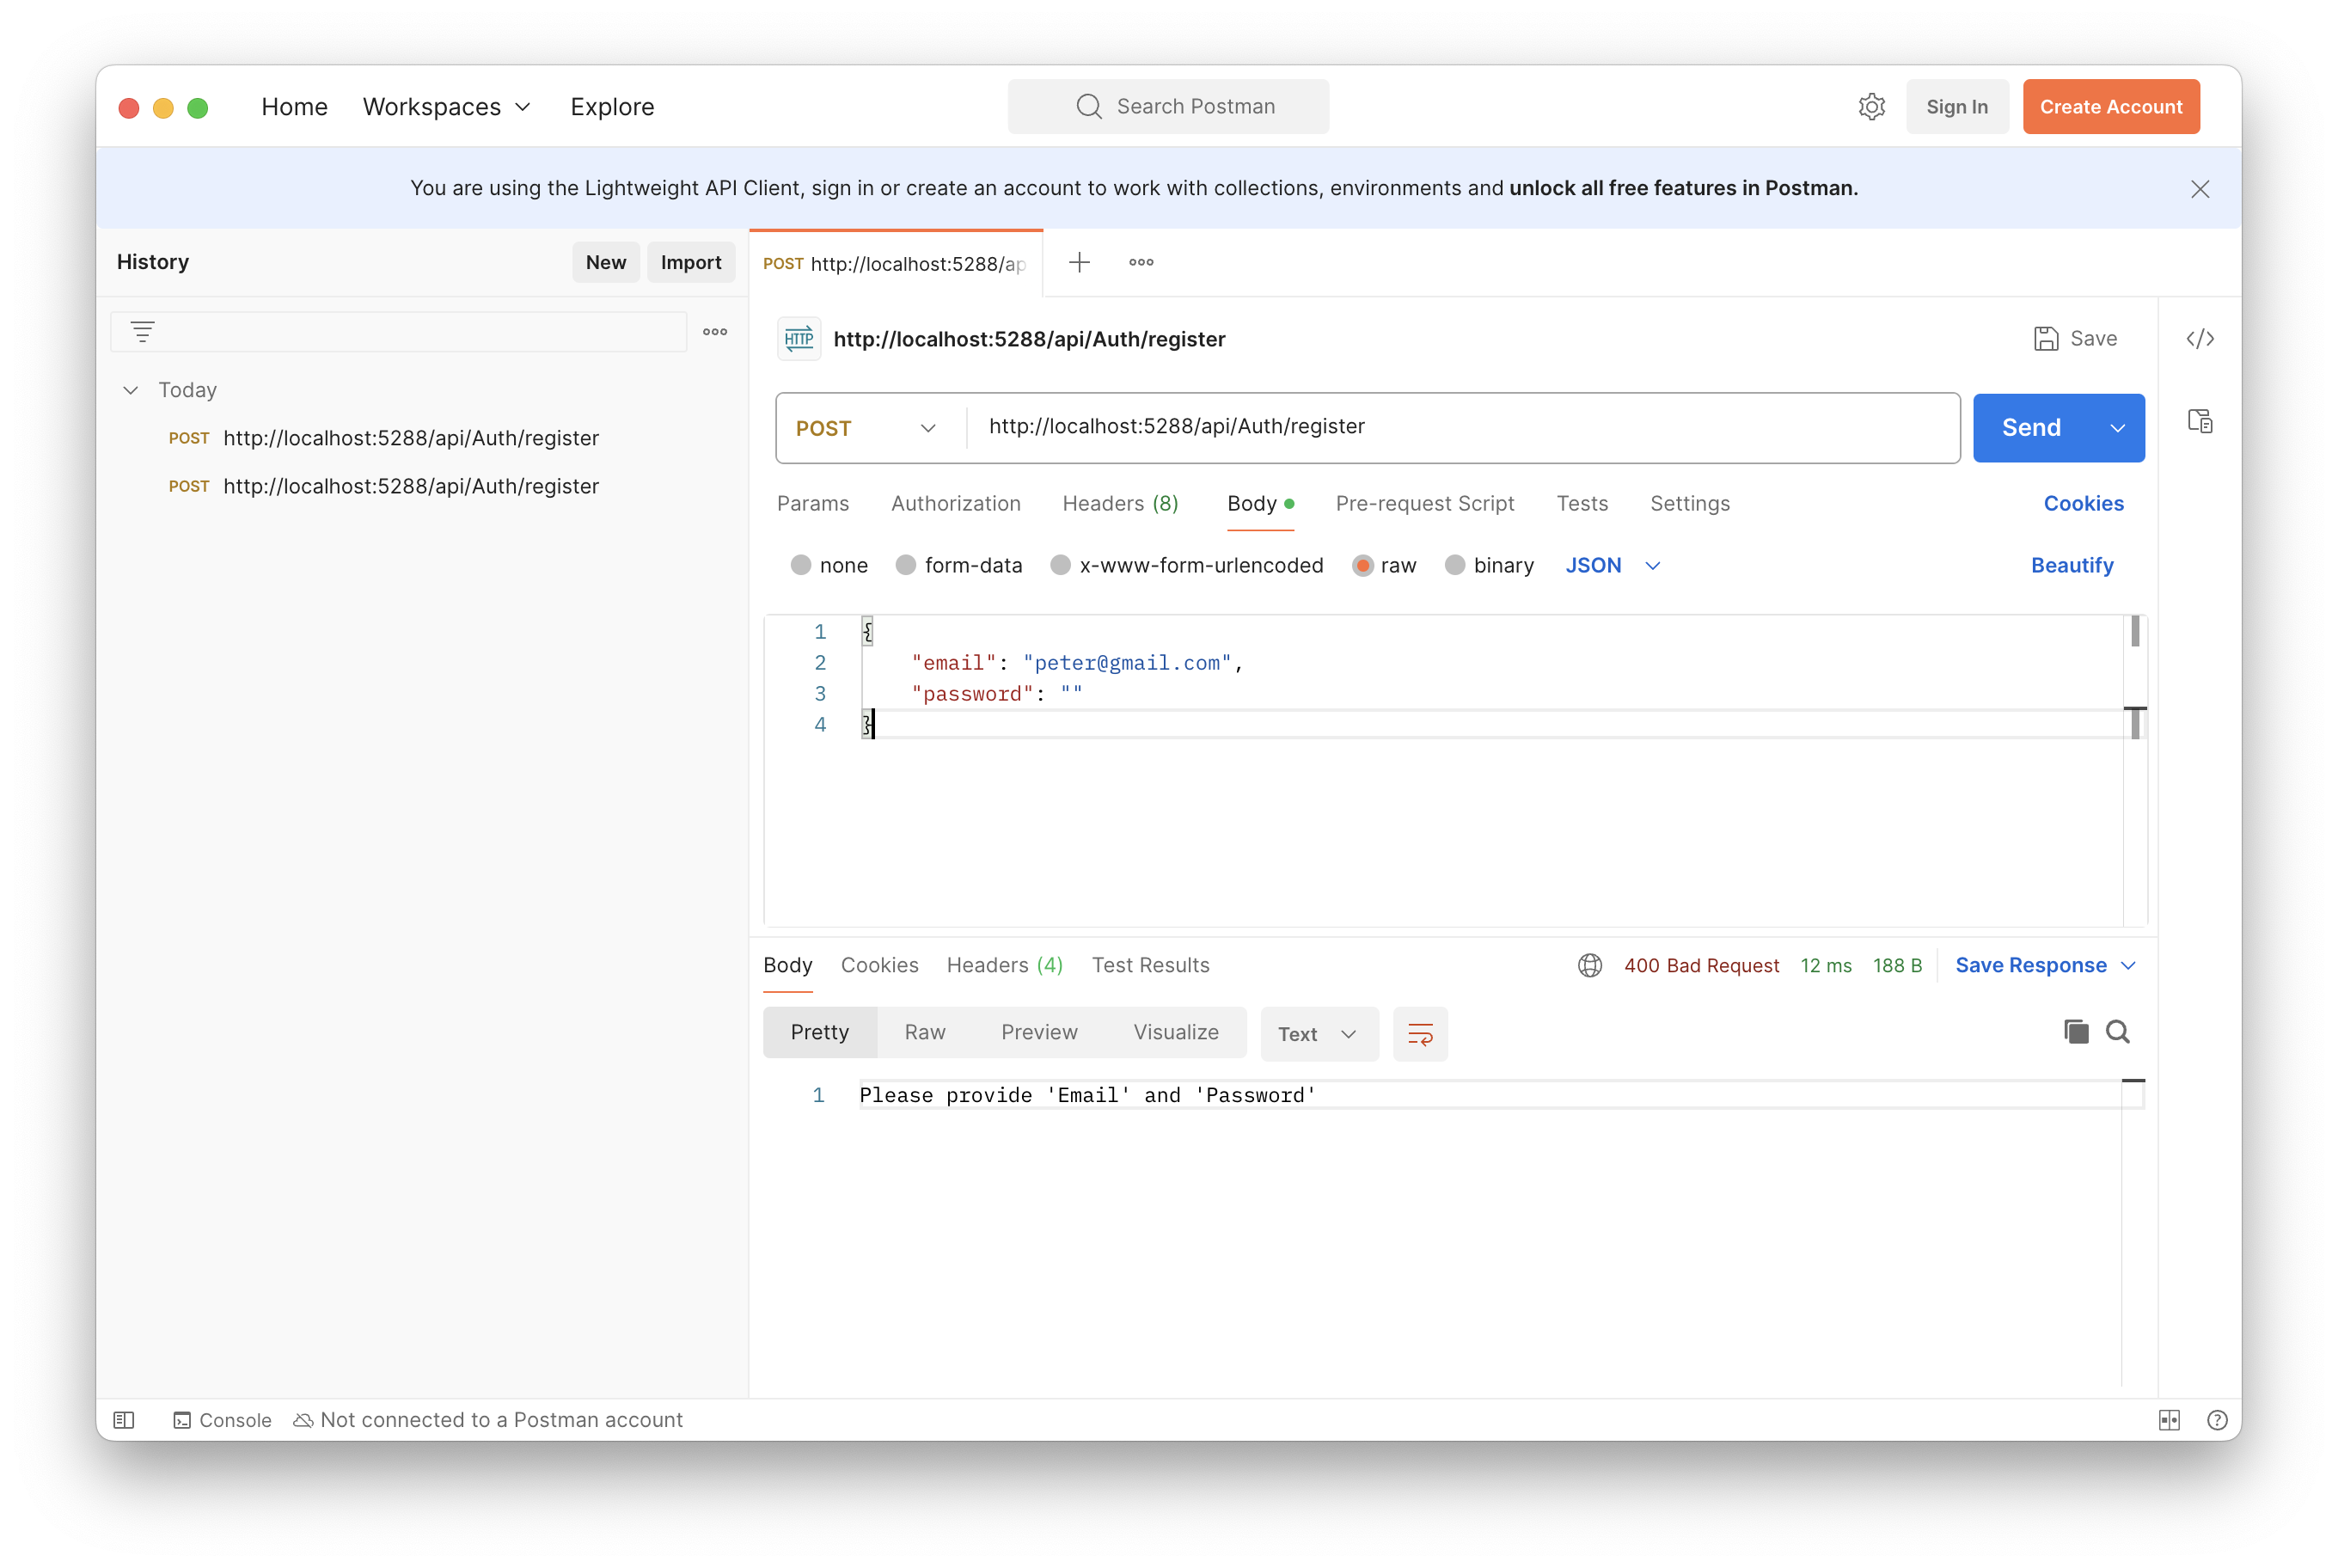
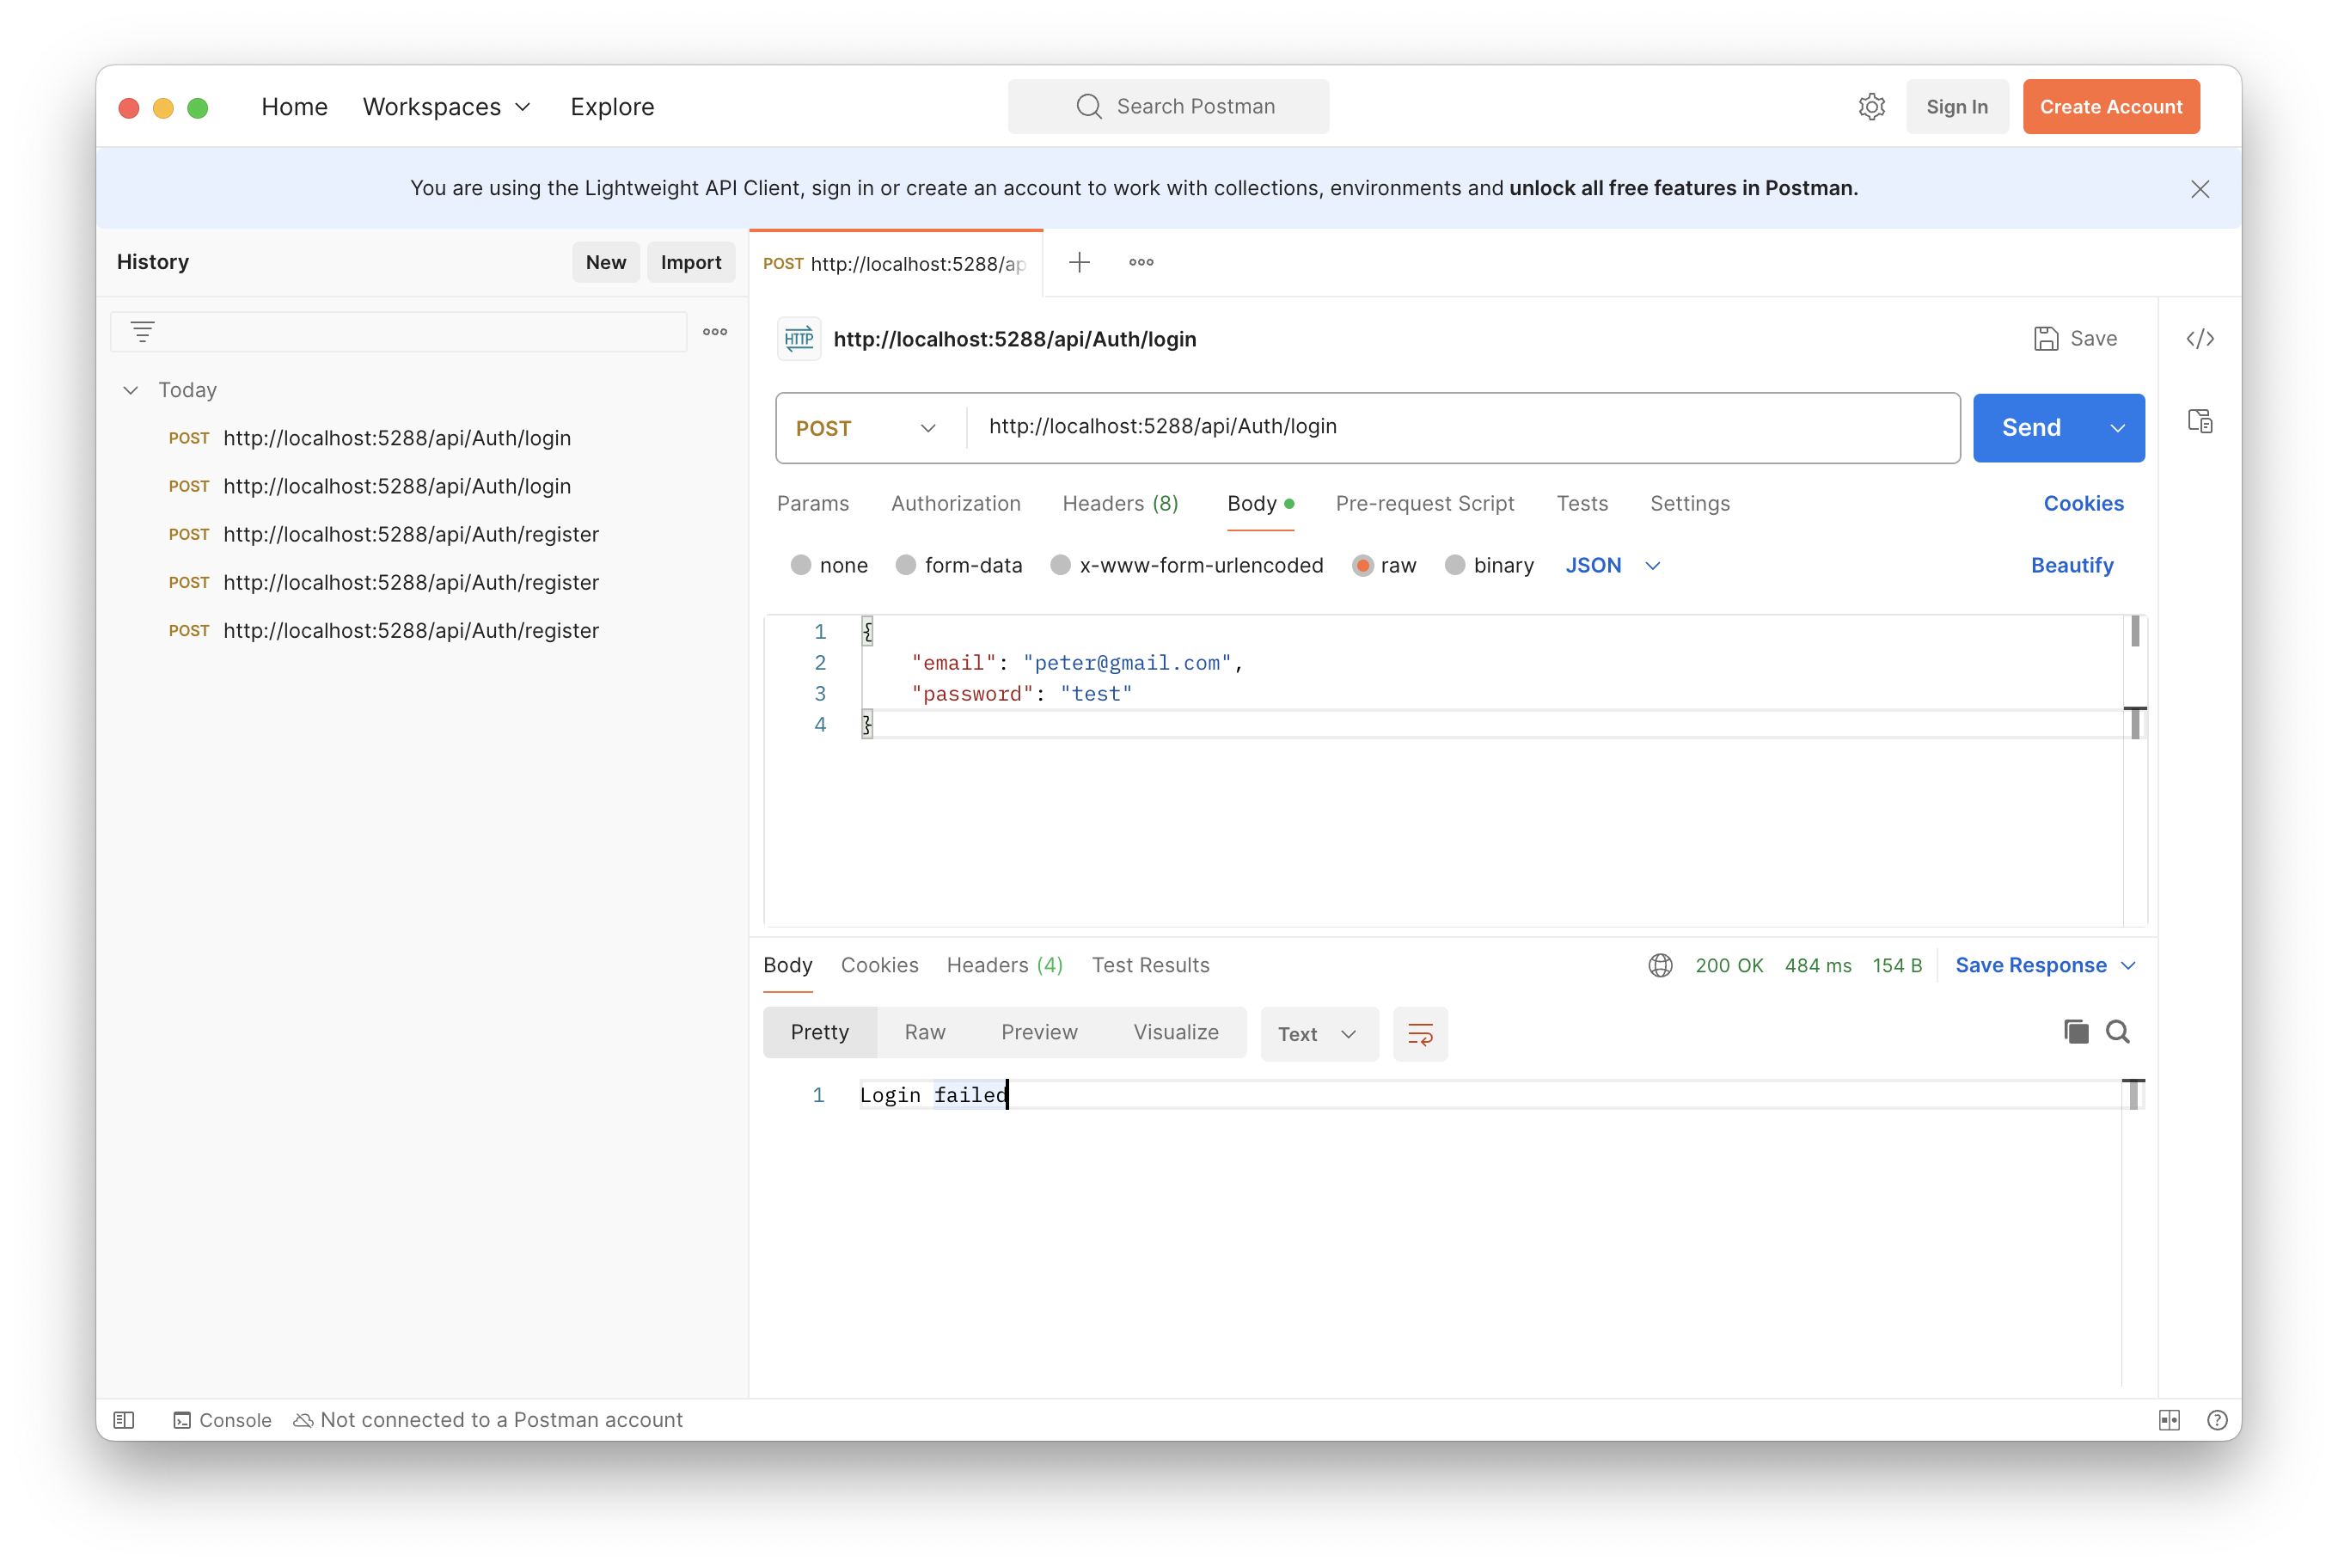
將網址改成登入的 API 網址,測試登入
JWT
接下來要實作產生 JWT 的方法,並將上一節 LoginAsync 方法回傳值改成所產生的 JWT
下圖簡單的說明 JWT 的驗證流程
1, 2, 3 上一節已經實作了,不再說明
- 如果登入登入成功,就合回傳一個合法的 JWT
- 使用者需要存取授權的資源時,會將 JWT 傳送至 Server 進行驗證
- 如果驗證通過,就會回傳授權的資源;
如果未通過有兩種情況- 正確的 Token,但權限不夠,如:業務部門無法存取會計部門的帳務資料
會回傳 Http 403 - 錯誤的 Token,如 Token 過期或遭竄改,會回傳 Http 401(未授權)
 1
 2
 3
 4
 5
 6
 7
 8
 9
10
11
12
13
14
15
16
17
18
19
20
21
22
23
24
25
26
27
28
29
30
| ┌───────────┐ ┌──────────┐ ┌────────┐
│Client User│ │Web Server│ │Database│
└─────┬─────┘ └────┬─────┘ └───┬────┘
│ │ │
│ 1. Login with Username and Password │ │
│────────────────────────────────────>│ │
│ │ │
│ │2. Check user data and validate│
│ │──────────────────────────────>│
│ │ │
│ │ 3. Valid user data │
│ │<──────────────────────────────│
│ │ │
│ 4. Send JWT(Bearer token) │ │
│<────────────────────────────────────│ │
│ │ │
│ 5. Request for protected data │ │
│ Send Bearer token │ │
│────────────────────────────────────>│ │
│ │ │
│ 6. Token is valid and │ │
│ Send protected data │ │
│<────────────────────────────────────│ │
│ │ │
│6. Token is invalid or no permission │ │
│ return Http 401 or Http 403 │ │
│<────────────────────────────────────│ │
┌─────┴─────┐ ┌────┴─────┐ ┌───┴────┐
│Client User│ │Web Server│ │Database│
└───────────┘ └──────────┘ └────────┘
|
安裝 JwtBearer
為了產生 JWT 及驗證 JWT,需要安裝這個套件,不過我沒有想到篇幅會這麼長,所以驗證的部分我會拉到下一篇教學,開啟 NuGet,輸入 Microsoft.AspNetCore.Authentication.JwtBearer,並安裝,安裝流程可以參考 安裝套件,記得安裝符合自已的 .NET 版本,我的本機是 .NET 8 所以我只能安裝 8.x.x 的版本,詳細可以參考 NuGet JwtBearer
修改登入方法
由上面的流程圖可以知道,JWT 的驗證,會回傳 Http 的結果,因此要統一每個 API 回傳的型別,原 LoginAsync 方法回傳的登入的相關訊息(string),現在為了回傳 Http XXX 要修改回傳資料的型別如下
 1
 2
 3
 4
 5
 6
 7
 8
 9
10
11
12
13
14
15
16
17
18
19
20
21
22
23
24
25
26
27
28
29
30
31
| /// <summary>
/// 登入
/// </summary>
/// <param name="loginDto"> 使用者的輸入資料 </param>
/// <returns> 登入結果 </returns>
[HttpPost("login")]
// 原本回傳型別是 Task<string> 是上一節為了測試而簡化
// 改成 Task<ActionResult<string>>,為了可以回傳 Http 結果
// Ok, BadRequest 都是繼承自 ActionResult 的類別
// 所以可以用 ActionResult 封裝
// Ok 會變成 Http 200
// BadRequest 會變成 Http 400
public async Task<ActionResult<string>> LoginAsync(LoginDto loginDto)
{
// 登入資料驗證
if (string.IsNullOrEmpty(loginDto.Email) ||
string.IsNullOrEmpty(loginDto.Password))
return BadRequest("Please provide 'Email' and 'Password'");
// 檢查員工帳號
if (await _employeeService.GetEmployeeByEmailAsync(loginDto.Email) == null)
return BadRequest("User does not exist!");
// 檢查員工密碼並回傳登入結果
if (!await _authService.ValidateUserAsync(loginDto))
return BadRequest("Login failed!");
// 產生 Jwt 方法
return Ok("JWT Token");
}
|
JWT 設定
回故一下,JWT 所需要的加載的資料內容,參考 JWT Payload,有一些資料是相對靜態的,所以可以設定在 appsettings.json 中,從設定檔中讀取,如 iss(發行單位),到期時間。
這要要特別說明一下 到期時間,通常會是指從 發行 JWT 之後,持續多久(月,天,分),並不是指一個故定的到期時間點,所以這個持續多久是可以固定下來的,因此可以寫在設定檔。如果是某一固定時間點的話,會變成不管什麼時候發行的 Token,都會在那一個時間點失效,即使是在有效期之後發行的也是一樣,會造成還沒發行就失效了,所以不合理。
開啟 appsettings.json,新增「JwtOptions」設定,如明如下
- Expiry:有效期限(分),我預設是分鐘,比較方便測試,有需要也可以當成天
- Issuer:發行單位,我輸入這個專案的名稱
- SecretKey:加密金鑰,隨便輸入的字,不一定要跟我一樣,另外這只是因為教學紀錄的專案,並沒有涉及機密資料,實際的產品應用上,是不能洩漏加密金鑰的
 1
 2
 3
 4
 5
 6
 7
 8
 9
10
11
12
13
14
| {
"Logging": {
"LogLevel": {
"Default": "Information",
"Microsoft.AspNetCore": "Warning"
}
},
"AllowedHosts": "*",
"JwtOptions": {
"Expiry": 5,
"Issuer": "JWT-Authentication-API",
"SecretKey": "This-is-secret-key-for-JWT-Authentication"
}
}
|
加載 JWT 設定
有兩種方式可以讀取設定檔
- 使用 Configuration 注入
 1
 2
 3
 4
 5
 6
 7
 8
 9
10
11
12
13
14
15
16
17
| // 用建構函數傳入
public class TargetClass(IConfiguration configuration)
{
// 在要被注入的類別中宣告 Configuration 的物件
private readonly IConfiguration _configuration = configuration;
public void Foo() {
// 讀取設定值 "第一層Key:第二層Key"
var secretKey = _configuration.GetValue<string>("JwtSettings:SecretKey");
// 或
// 用 GetSection 方法先取得第一層的物件
// 再用 GetValue 取得第二層 Key 的設定值
var secretKey = _configuration.GetSection("JwtSettings").GetValue<string>("SecretKey");
// 上面兩種寫法效果是一樣的
}
}
|
- 自定義一個設定類別,將設定值物件化
JwtOptions
我採用第二個方法,為強化資料型別的管理,但會比較麻煩,可以自行取舍,在專案下新增 Options 目錄,用來存放設定物件的類別,在目錄下新增一個 JwtOptions.cs,並依 appsettings.json 的相關設定定義資料欄位如下
※ 同樣都是承載資料的模型物件,為什麼不放在 Models 目錄?因為 Settings 或 Options 相關的資料物件只會用在程式中資料的設定,不會與資料庫的資庫互動,這樣語意更清析
 1
 2
 3
 4
 5
 6
 7
 8
 9
10
11
12
13
14
15
16
17
18
19
20
21
22
| namespace JWT_Authentication_API.Options;
/// <summary>
/// Jwt 的設定物件
/// </summary>
public class JwtOptions
{
/// <summary>
/// 有效期限(分),預設 10 分鐘
/// </summary>
public int Expiry { get; set; } = 10;
/// <summary>
/// 發行單位
/// </summary>
public string Issuer { get; set; } = "JWT_Authentication_API";
/// <summary>
/// 加密金鑰
/// </summary>
public string SecretKey { get; set; } = Guid.NewGuid().ToString();
}
|
接下來在 Program.cs 中註冊這個自定定的 JwtOption 類別,並封裝在 IOptions 的類別中,在 AddScoped 方法的後面加入註冊方法如下
1
2
3
4
5
6
7
| #region CustomService
builder.Services
.AddScoped<IEmployeeService, EmployeeService>()
.AddScoped<IAuthService, AuthService>()
// 註冊這個 JwtOptions 的物件,並封裝成 IOptions 型別,讓其他類別可以注入使用
.Configure<JwtOptions>(builder.Configuration.GetSection(nameof(JwtOptions)));
#endregion
|
設定的前置就完成了,可以在 Jwt 相關類別中使用
產生 JWT
為了產生合法的 JWT,在專案下新增一個 Helper 目錄,用來存放輔助的相關類別,在目錄下新增一個 JwtHelper.cs 用來加載 JWT 的設定並產生 JWT
注入 JwtOptions
先注入 JWT 的相關設定
 1
 2
 3
 4
 5
 6
 7
 8
 9
10
11
12
13
14
15
16
| using JWT_Authentication_API.Options;
using Microsoft.Extensions.Options;
namespace JWT_Authentication_API.Helper;
/// <summary>
/// JSON Web Token 輔助工具
/// 注入 JwtOptions
/// </summary>
public class JwtHelper(IOptions<JwtOptions> jwtOptions)
{
/// <summary>
/// Jwt 的相關設定
/// </summary>
private readonly JwtOptions _jwtOptions = jwtOptions.Value;
}
|
將使用者登入資訊加入 Payload 中
使用者資訊會使用 List<Claim> 中,一個 Claim 就是使用者的其中一項資料,
可以想成 出國用的護照
- 護照號碼:是一個 Claim
- 中文姓名:是一個 Claim
- 英文姓名(拼音):是一個 Claim
- 照片:是一個 Claim
- 國籍:是一個 Claim
而上面這麼多個 Claim 就會組成護照,變成出國用的身分證明,只是在網路的世界,使用者的身份證明變成了 List<Claim> 型式,而在 JWT 的應用場景中,Claim 變成了 JWT 所需要的資料,在 JwtHelper 中新增一個 CreateJwt 方法,並傳入使用者資料,寫入 payload,如下
 1
 2
 3
 4
 5
 6
 7
 8
 9
10
11
12
13
14
15
16
17
18
19
20
21
22
23
24
25
26
27
28
29
30
31
32
33
34
35
36
37
38
39
40
| /// <summary>
/// 產生 JWT
/// </summary>
/// <param name="loginDto"> 使用者的登入資訊 </param>
/// <returns> JSON Web Token </returns>
public string CreateJwt(LoginDto loginDto)
{
var now = DateTimeOffset.UtcNow;
// 設定 Payload
List<Claim> claims = [
// 發行單位
new(JwtRegisteredClaimNames.Iss, _jwtOptions.Issuer),
// 使用者帳號作為識別
new(JwtRegisteredClaimNames.Sub, loginDto.Email),
// Token 的有效期限,從現在開始到 5 分鐘後
new(JwtRegisteredClaimNames.Exp, $"{now.AddMinutes(_jwtOptions.Expiry)
.ToUnixTimeSeconds()}"),
// 這個 JWT 的識別
new(JwtRegisteredClaimNames.Jti, Guid.NewGuid().ToString()),
// 這個 JWT 的發行時間
new(JwtRegisteredClaimNames.Iat, $"{now.ToUnixTimeSeconds()}")
];
// 產生使用者身分證明
ClaimsIdentity userClaimsIdentity = new(claims);
// 產生私鑰供後續加密使用
SymmetricSecurityKey securityKey = new(Encoding.UTF8.GetBytes(_jwtOptions.SecretKey));
// 產生數位簽章憑證,使用 SHA256 加密演算
SigningCredentials credentials = new(securityKey, SecurityAlgorithms.HmacSha256);
// 產生 JWT
JwtSecurityToken securityToken = new(
issuer: _jwtOptions.Issuer, // issuer
claims: userClaimsIdentity.Claims, // payload
signingCredentials: credentials, // signature
expires: now.AddMinutes(_jwtOptions.Expiry).UTCDateTime); // expiry time
// 輸出 JWT 並轉換成字串
return new JwtSecurityTokenHandler().WriteToken(securityToken);
}
|
在 Program.cs 中,註冊 JwtHelper,因為 JwtHelper 的設定是固定不變的,所以不像 EmployeeService 只會存在某些特定的 Controller 中,一但 Request 的生命週期結束,依賴的 Service 就必需要結束,所以 JwtHelper 要使用 AddSingleton 來註冊
1
2
| // 註冊 JwtHelper
builder.Services.AddSingleton<JwtHelper>();
|
回到 AuthController 將產生 JWT 的部分補上
1
2
3
4
5
6
7
8
9
10
11
12
13
14
15
16
17
18
19
20
21
22
23
24
25
26
27
28
29
30
31
32
33
34
35
36
37
38
39
40
41
42
43
44
45
46
47
48
49
50
51
52
53
54
55
56
57
58
59
| /// <summary>
/// 將 AuthController 宣告成為 ApiController
/// 並定義路由規則(網址)=> domain/api/auth
/// </summary>
/// <param name="employeeService"> 員工資料存取服務 </param>
/// <param name="authService"> 登入驗證服務 </param>
/// <param name="jwtHelper"> JWT 輔助工具 </param>
[ApiController, Route("api/[controller]")]
public class AuthController(
IEmployeeService employeeService,
IAuthService authService,
JwtHelper jwtHelper) : Controller
{
/// <summary>
/// 員工資料存取的服務
/// </summary>
private readonly IEmployeeService _employeeService = employeeService;
/// <summary>
/// 登入驗證的服務
/// </summary>
private readonly IAuthService _authService = authService;
/// <summary>
/// JWT 輔助工具,負責生成 JWT
/// </summary>
private readonly JwtHelper _jwtHelper = jwtHelper;
#region 註冊
......
#endregion
#region 登入
/// <summary>
/// 登入
/// </summary>
/// <param name="loginDto"> 使用者的輸入資料 </param>
/// <returns> 登入結果 </returns>
[HttpPost("login")]
public async Task<ActionResult<string>> LoginAsync(LoginDto loginDto)
{
// 登入資料驗證
if (string.IsNullOrEmpty(loginDto.Email) ||
string.IsNullOrEmpty(loginDto.Password))
return BadRequest("Please provide 'Email' and 'Password'");
// 檢查員工帳號
if (await _employeeService.GetEmployeeByEmailAsync(loginDto.Email) == null)
return BadRequest("User does not exist!");
// 檢查員工密碼並回傳登入結果
if (!await _authService.ValidateUserAsync(loginDto))
return BadRequest("Login failed!");
// 產生 Jwt
var jwt = _jwtHelper.CreateJwt(loginDto);
return Ok(jwt);
}
#endregion
}
|
驗證 JWT
完成 JWT 的部分後,就可以來測試了,由於在 Login.已經註冊過 peter 這個帳號了,現在用 peter 這個帳號來測試會不會回傳 JWT,也可以順便知道資料庫的運作,是不是真會存在 peter 這筆帳號資料

如果有看到 JWT 成功回傳,就代表登入方法成功了,同時也確認資料庫存取是沒有問題的
接著請把 JWT 複製,貼到 JWT IO 的網站,它會協助驗證 JWT 的格式有沒有正確
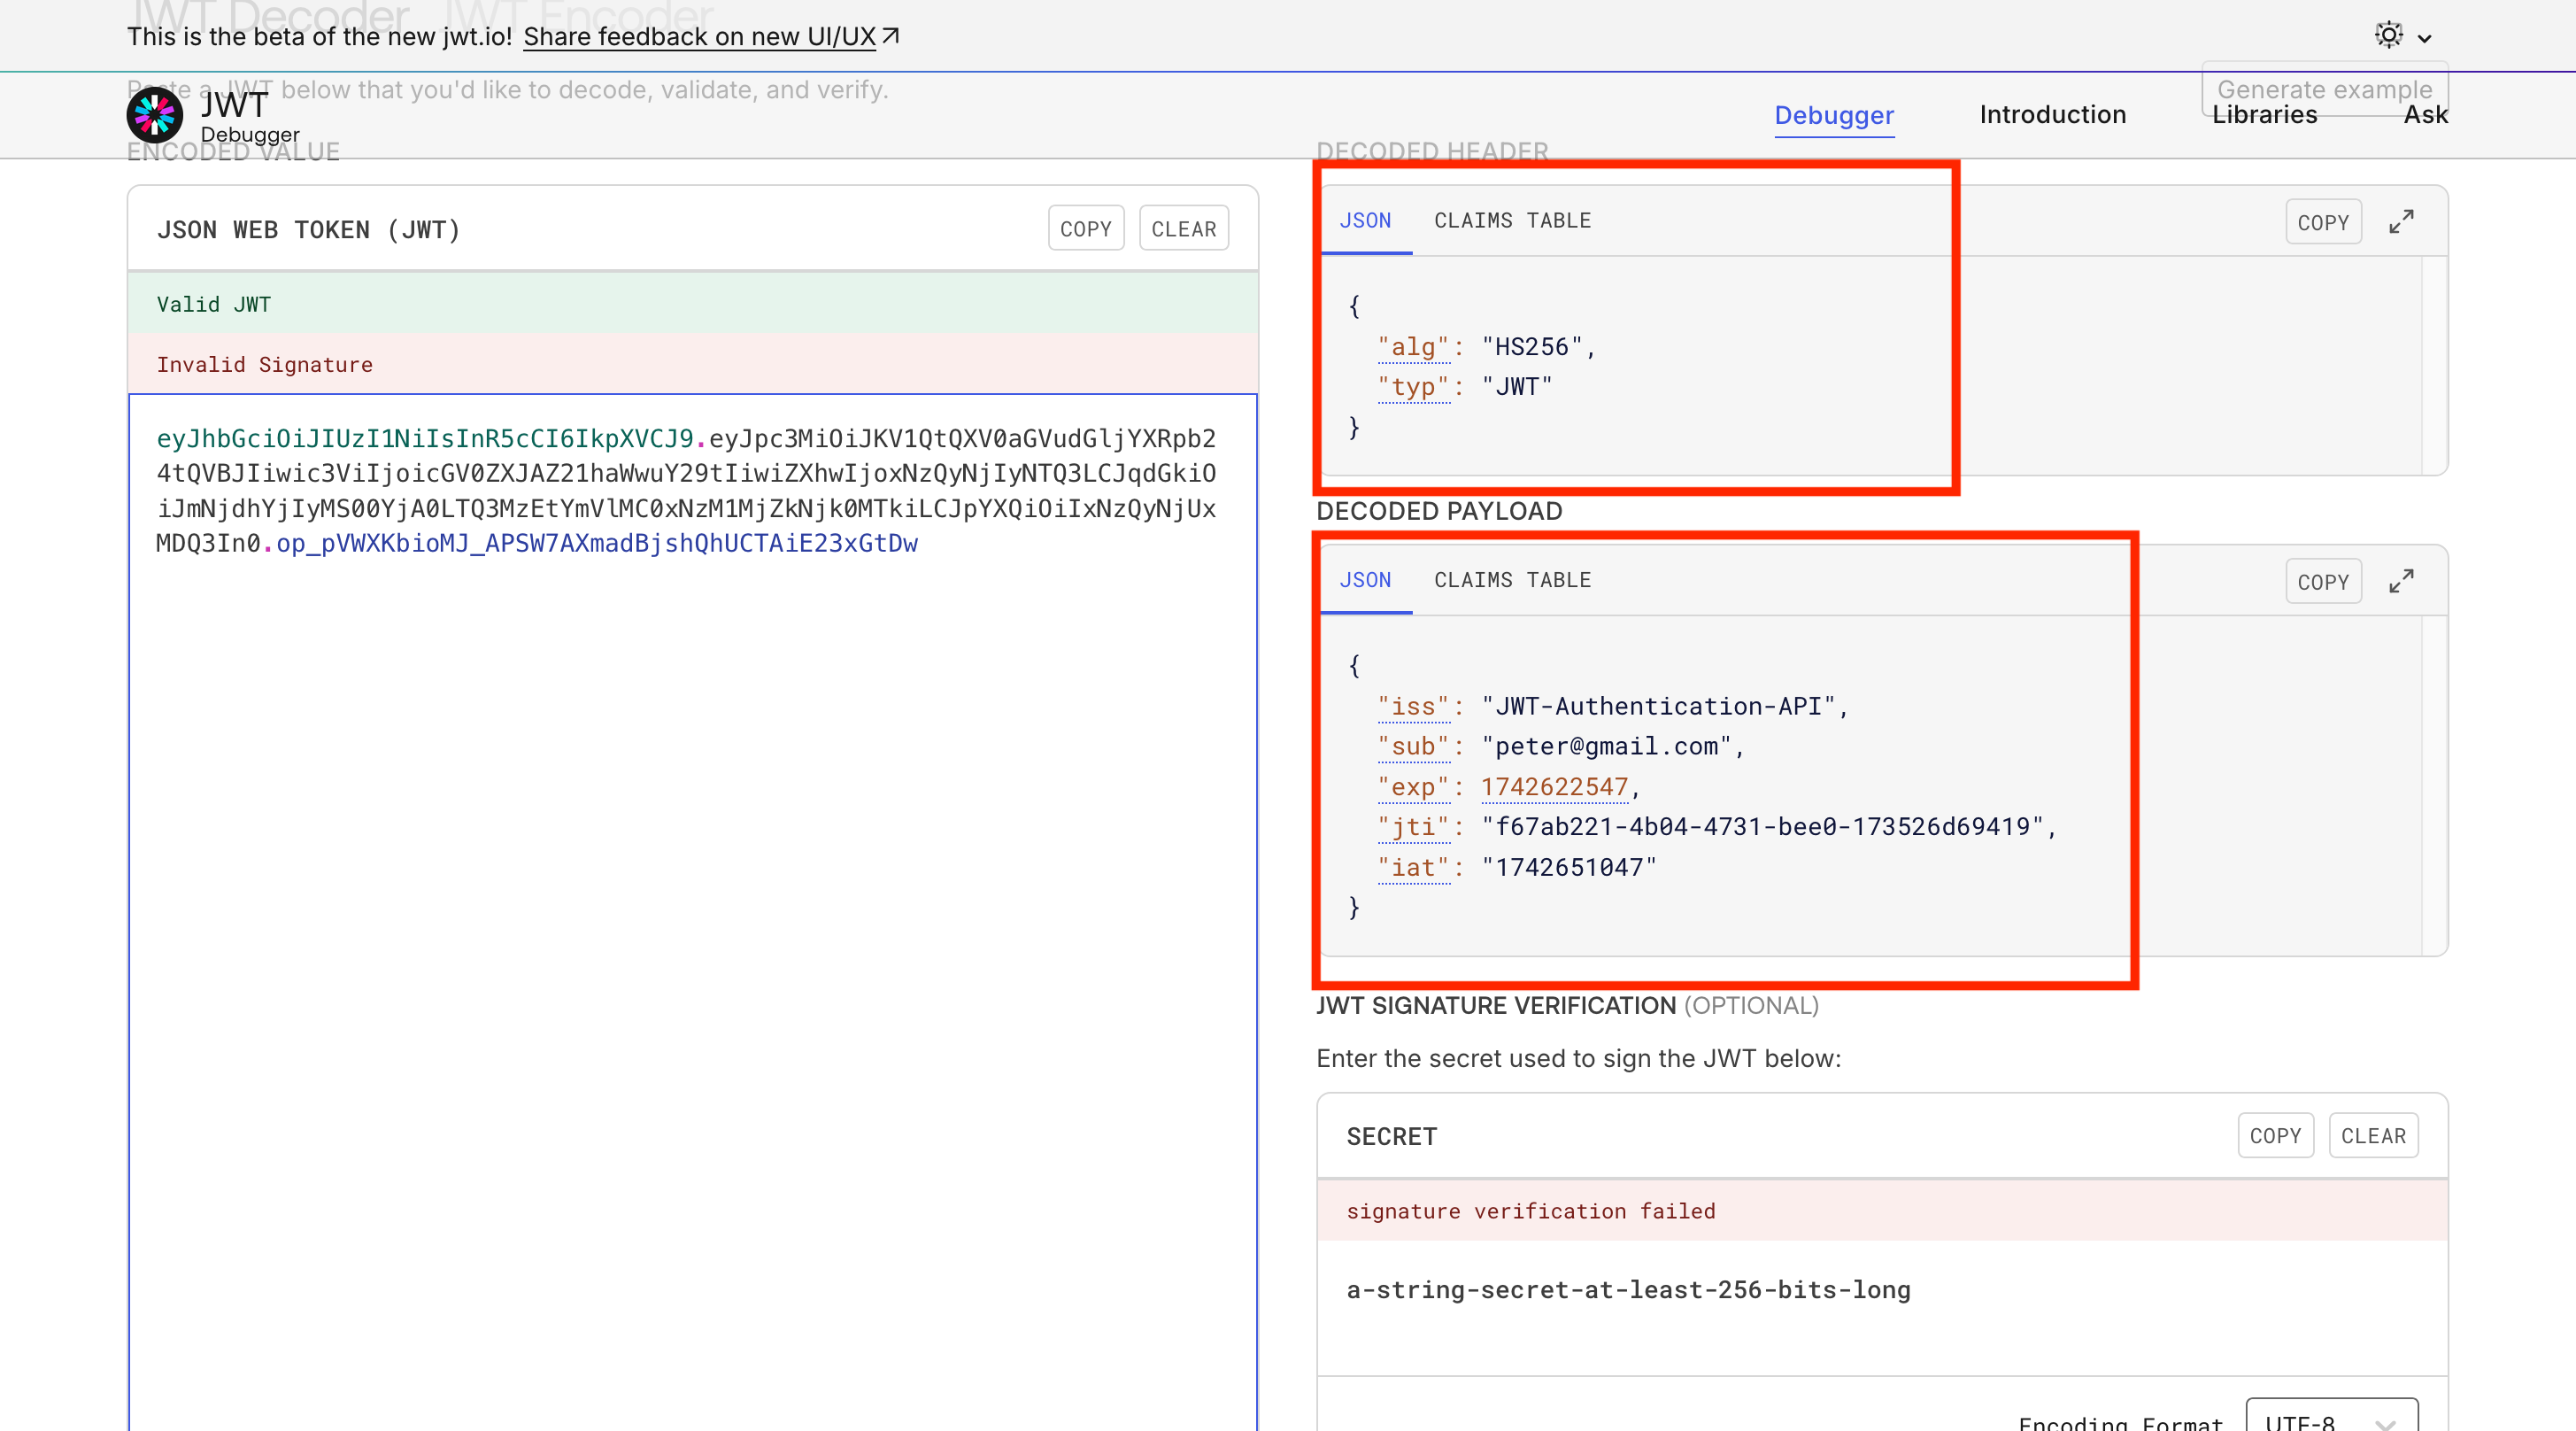
由上面的結果可以知道,JWT 結果和我寫入的一樣,這樣登入功能就完成了,這邊順便說一下,右下方的 Secret 驗證,其實是驗證金鑰的正確性,一般來說不會把金鑰公開,不過我這邊為了範例,我測試一下,把 appsettings.json 的 SecretKey 複製貼上
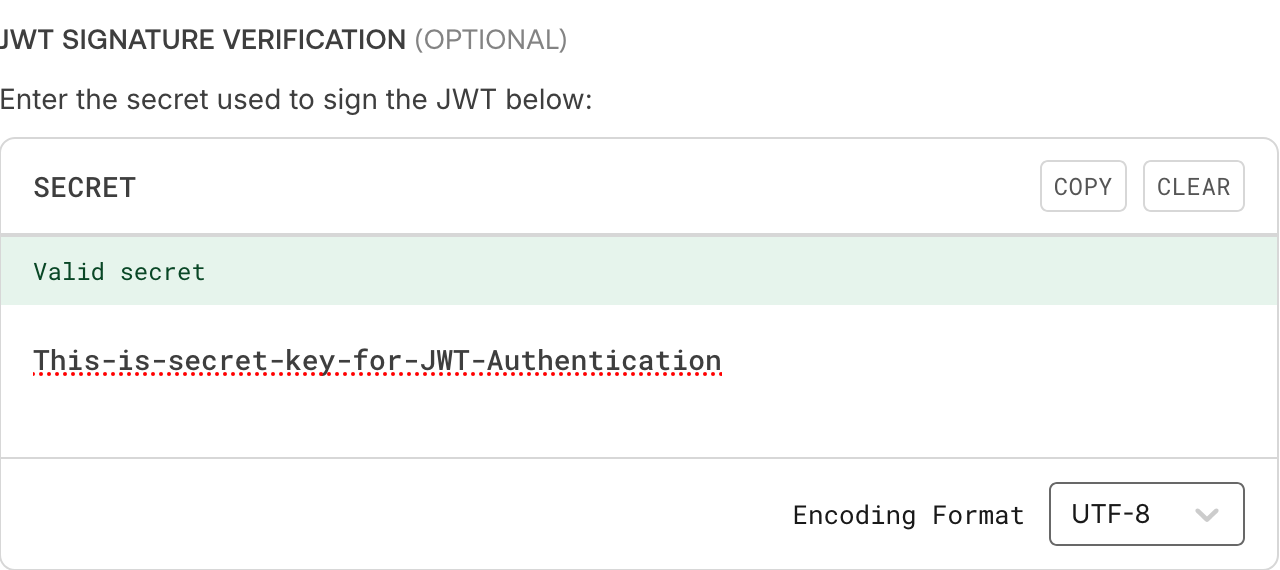
會發現 SecretKey 也是 ok 的,這樣就驗證完成了
登出
最後要來做登出功能了,這邊採用比較簡單且直觀的方式「黑名單」,也就是將已經使用過的 JWT 寫入黑名單來代表登出,這樣就無法再次使用一樣的 token 進行其他操作。
為了建立黑名單,要先建立一個「黑名單的資料模型」,在 Entities 目錄新增 TokenBlackList.cs 如下
1
2
3
4
5
6
7
8
9
10
11
12
13
14
15
16
17
18
19
20
21
22
23
24
25
| using System.ComponentModel.DataAnnotations;
using System.ComponentModel.DataAnnotations.Schema;
namespace JWT_Authentication_API.Entities;
/// <summary>
/// JWT 的黑名單
/// </summary>
public class TokenBlackList
{
/// <summary>
/// 資料識別(PK)
/// </summary>
[Required, DatabaseGenerated(DatabaseGeneratedOption.Identity)]
public Guid Id { get; set; }
/// <summary>
/// 使用過的 Token
/// </summary>
[Required]
public string Token { get; set; } = string.Empty;
/// <summary>
/// 資料新增的時間,也是 Token 過期的時間
/// </summary>
public DateTimeOffset CreateTime { get; set; } = DateTimeOffset.Now;
}
|
接著在 AppDbContext.cs 加入 TokenBlackList 的對映參考,加完程式碼會變成下面這樣
1
2
3
4
5
6
7
8
9
10
11
12
13
14
15
16
17
18
19
20
| using Microsoft.EntityFrameworkCore;
namespace JWT_Authentication_API.Entities;
/// <summary>
/// Database Context
/// </summary>
/// <param name="options"></param>
public class AppDbContext(DbContextOptions<AppDbContext> options)
: DbContext(options)
{
/// <summary>
/// 員工資料表
/// </summary>
public DbSet<Employee> Employees { get; set; }
/// <summary>
/// Token 黑名單資料表
/// </summary>
public DbSet<TokenBlackList> TokenBlackLists { get; set; }
}
|
然後參考 新增 Migration 加入新的資料表,然後為了要新增 Token 到黑名單,再新增相關服務及介面
在 Interfaces 目錄下新增 ITokenService.cs
在 Services 目錄下新增 TokenService.cs 並實作 ITokenService
ITokenService
1
2
3
4
5
6
7
8
9
10
11
12
13
14
| namespace JWT_Authentication_API.Interfaces;
/// <summary>
/// Token 相關服務的介面
/// </summary>
public interface ITokenService
{
/// <summary>
/// 新增 token 到黑名單
/// </summary>
/// <param name="token"> 要新增的 token </param>
/// <returns> 新增結果 </returns>
Task<bool> AddTokenToTokenBlackListAsync(string token);
}
|
TokenService
1
2
3
4
5
6
7
8
9
10
11
12
13
14
15
16
17
18
19
20
21
22
23
24
25
26
27
28
| using JWT_Authentication_API.Entities;
using JWT_Authentication_API.Interfaces;
namespace JWT_Authentication_API.Services;
/// <summary>
/// Token 資料存取服務
/// </summary>
/// <param name="context"> 資料庫物件 </param>
public class TokenService(AppDbContext context): ITokenService
{
/// <summary>
/// 資料庫物件
/// </summary>
private readonly AppDbContext _appDb = context;
/// <summary>
/// 新增 Token 到黑名單
/// </summary>
/// <param name="token"> 要新增的 Token </param>
/// <returns> 新增結果 </returns>
public async Task<bool> AddTokenToTokenBlackListAsync(string token)
{
await _appDb.TokenBlackLists.AddAsync(new TokenBlackList { Token = token });
var result = await _appDb.SaveChangesAsync();
return result > 0;
}
}
|
註冊 TokenService
Program.cs
1
2
3
4
5
6
7
8
9
10
11
12
13
| #region CustomService
builder.Services
// 註冊 EmployeeService
.AddScoped<IEmployeeService, EmployeeService>()
// 註冊 AuthService
.AddScoped<IAuthService, AuthService>()
// 註冊 TokenService
.AddScoped<ITokenService, TokenService>()
// 註冊這個 JwtOptions 的物件,並封裝成 IOptions 型別,讓其他類別可以注入使用
.Configure<JwtOptions>(builder.Configuration.GetSection(nameof(JwtOptions)));
// 註冊 JwtHelper
builder.Services.AddSingleton<JwtHelper>();
#endregion
|
Logout
回到 AuthController.cs 加入 ITokenService 的注入,並新增 LogoutAsync 方法
 1
 2
 3
 4
 5
 6
 7
 8
 9
10
11
12
13
14
15
16
17
18
19
20
21
22
23
24
25
26
27
28
29
30
31
32
33
34
35
36
37
38
39
40
41
42
43
44
45
46
47
48
49
50
51
52
| /// <summary>
/// 將 AuthController 宣告成為 ApiController
/// 並定義路由規則(網址)=> domain/api/auth
/// </summary>
/// <param name="employeeService"> 員工資料存取服務 </param>
/// <param name="authService"> 登入驗證服務 </param>
/// <param name="jwtHelper"> JWT 輔助工具 </param>
[ApiController, Route("api/[controller]")]
public class AuthController(
IEmployeeService employeeService,
IAuthService authService,
ITokenService tokenService,
JwtHelper jwtHelper) : Controller
{
......
/// <summary>
/// Token 相關服務
/// </summary>
private readonly ITokenService _tokenService = tokenService;
#region 註冊
......
#endregion
#region 登入
......
#endregion
#region 登出
/// <summary>
/// 登出
/// </summary>
/// <returns> 登出結果 </returns>
[HttpPost("logout")]
public async Task<IActionResult> LogoutAsync()
{
// 從 header 讀取 JWT
var token = $"{HttpContext.Request.Headers.Authorization}"
.Replace("Bearer", string.Empty, StringComparison.OrdinalIgnoreCase)
.Trim();
if (string.IsNullOrEmpty(token))
return BadRequest("Not token provided!");
// 將 JWT 加入黑名單
var result = await _tokenService.AddTokenToTokenBlackListAsync(token);
if (!result) return BadRequest("Logout failed!");
return Ok("Logout successfully!");
}
#endregion
}
|
測試登出
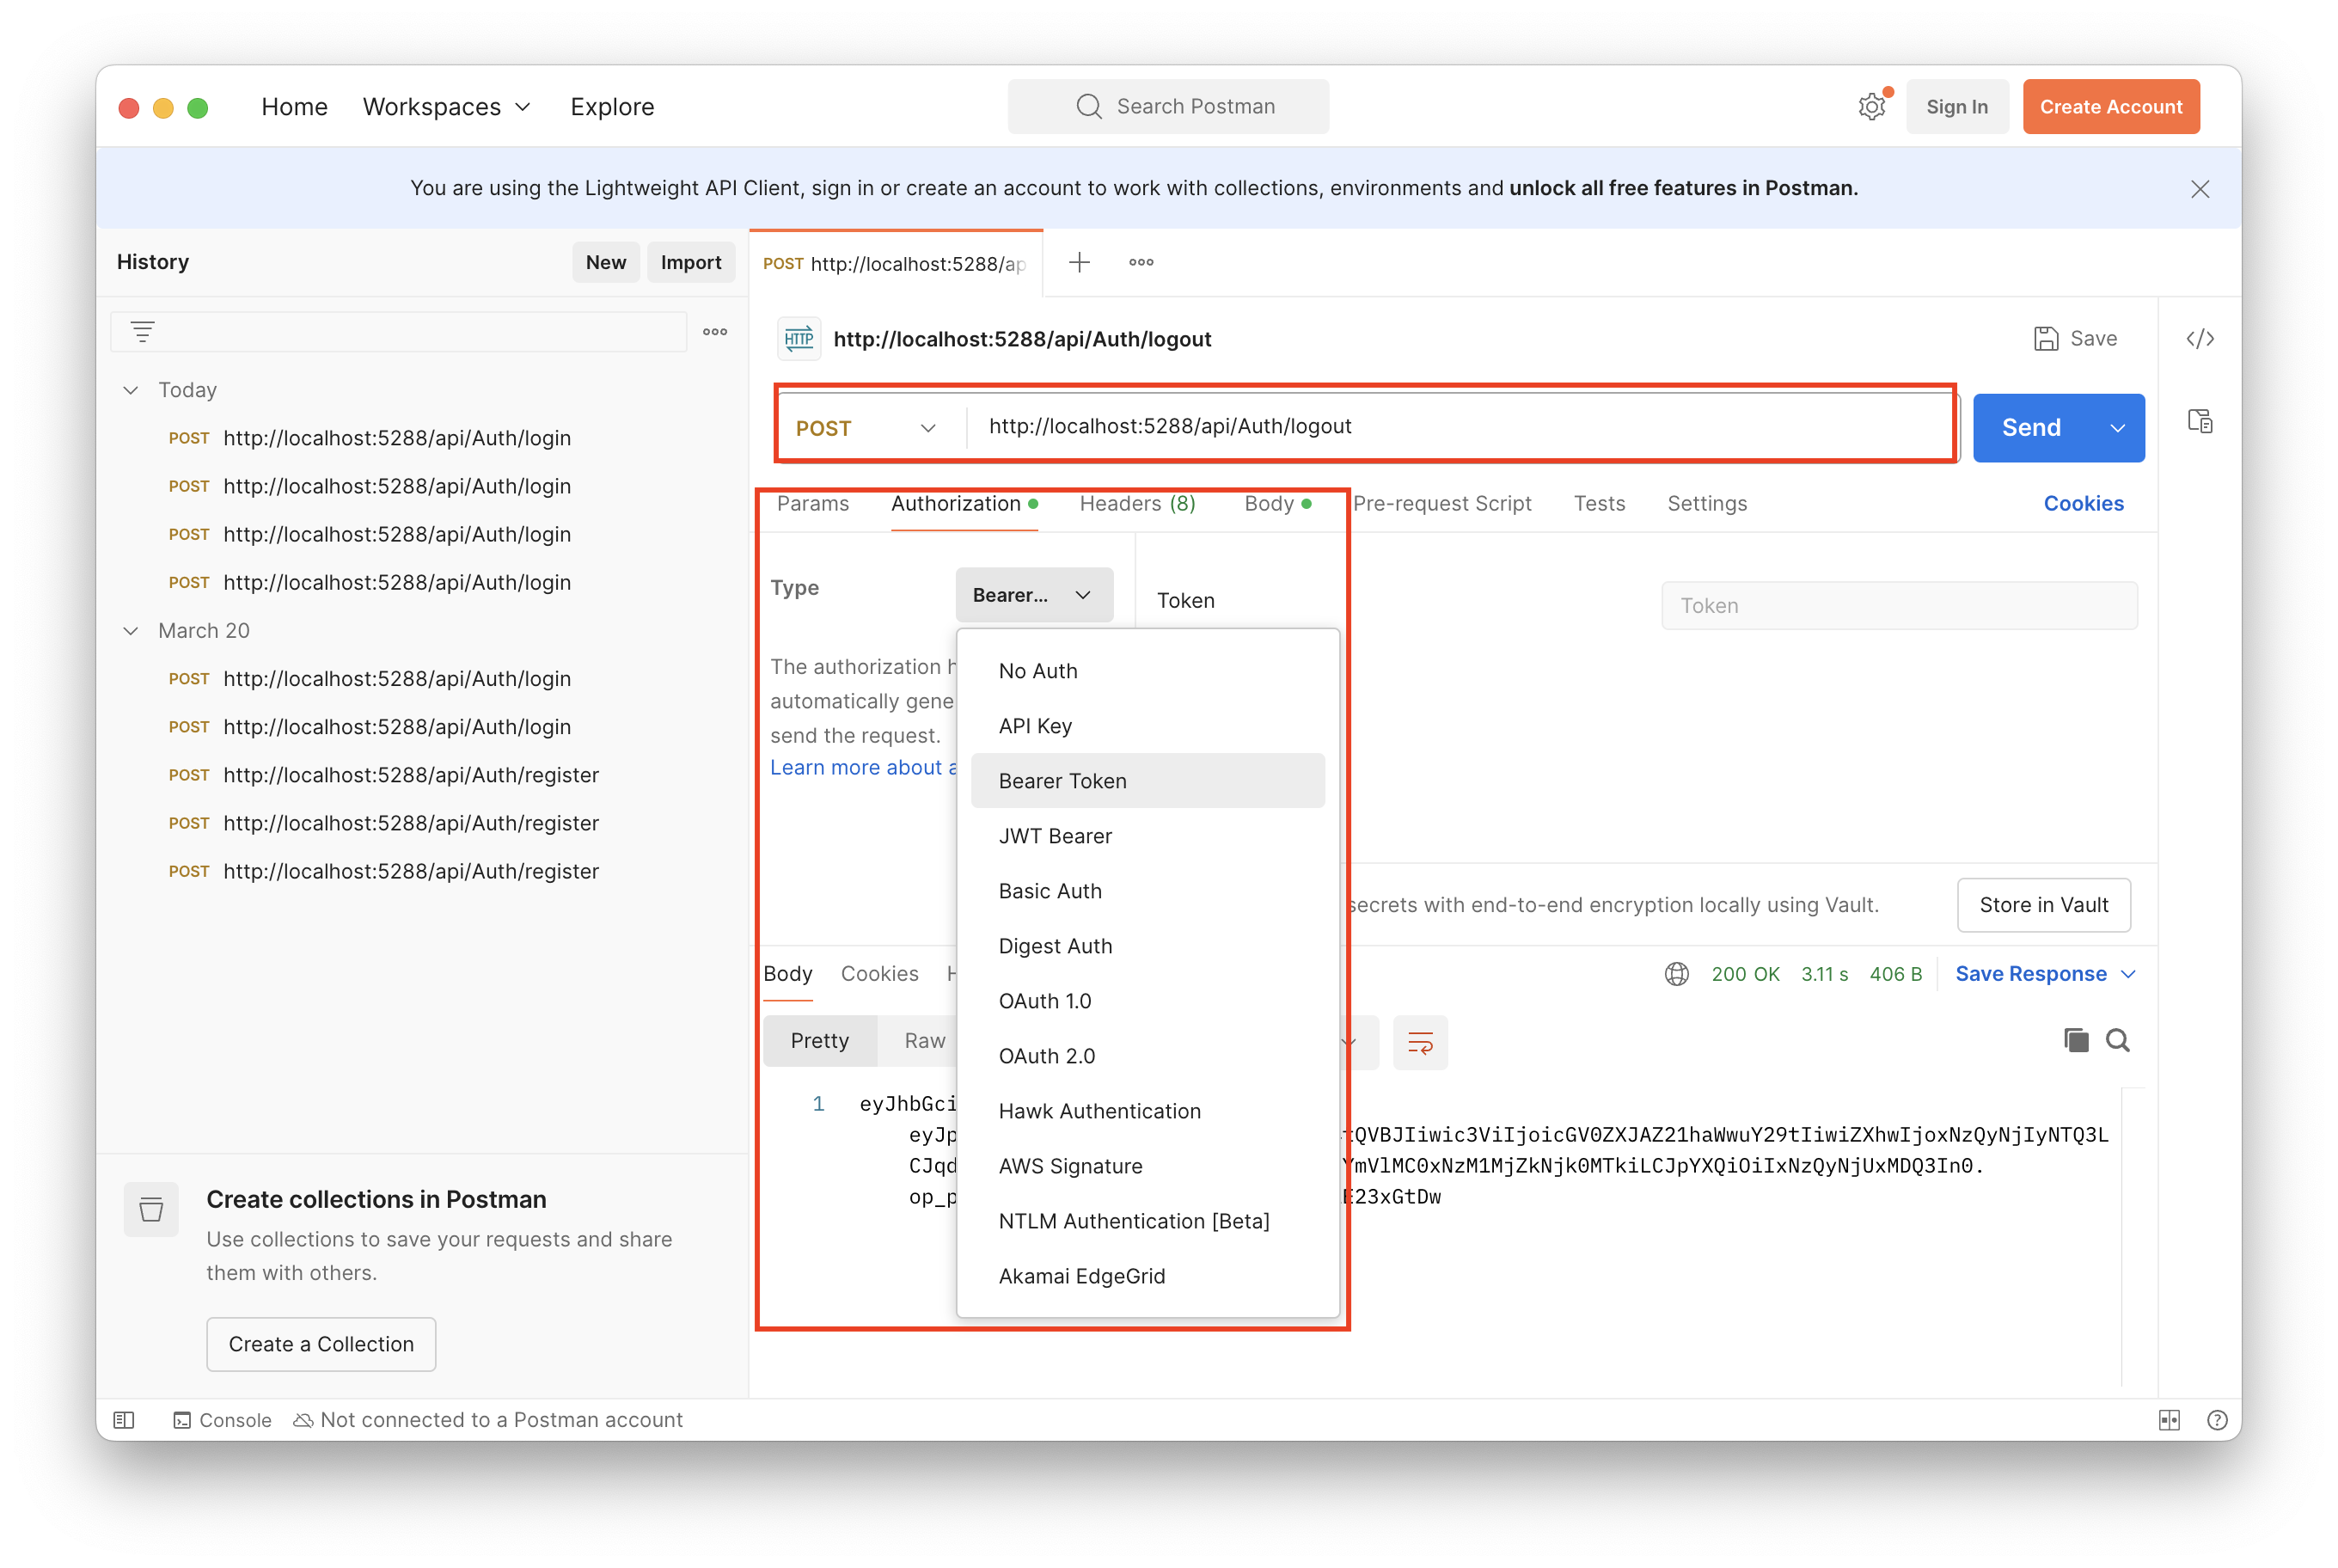
最後來測試登出功能,啟動專案並執行 Postman,網址輸入登出的,下面的頁籤選「Authorization」,Type 選第三個「Bearer Token」
接著按下「Send」
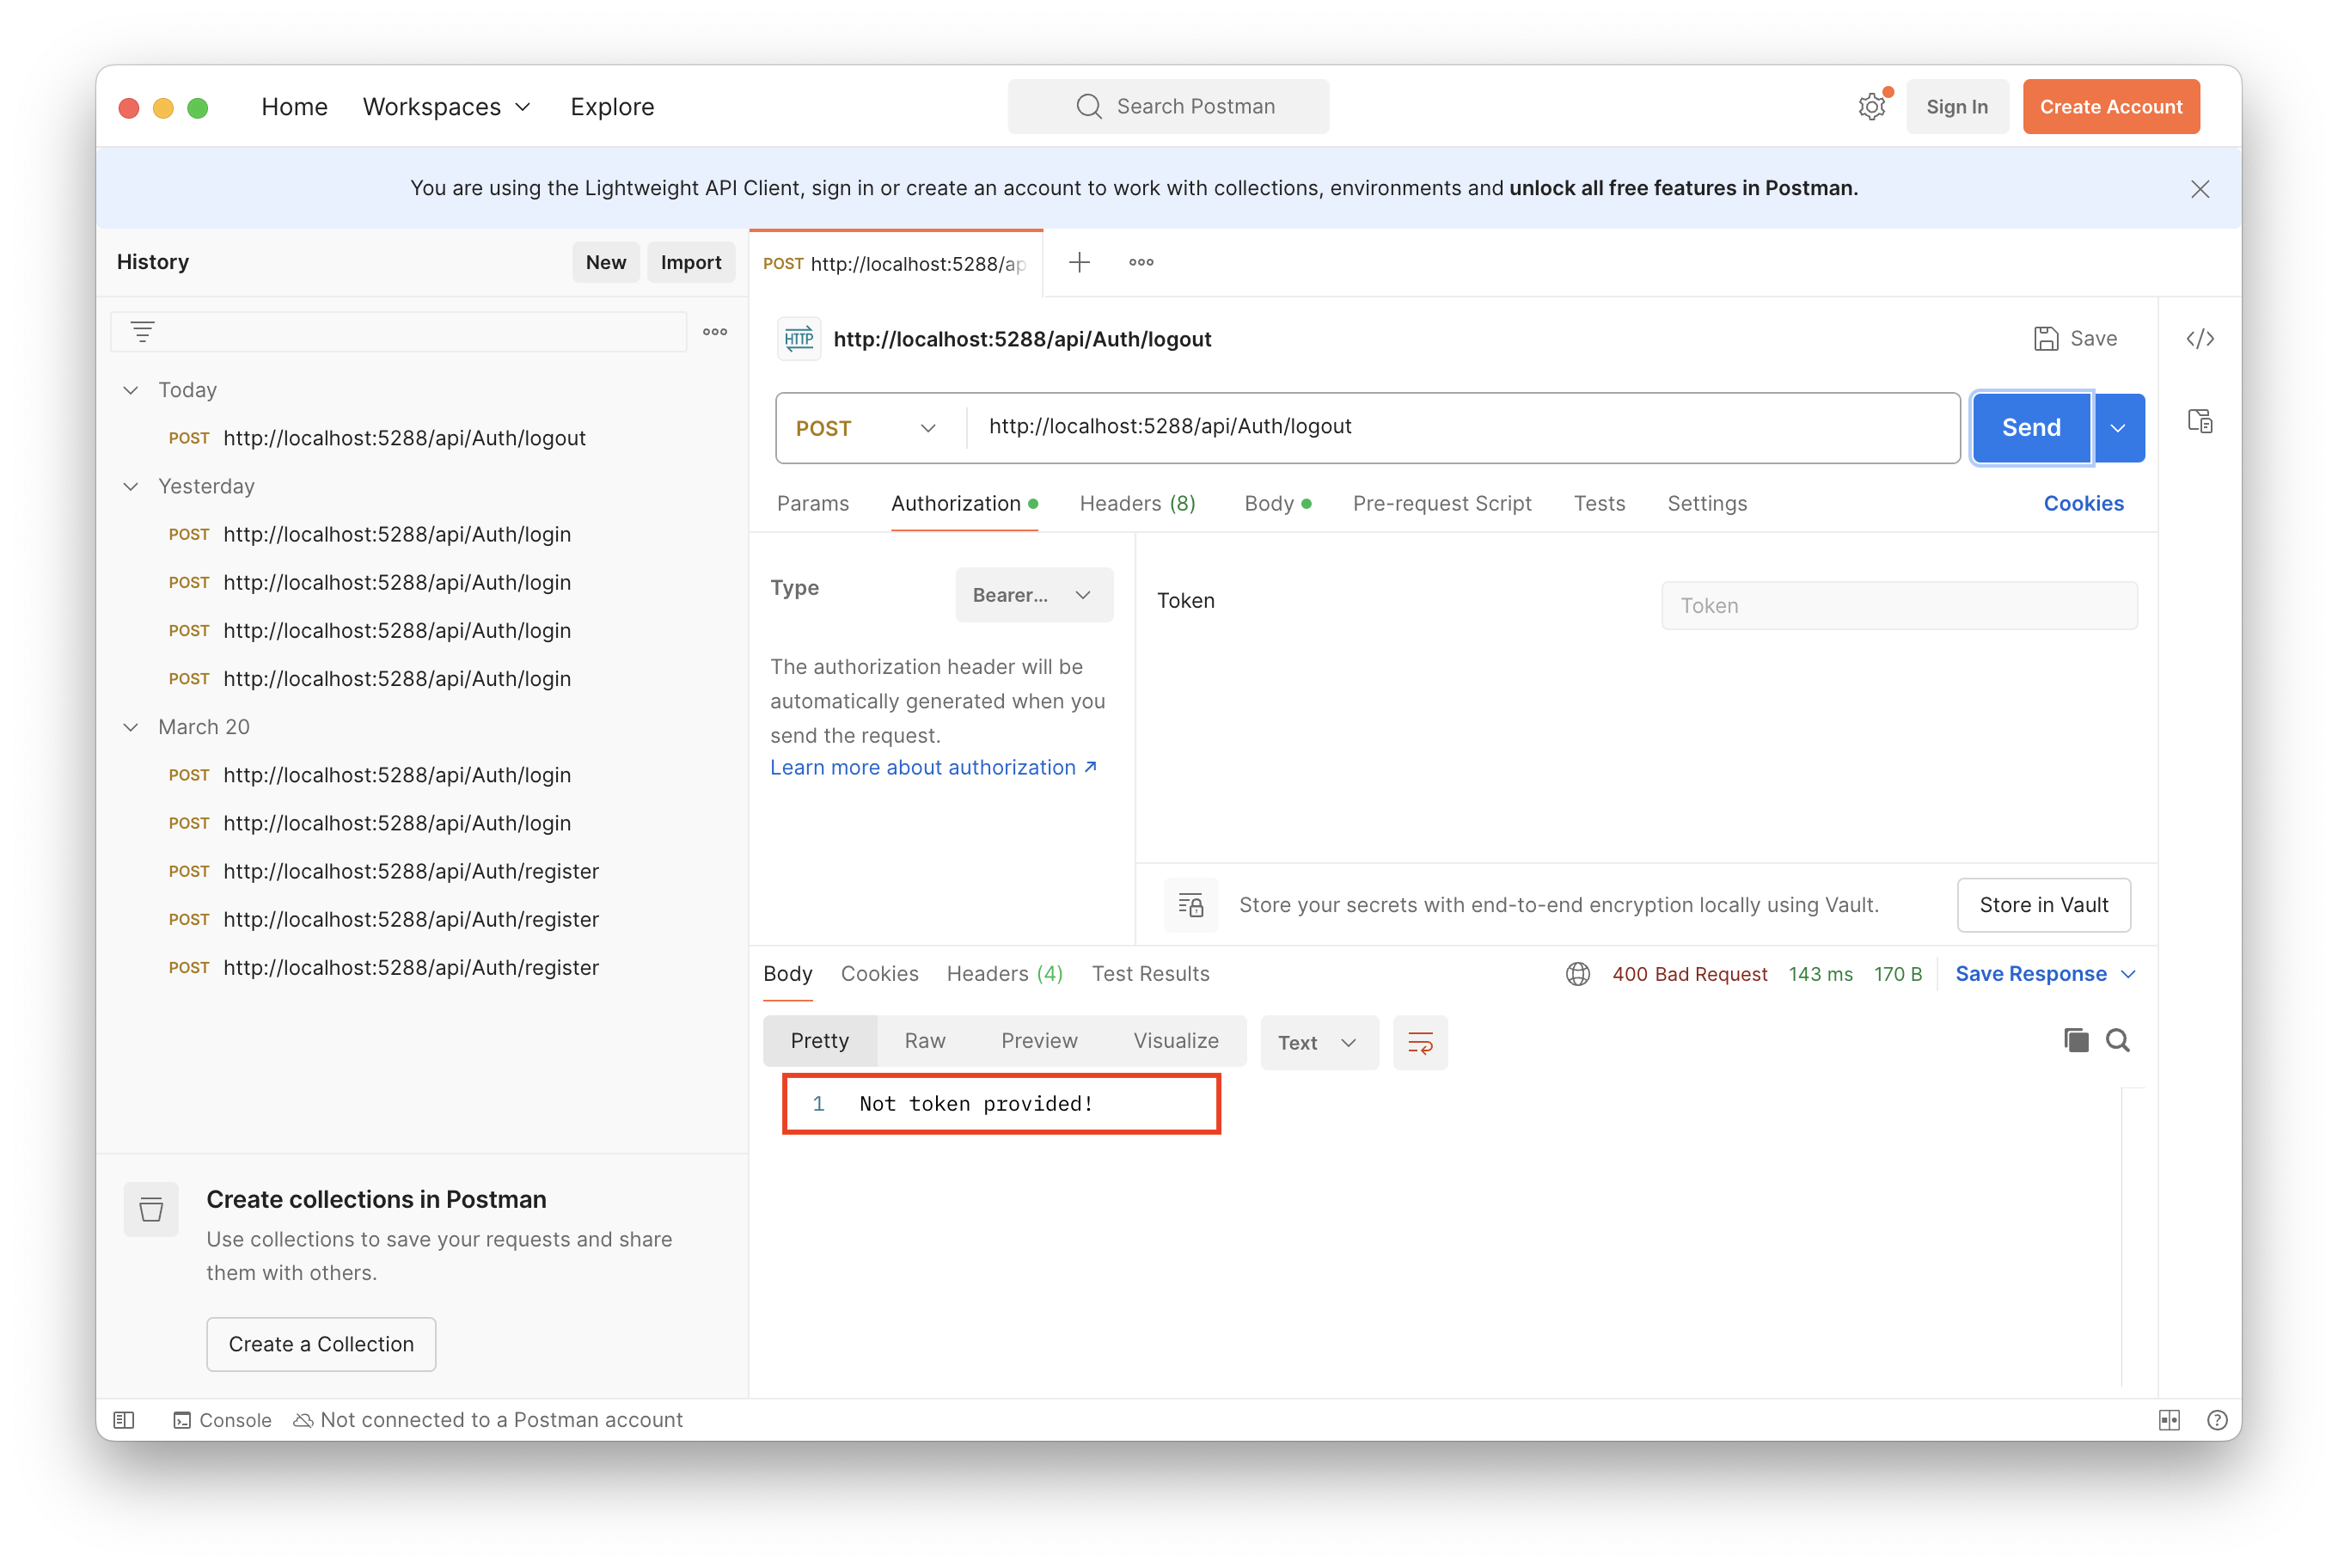
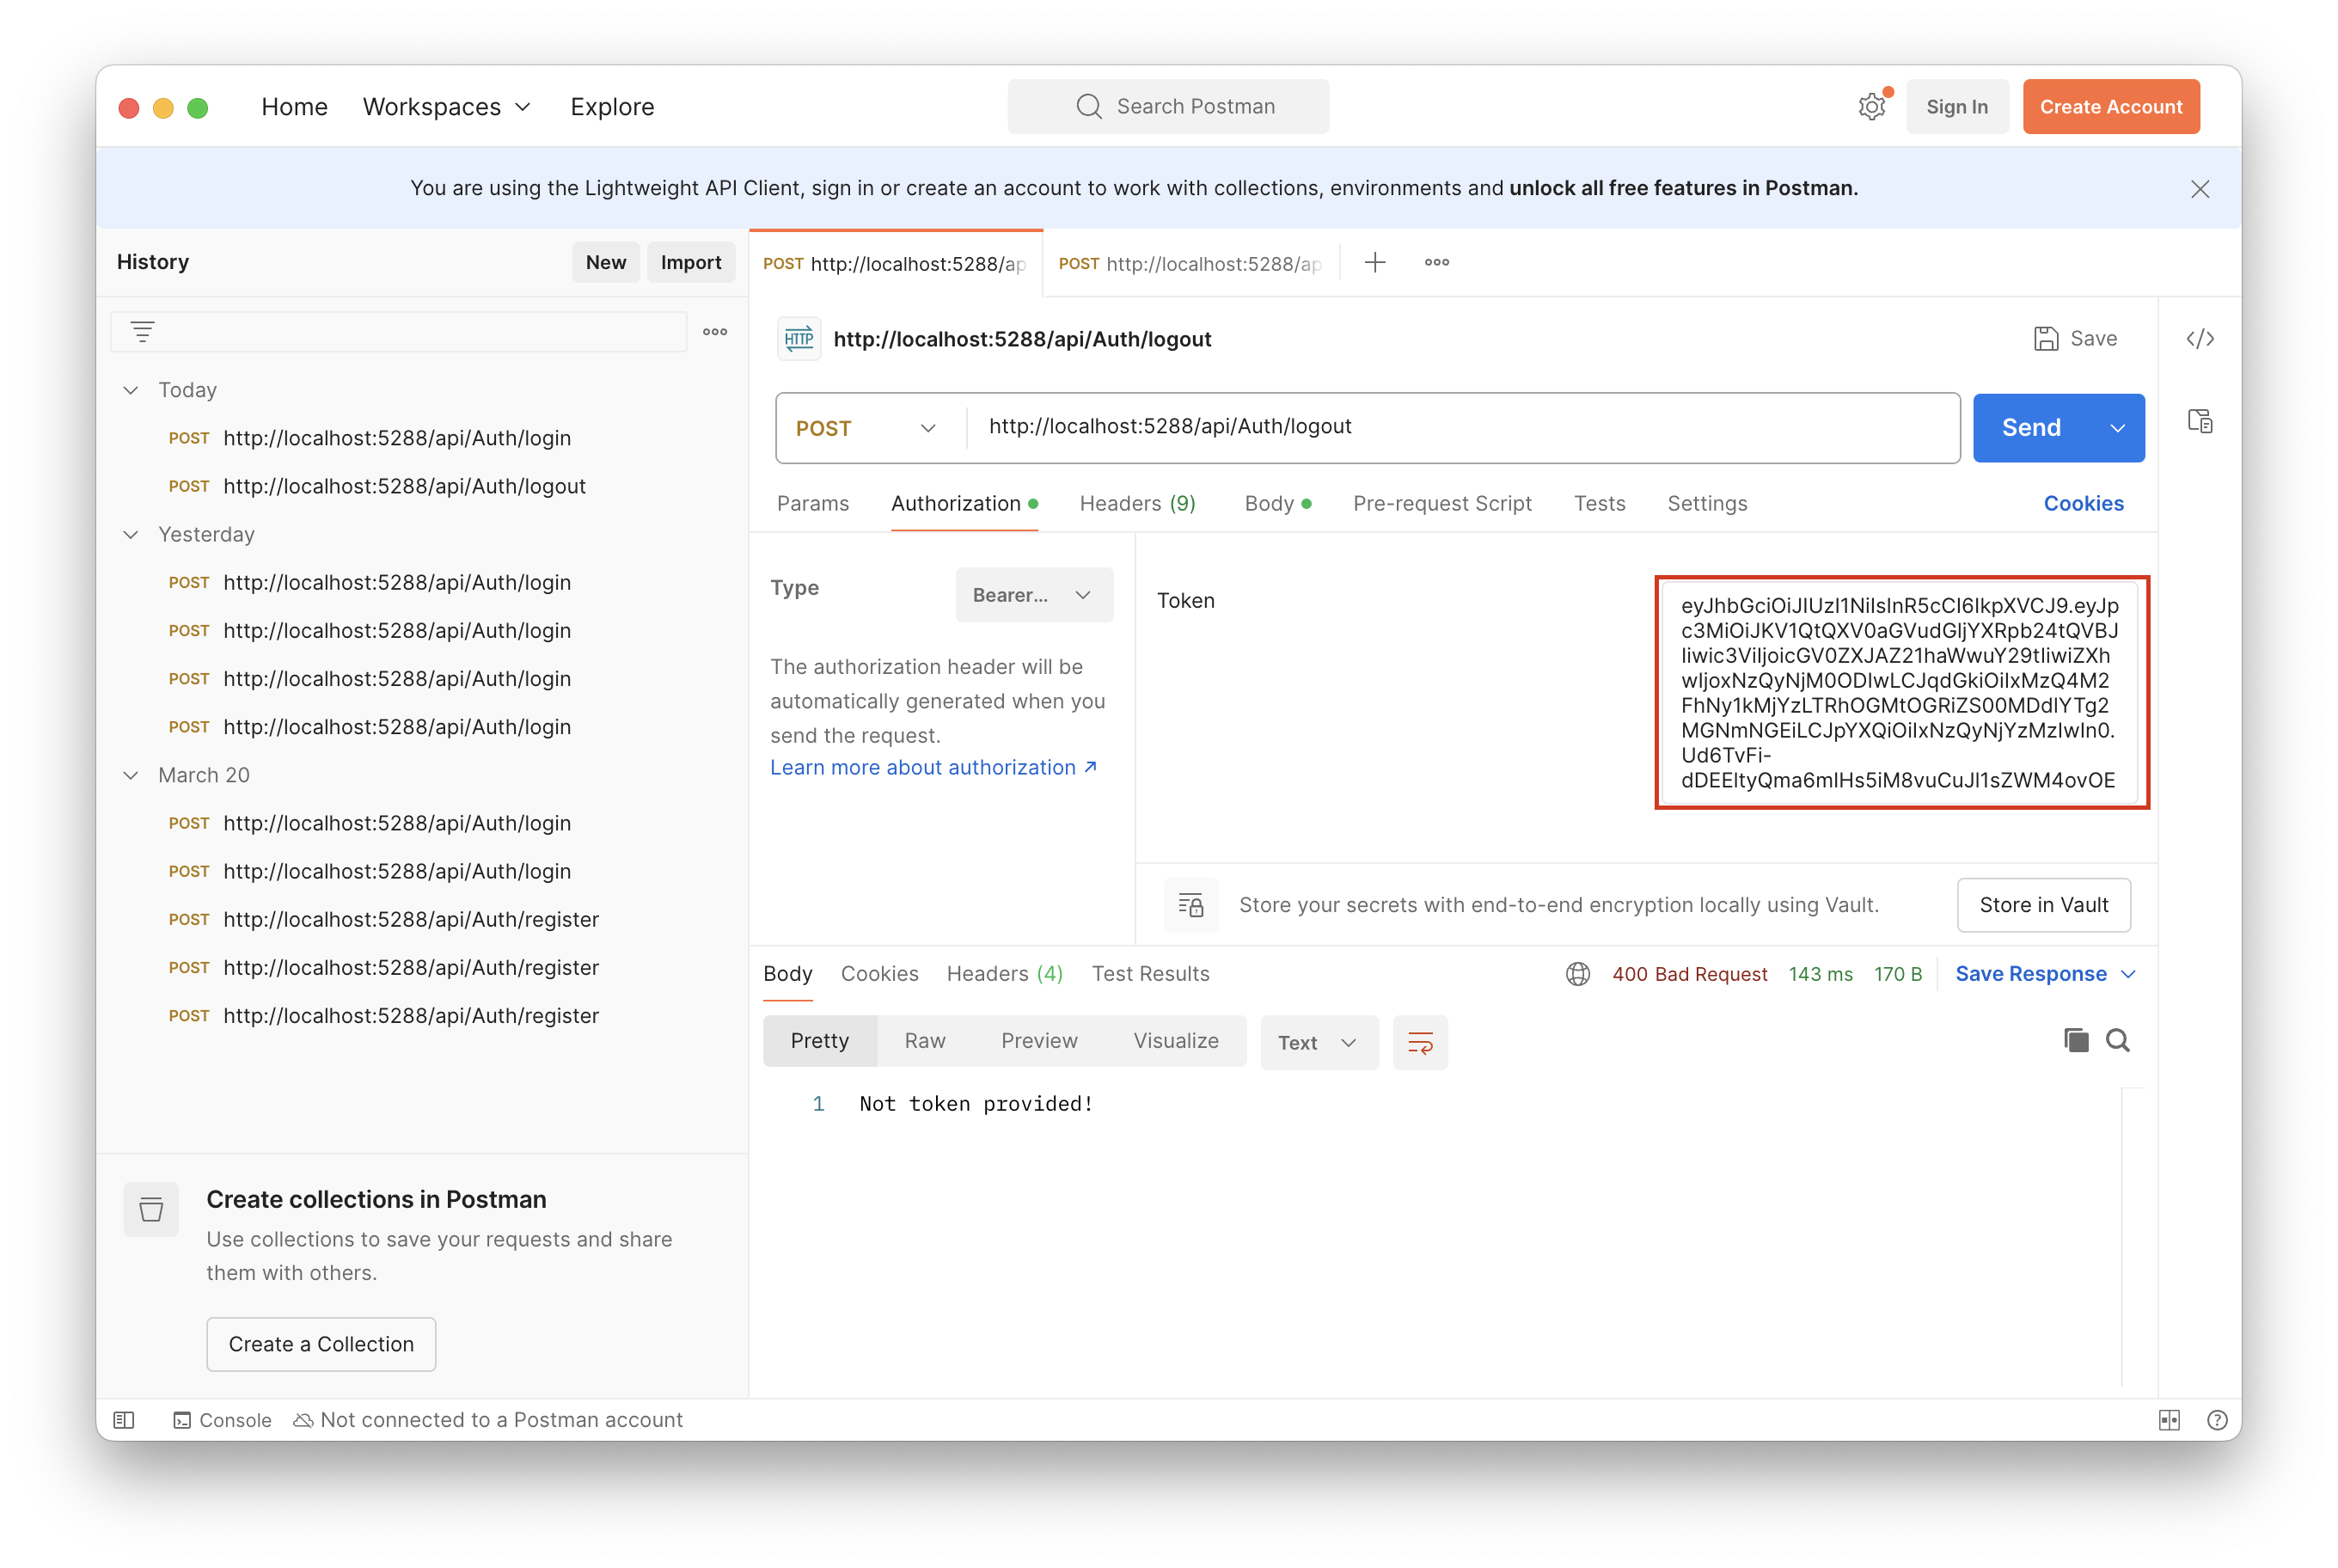
會發現出現沒 Token 的訊息,因為我們沒有提供 Token(上面的輸入框),同時也代表登出的檢查有成功,現在先去登入取得一個 Token 並複製下來,參考 驗證 JWT,貼上「Token 輸入框」,按下 Send
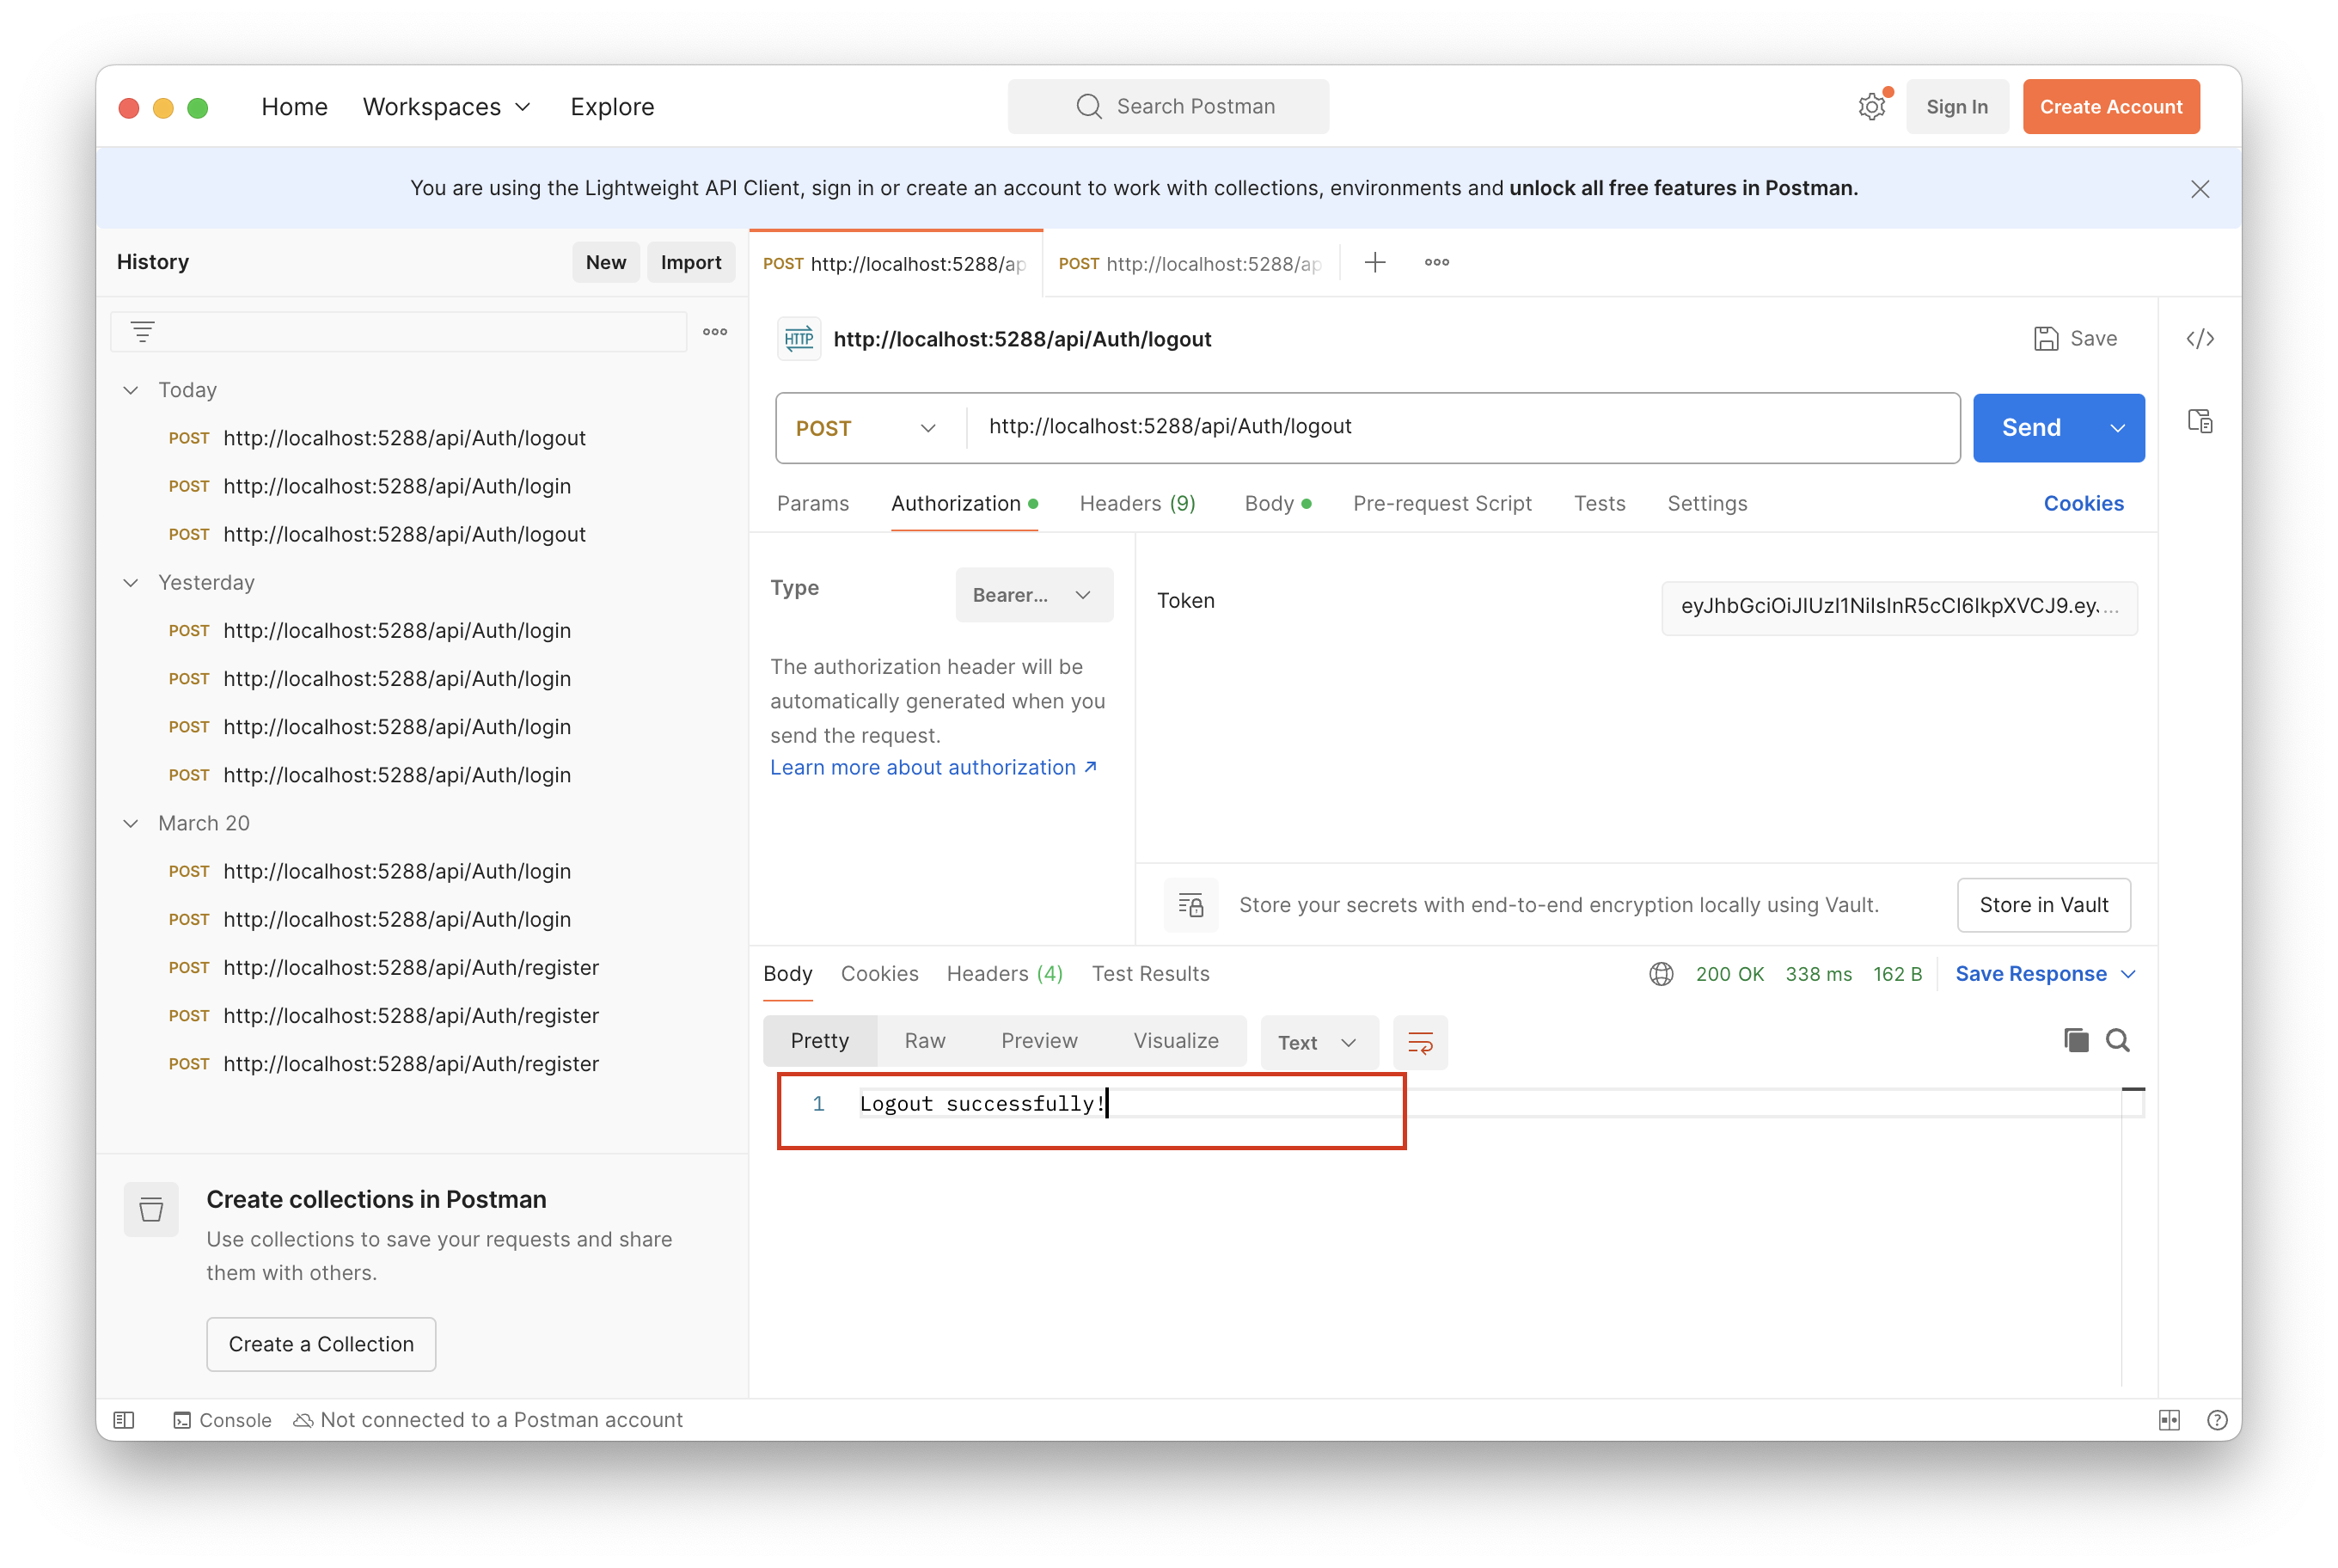
如果有看到登出訊息就是成功了
到這邊,註冊、登入、登出就完成了,下篇下會介紹及實作 Refresh Token,並將專案加入角色驗證,讓專案更完整。